Prometheus

Prometheus是一个开源的云原生监控系统和时间序列数据库。
一、Prometheus概述
Prometheus 作为新一代的云原生监控系统,目前已经有超过 650+位贡献者参与到 Prometheus 的研发工作上,并且超过 120+项的第三方集成。
1.1 Prometheus的优点
- 提供多维度数据模型和灵活的查询方式,通过将监控指标关联多个 tag,来将监控数据进行任意维度的组合,并且提供简单的 PromQL 查询方式,还提供 HTTP 查询接口,可以很方便地结合 Grafana 等 GUI 组件展示数据。
- 在不依赖外部存储的情况下,支持服务器节点的本地存储,通过 Prometheus 自带的时序数据库,可以完成每秒千万级的数据存储;不仅如此,在保存大量历史数据的场景中,Prometheus 可以对接第三方时序数据库和 OpenTSDB 等。
- 定义了开放指标数据标准,以基于 HTTP 的 Pull 方式采集时序数据,只有实现了 Prometheus 监控数据才可以被 Prometheus 采集、汇总、并支持 Push 方式向中间网关推送时序列数据,能更加灵活地应对多种监控场景。
- 支持通过静态文件配置和动态发现机制发现监控对象,自动完成数据采集。
- Prometheus 目前已经支持 Kubernetes、etcd、Consul 等多种服务发现机制。易于维护,可以通过二进制文件直接启动,并且提供了容器化部署镜像。
- 支持数据的分区采样和联邦部署,支持大规模集群监控。
1.2 Prometheus基本组件
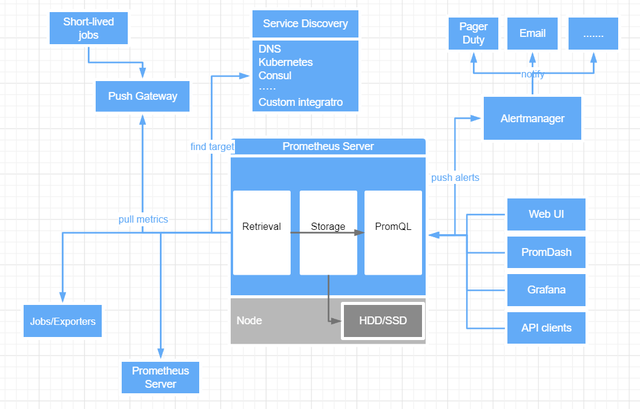
- Prometheus Server:是 Prometheus 组件中的核心部分,负责实现对监控数据的获取,存储以及查询。收集到的数据统称为metrics。
- Push Gateway:当网络需求无法直接满足时,就可以利用 Push Gateway 来进行中转。可以通过 Push Gateway 将内部网络的监控数据主动 Push 到 Gateway 当中。而 Prometheus Server 则可以采用同样 Pull 的方式从 Push Gateway 中获取到监控数据。
- Exporter:主要用来采集数据,并通过 HTTP 服务的形式暴露给 Prometheus Server,Prometheus Server 通过访问该 Exporter 提供的接口,即可获取到需要采集的监控数据。
- Alert manager:管理告警,主要是负责实现报警功能。现在grafana也能实现报警功能,所以也慢慢被取代。
1.3 Prometheus数据类型
- Counter(计数器类型):Counter类型的指标的工作方式和计数器一样,只增不减(除非系统发生了重置)。
- Gauge(仪表盘类型):Gauge是可增可减的指标类,可以用于反应当前应用的状态。
- Histogram(直方图类型):主要用于表示一段时间范围内对数据进行采样(通常是请求持续时间或响应大小),并能够对其指定区间以及总数进行统计,通常它采集的数据展示为直方图。
- Summary(摘要类型):主要用于表示一段时间内数据采样结果(通常是请求持续时间或响应大小)。
二、Prometheus安装
2.1 Prometheus server安装
- Prometheus安装较为简单,下载解压即可
1 | wget https://github.com/prometheus/prometheus/releases/download/v2.26.0-rc.0/prometheus-2.26.0-rc.0.linux-amd64.tar.gz |
- prometheus.yml配置文件
1 | # 全局配置 |
- 创建Prometheus的用户及数据存储目录
1 | groupadd prometheus |
- Prometheus的启动很简单,只需要直接启动解压目录的二进制文件Prometheus即可,但是为了更加方便对Prometheus进行管理,这里编写脚本或者使用screen工具来进行启动
1 | vim /root/prometheus/start.sh |
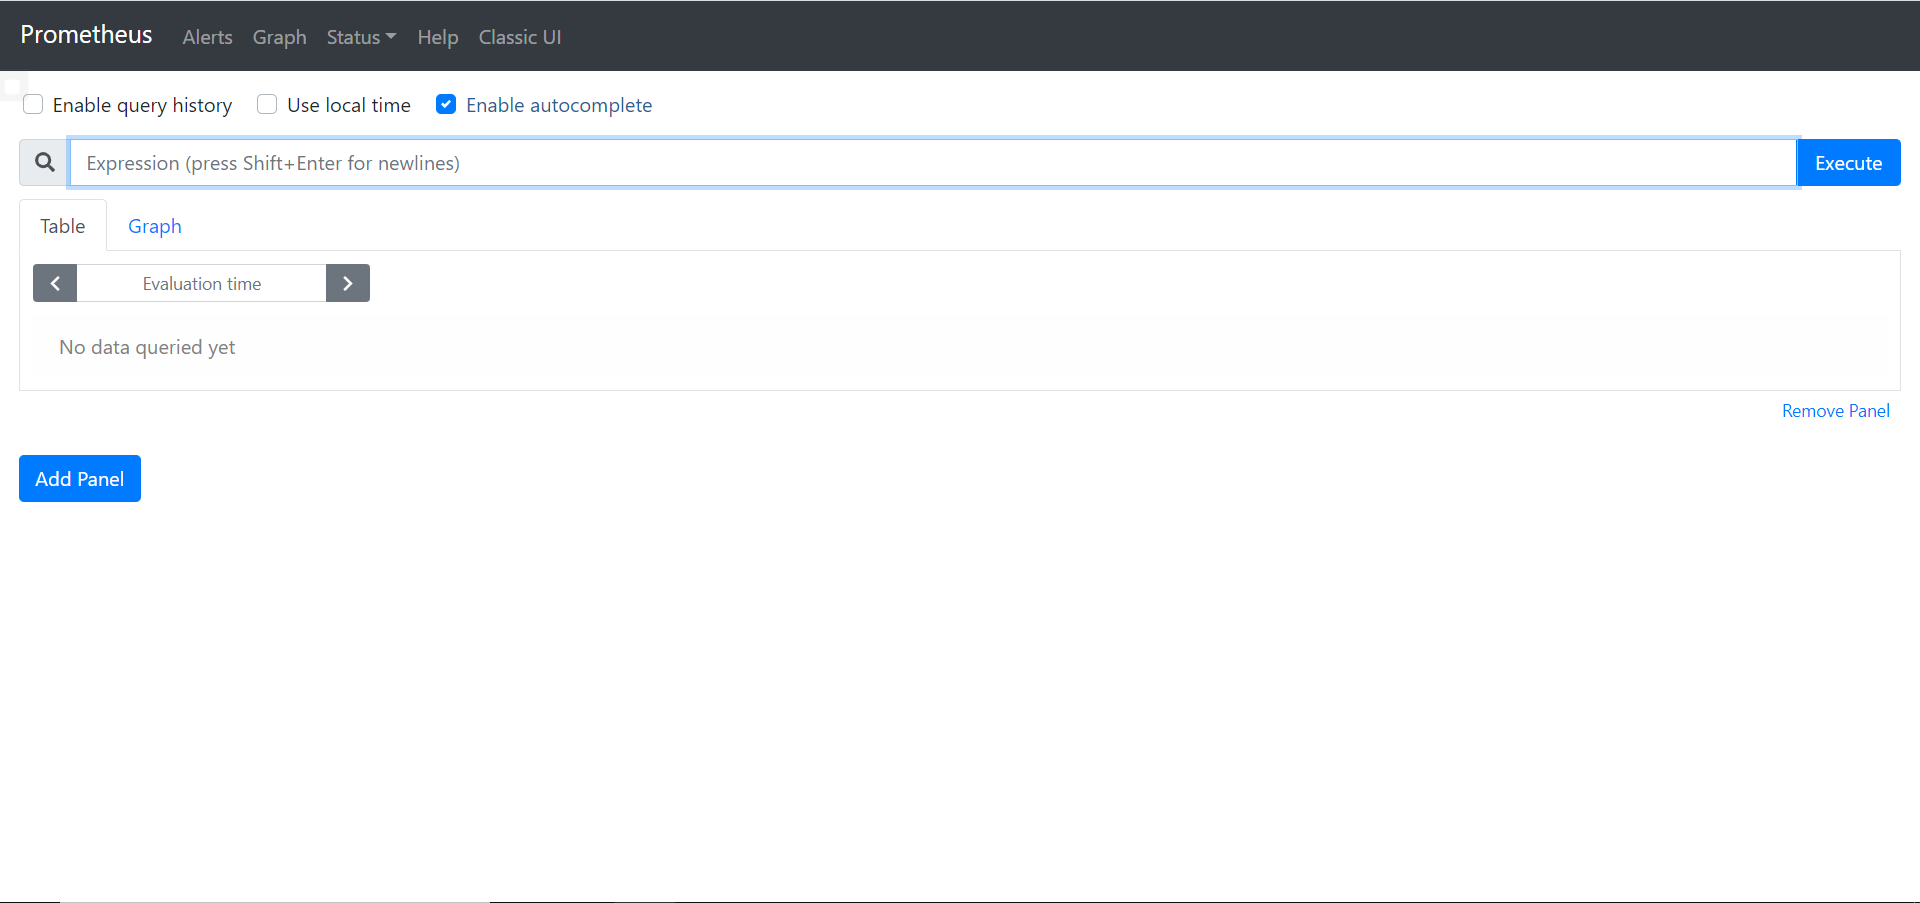
- 启动Prometheus后访问
1 | nohup英文全称no hang up(不挂起),用于在系统后台不挂断地运行命令,退出终端不会影响程序的运行。 |
- 用screen工具进行启动
1 | yum -y install screen |
2.2 node exporter安装
在Prometheus架构中,exporter是负责收集数据并将信息汇报给Prometheus Server的组件。官方提供了node_exporter内置了对主机系统的基础监控。
- 下载node exporter
1 | wget https://github.com/prometheus/node_exporter/releases/download/v1.1.2/node_exporter-1.1.2.linux-amd64.tar.gz |
- 在prometheus.yml中添加被监控主机
1 | static_configs: |
- 后台启动exporter和重启prometheus
1 | screen |
- 通过curl命令获取收集到的数据key
1 | curl http://localhost:9100/metrics |
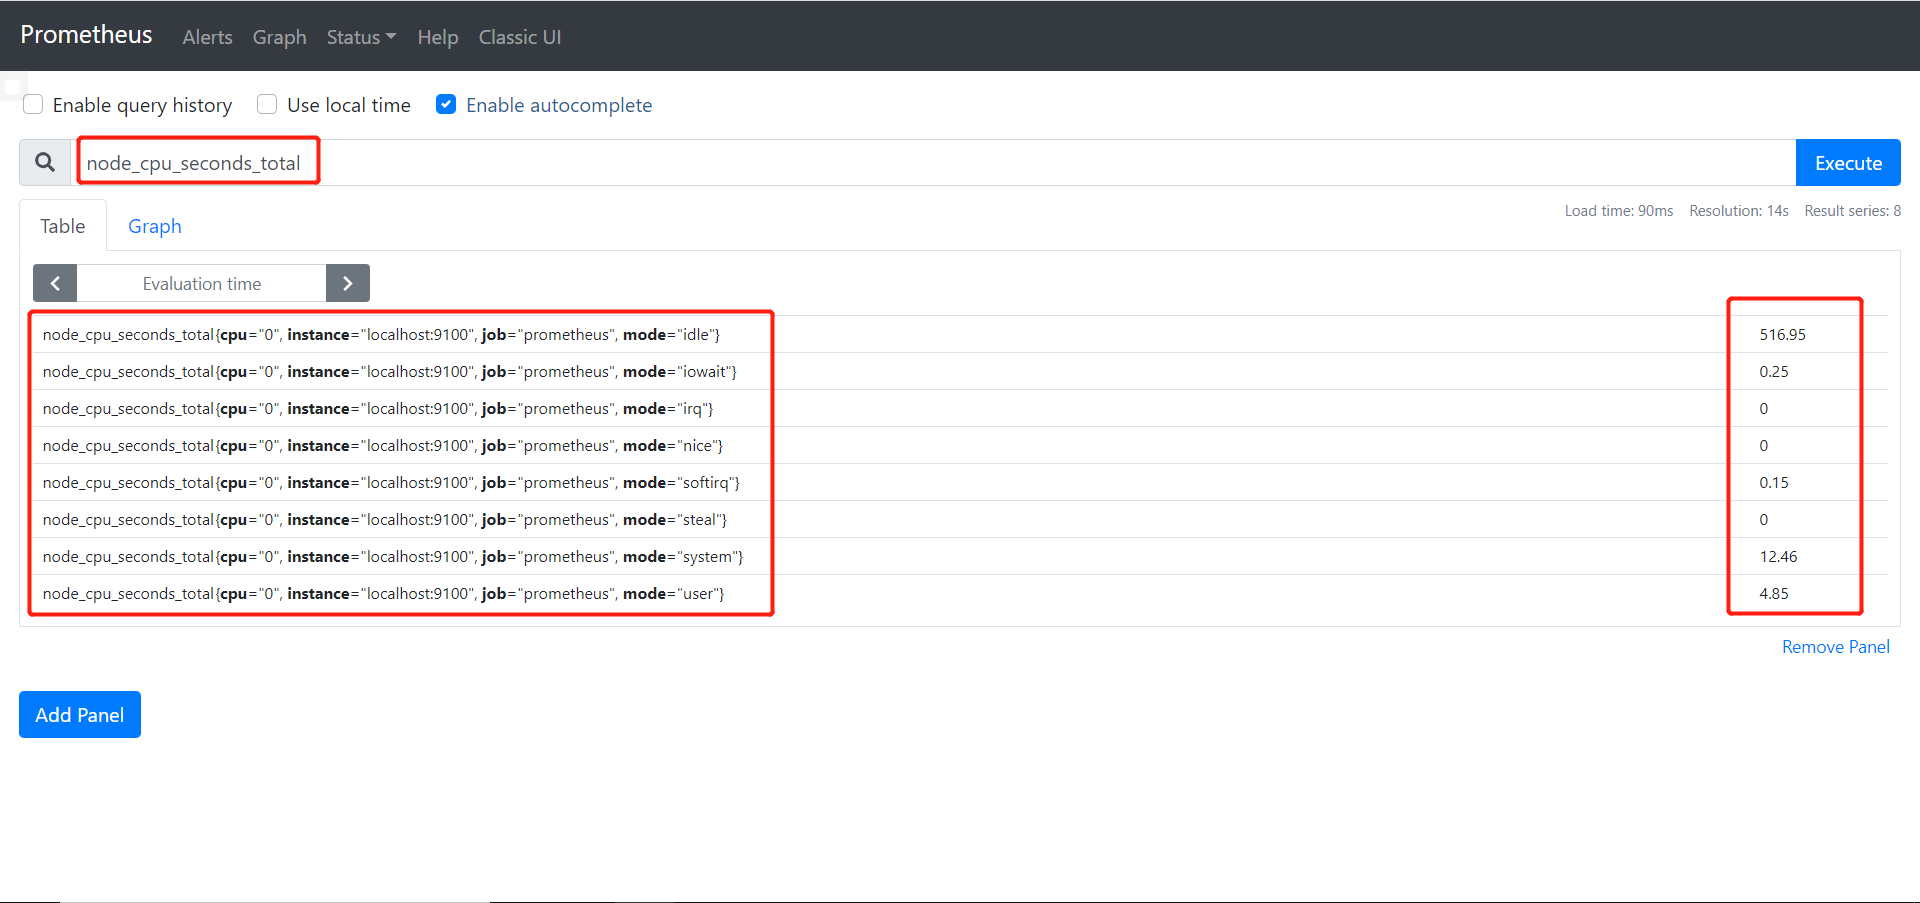
- 用其中的一个key在Prometheus测试是否被监控
三、Prometheus命令行的使用
3.1 计算cpu使用率

通过上图可以知道,linux的cpu使用是分为很多种状态的,例如用户态user,空闲态idle。
要计算cpu的使用率有两种粗略的公式:
- 除去idle状态的所有cpu状态时间之和 / cpu时间总和
- 100% - (idle状态 / cpu时间总和)
但这两种方式都存在两个问题:
- 如何计算某一时间段的cpu使用率?例如精确到每一分钟。
- 实际工作中cpu大多数都是多核的,node exporter截取到的数据精确到了每个核,如何监控所有核加起来的数据?
Prometheus提供了许多的函数,其中 increase 和 sum 就很好的解决了以上两个问题。
- 提取cpu的key,即node_cpu_seconds_total
- 把idle空闲时间和总时间过滤出来,在Prometheus中使用{}进行过滤
1 | node_cpu_seconds_total{mode='idle'} |
- 使用increase函数取一分钟内的增量
1 | increase(node_cpu_seconds_total{mode='idle'}[1m]) |
- 使用sum函数将每个核的数整合起来
1 | sum(increase(node_cpu_seconds_total{mode='idle'}[1m])) |
到这里又出现一个问题,sum函数会将所有数据整合起来,不光将一台机器的所有cpu加到一起,也将所有机器的cpu都加到了一起,最终显示的是集群cpu的总平均值,by(instance)可以解决这个问题。
1 | sum(increase(node_cpu_seconds_total{mode='idle'}[1m])) by(instance) |
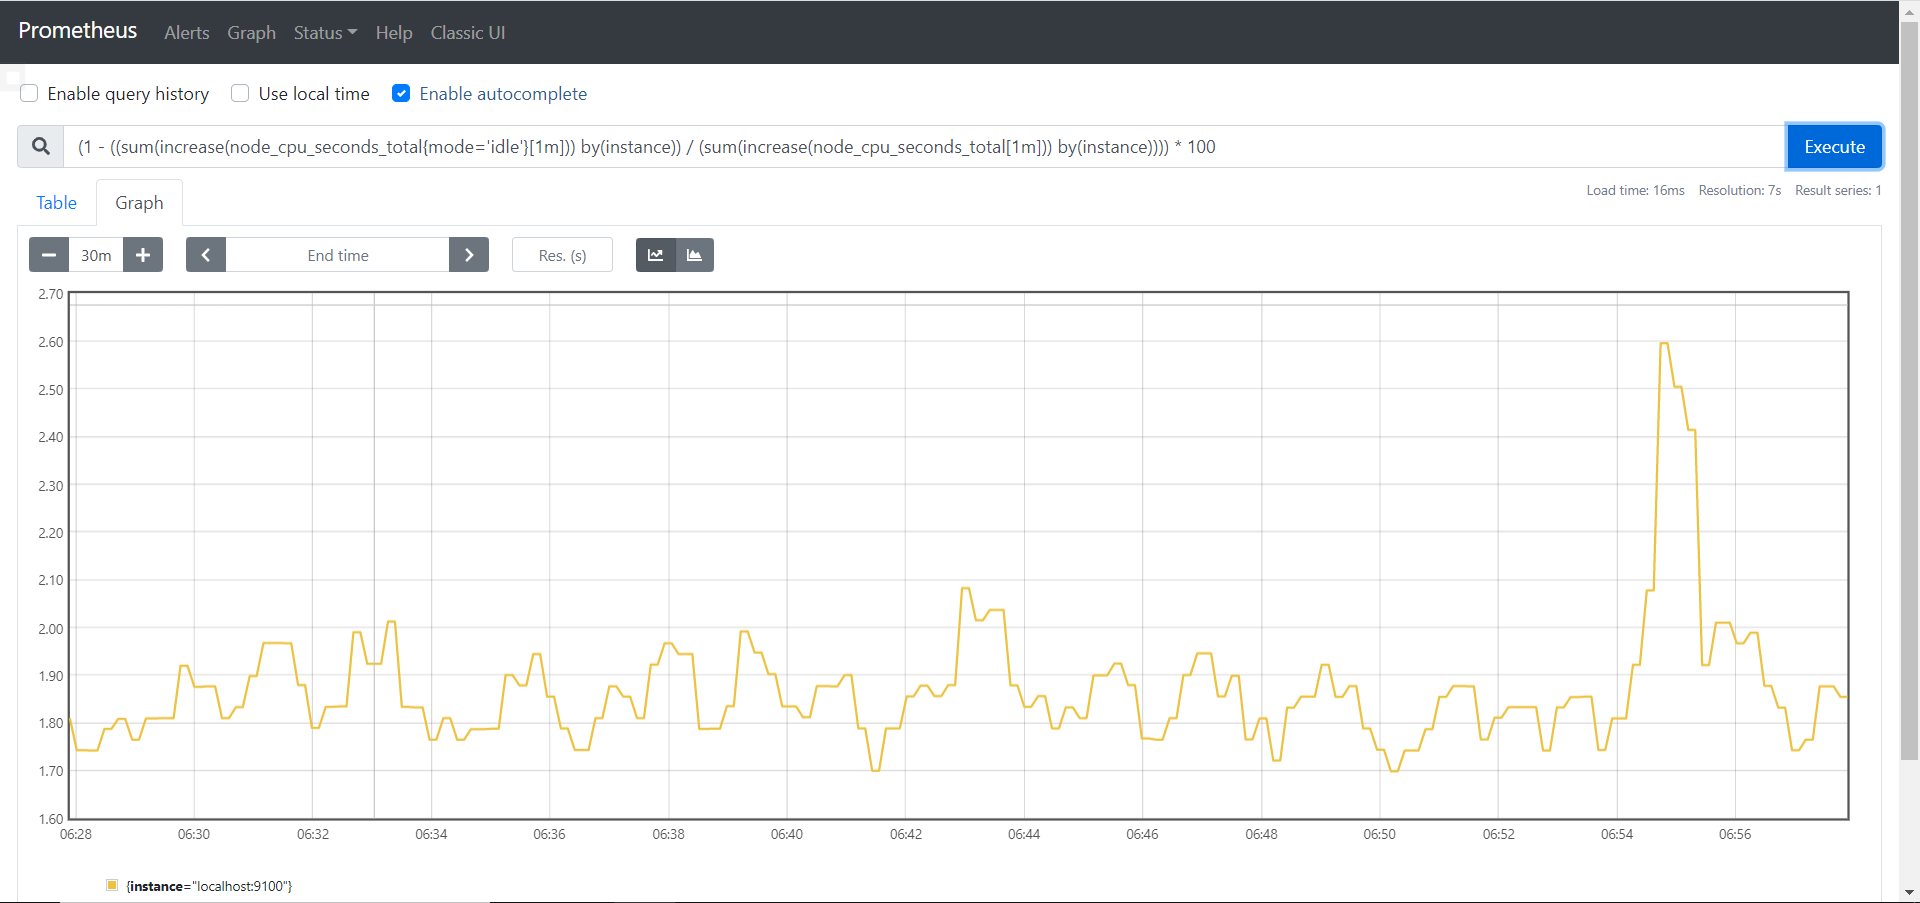
这样就得到了空闲时cpu的数据了,用上边第一个公式即可得到单台主机cpu在一分钟内的使用率。
1 | (1 - ((sum(increase(node_cpu_seconds_total{mode='idle'}[1m])) by(instance)) / (sum(increase(node_cpu_seconds_total[1m])) by(instance)))) * 100 |
3.2 计算内存使用率
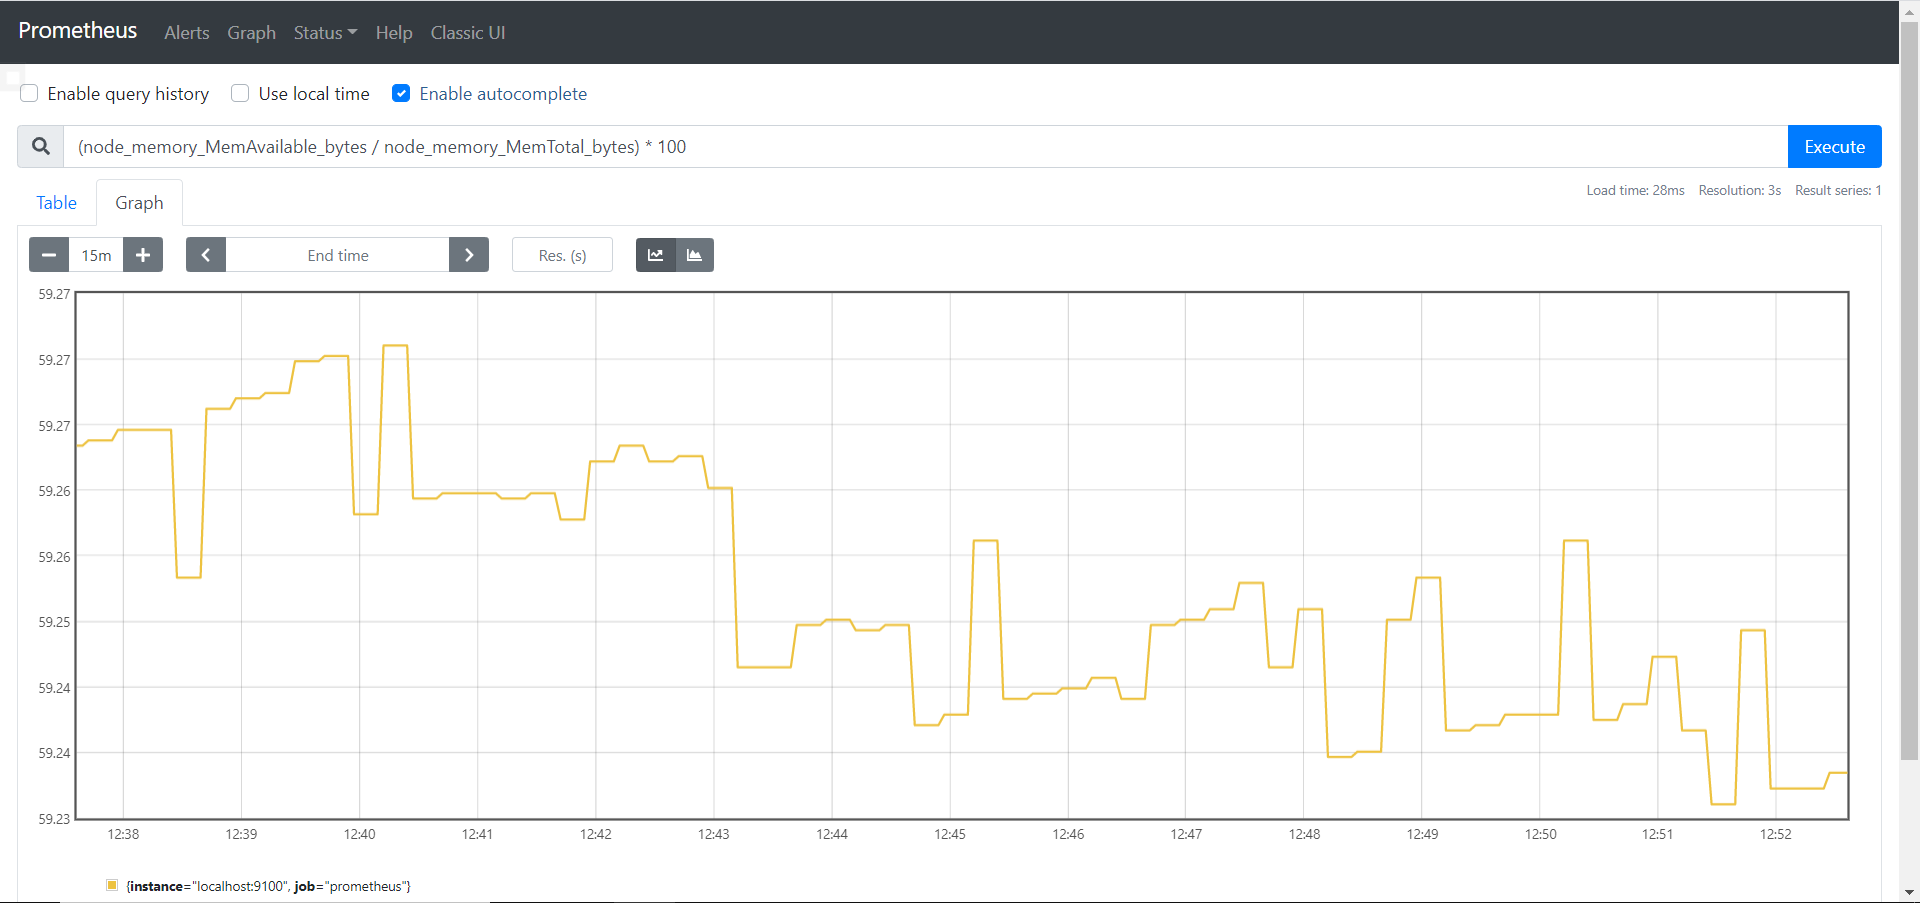
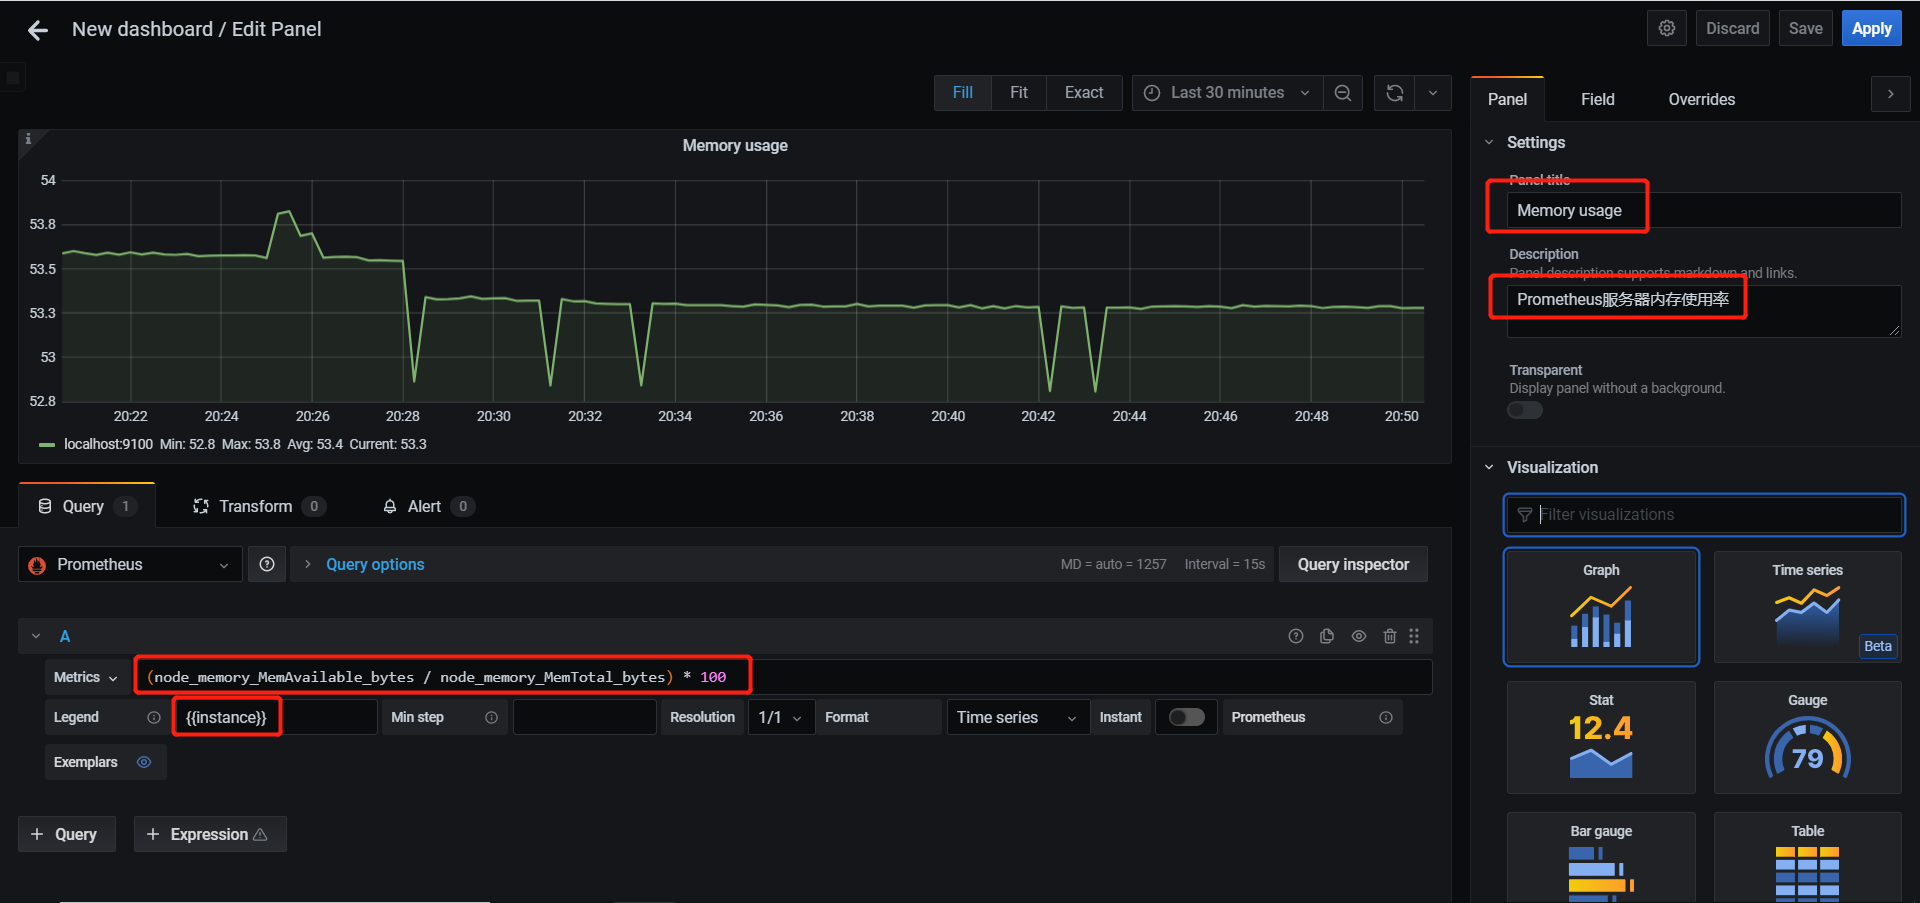
内存使用率公式为 = (available / total) * 100
1 | (node_memory_MemAvailable_bytes / node_memory_MemTotal_bytes) * 100 |
3.3 rate函数
rate函数是专门搭配counter类型数据使用的函数,功能是按照设置的一个时间段,取counter在这个时间段中平均每秒的增量。
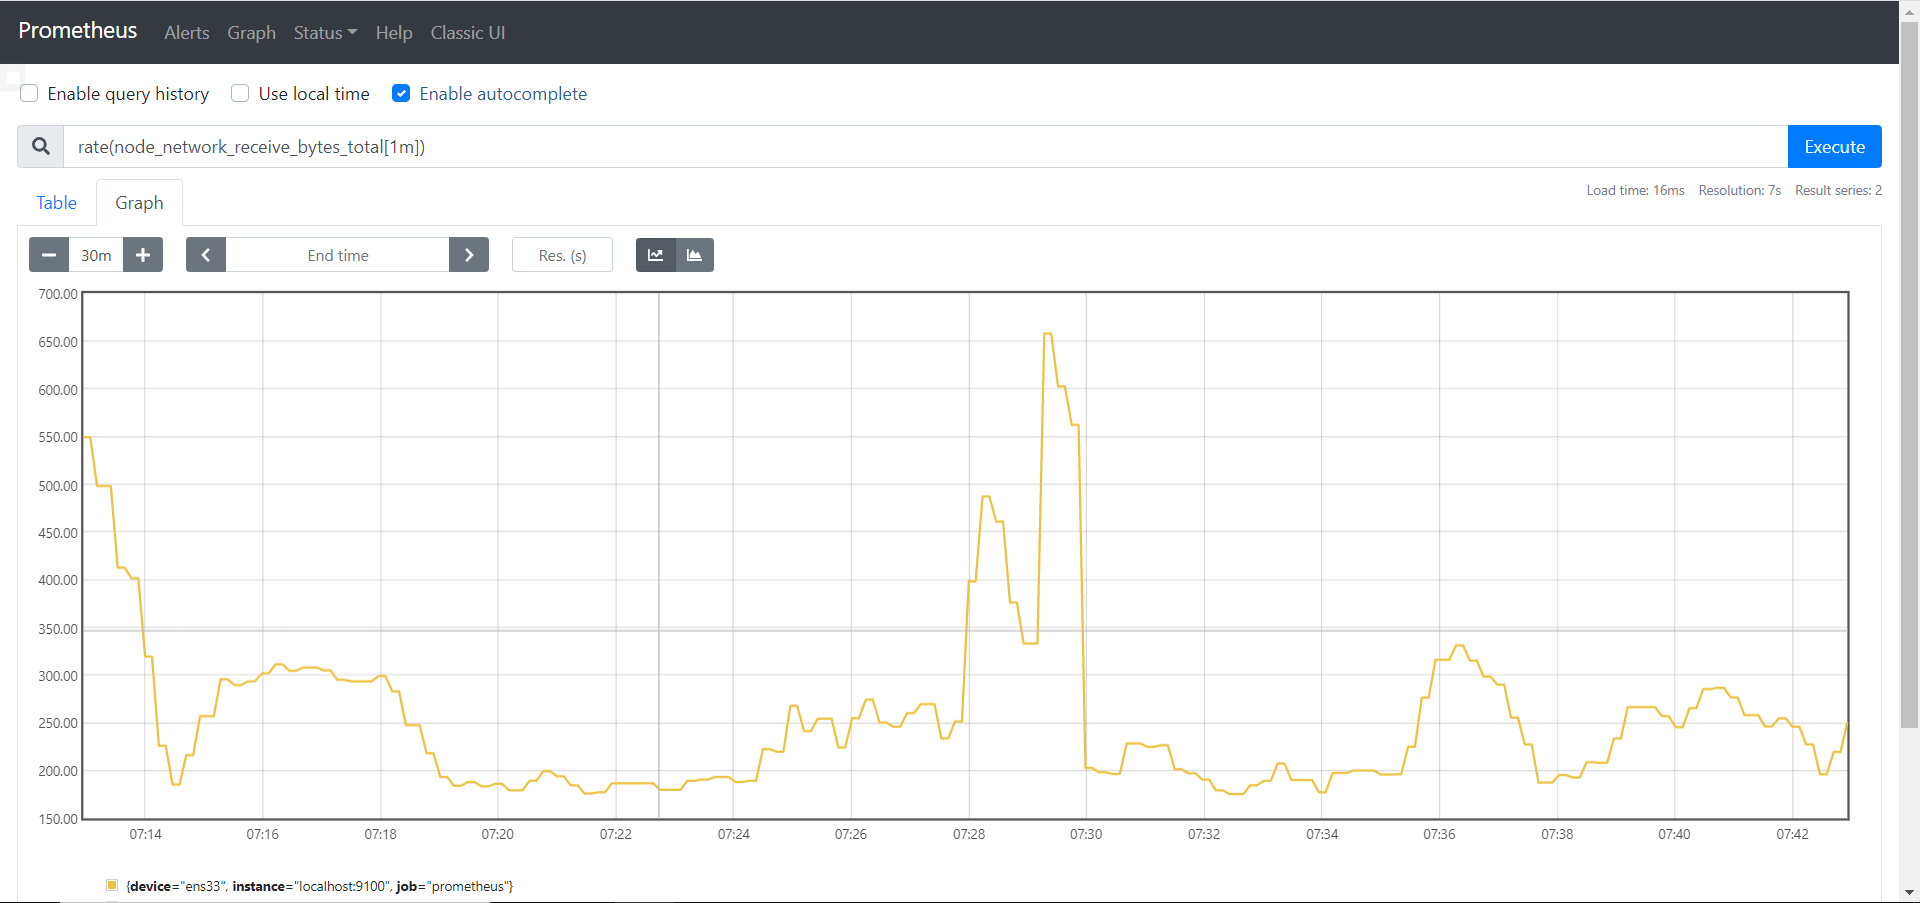
举个栗子,假设我们要取ens33这个网卡在一分钟内字节的接受数量,假如一分钟内接收到的是1000bytes,那么平均每秒接收到就是1000bytes / 1m * 60s ≈ 16bytes/s。
1 | rate(node_network_receive_bytes_total{device='ens33'}[1m]) |
如果是五分钟的话即为5000bytes / 5m * 60s ≈ 16bytes/s,结果是一样的,但曲线图就不一样了,上图为一分钟,下图为五分钟,因为五分钟的密度要更底,所以可以看到五分钟的曲线图更加平缓。
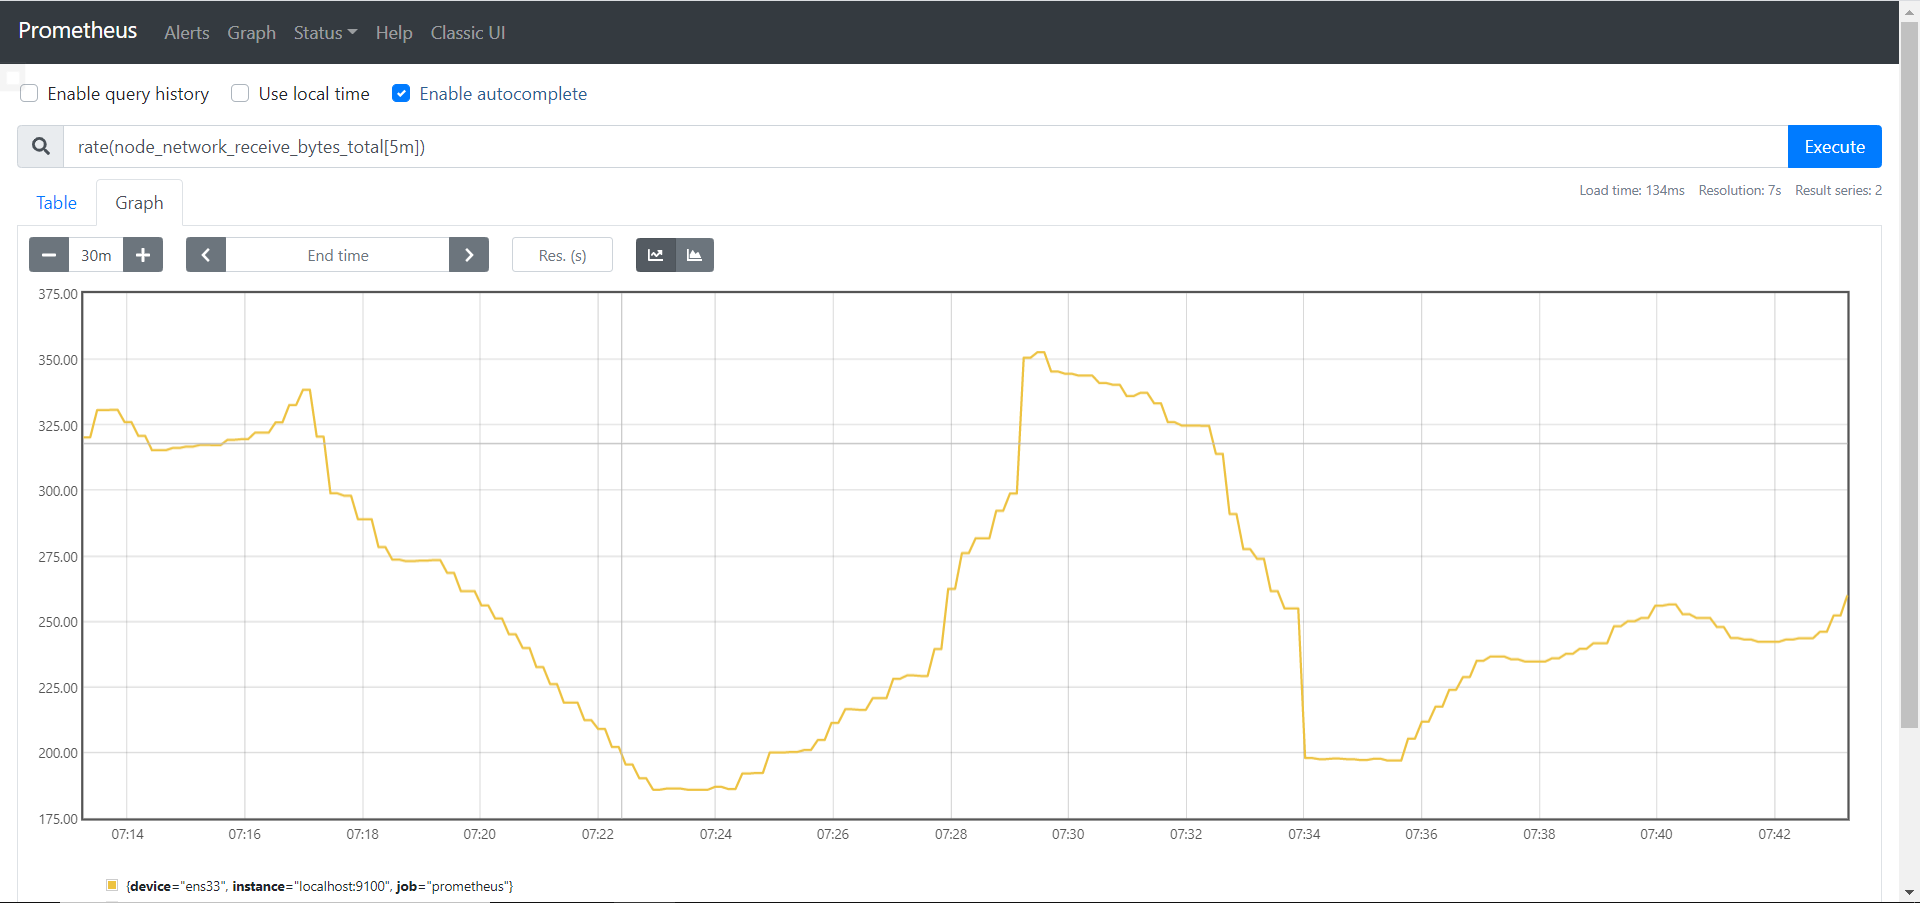
rate和increase的概念有些类似,但rate取的是一段时间增量的平均每秒数量,increase取的是一段时间增量的总量,即:
- rate(1m):总量 / 60s
- increase(1m):总量
3.4 sum函数
sum函数就是将收到的数据全部进行整合。
假如一个集群里有20台服务器,分别为5台web服务器,10台db服务器,还有5台其他服务的服务器,这时候sum就可以分为三条曲线来代表不同功能服务器的总和数据。
3.5 topk函数
topk函数的作用就是取前几位的最高值。

3.6 count函数
count函数的作用是把符合条件的数值进行整合。
假如我们要查看集群中cpu使用率超过80%的主机数量的话
1 | count((1 - ((sum(increase(node_cpu_seconds_total{mode='idle'}[1m])) by(instance)) / (sum(increase(node_cpu_seconds_total[1m])) by(instance)))) * 100 > 80) |
四、Push gateway
Push gateway实际上就是一种被动推送数据的方式,与exporter主动获取不同。
4.1 Push gateway安装
- 下载安装Push gateway
1 | wget https://github.com/prometheus/pushgateway/releases/download/v1.4.0/pushgateway-1.4.0.linux-amd64.tar.gz |
- 后台运行Push gateway
1 | screen |
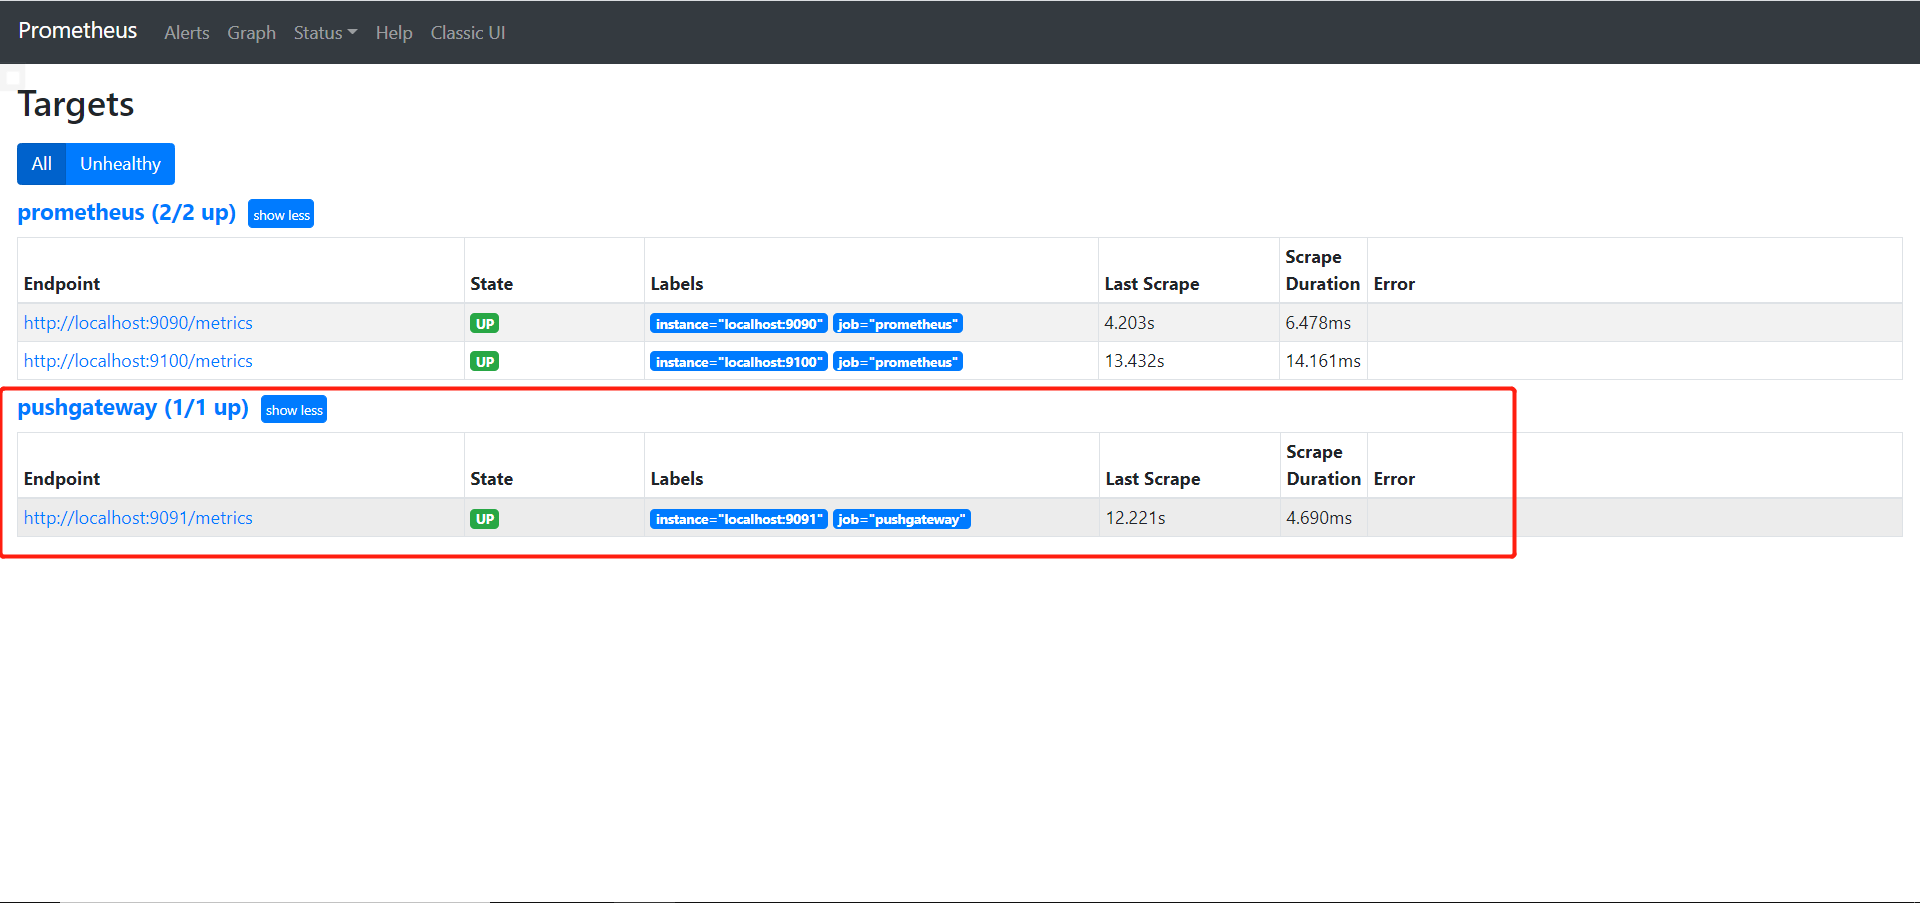
- 在prometheus.yml中加上
1 | - job_name: 'pushgateway' |
4.2 自定义编写脚本
由于Push gateway自己本身是没有任何抓取数据的功能的,所以用户需要自行编写脚本来抓取数据。
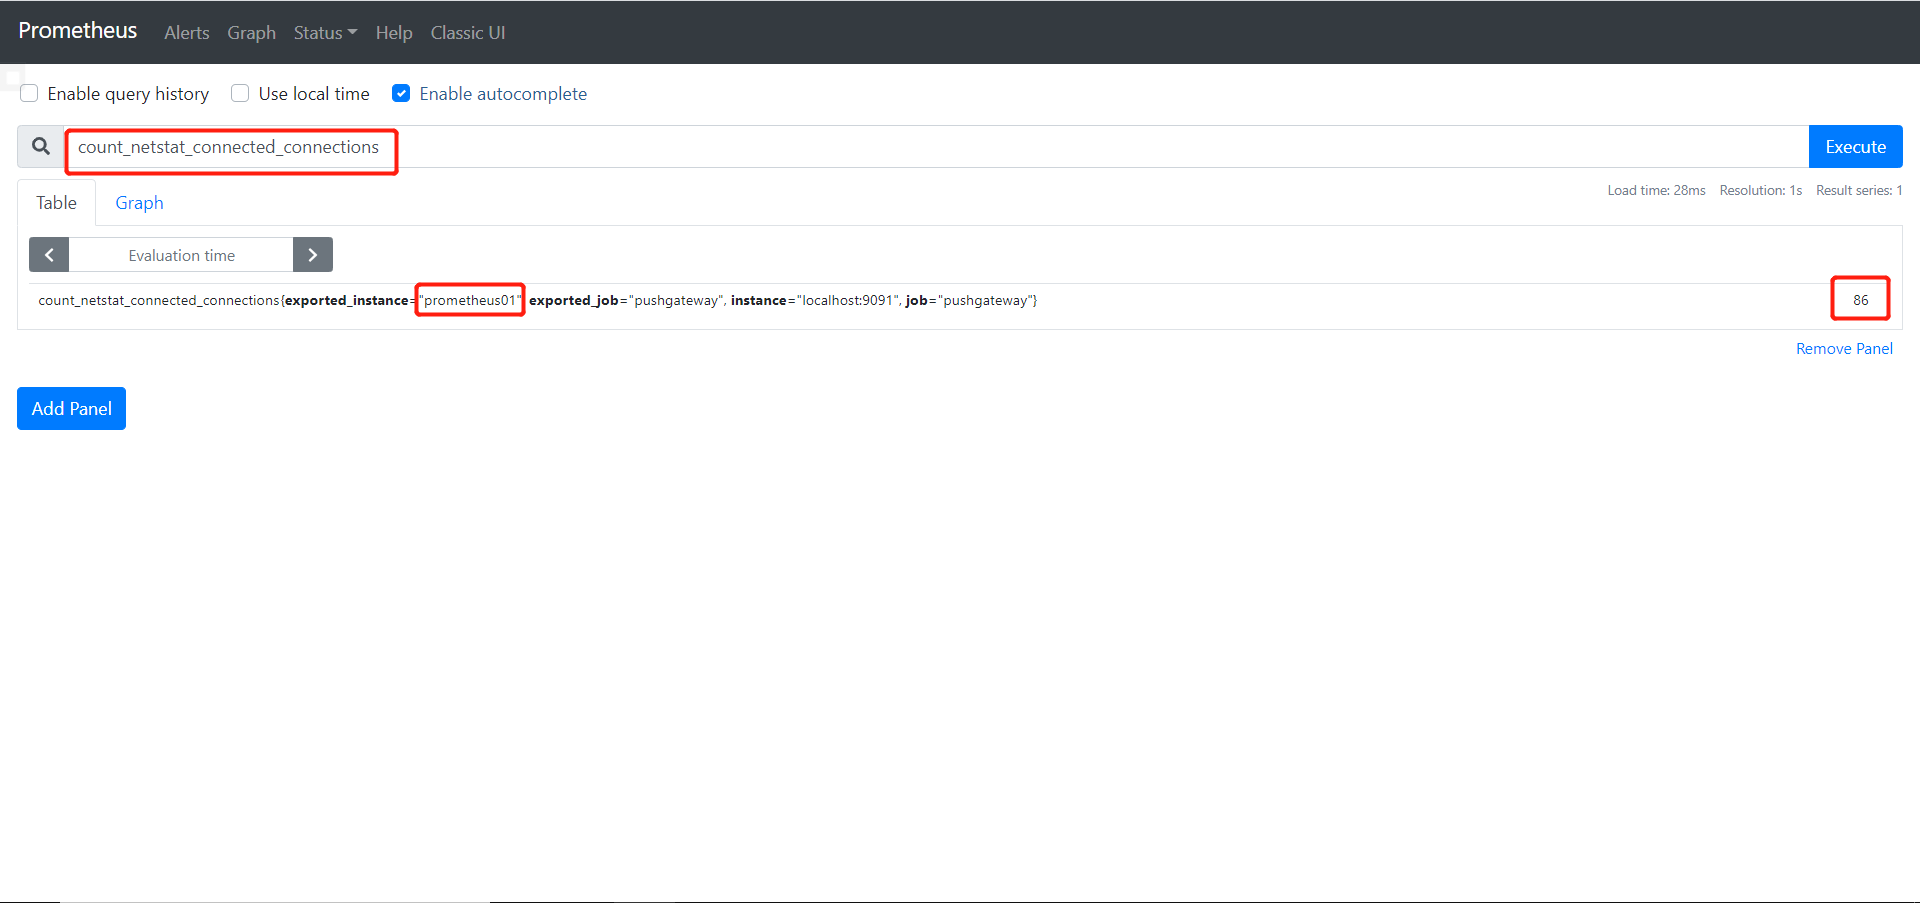
举个例子:编写脚本抓取 TCP waiting_connection 的数量
- 编写自定义脚本
1 | !/bin/bash |
- 因为脚本都是运行一次后就结束了,可以配合crontab反复运行
1 | crontab -e |
4.3 编写抓取ping丢包和延迟时间数据
在node_exporter_shell.sh中加入
1 | --- |
五、Grafana的使用
Grafana是一款用Go语言开发的开源数据可视化工具,可以做数据监控和数据统计,带有告警功能。
5.1 Grafana安装
1 | wget https://dl.grafana.com/oss/release/grafana-7.5.1-1.x86_64.rpm |
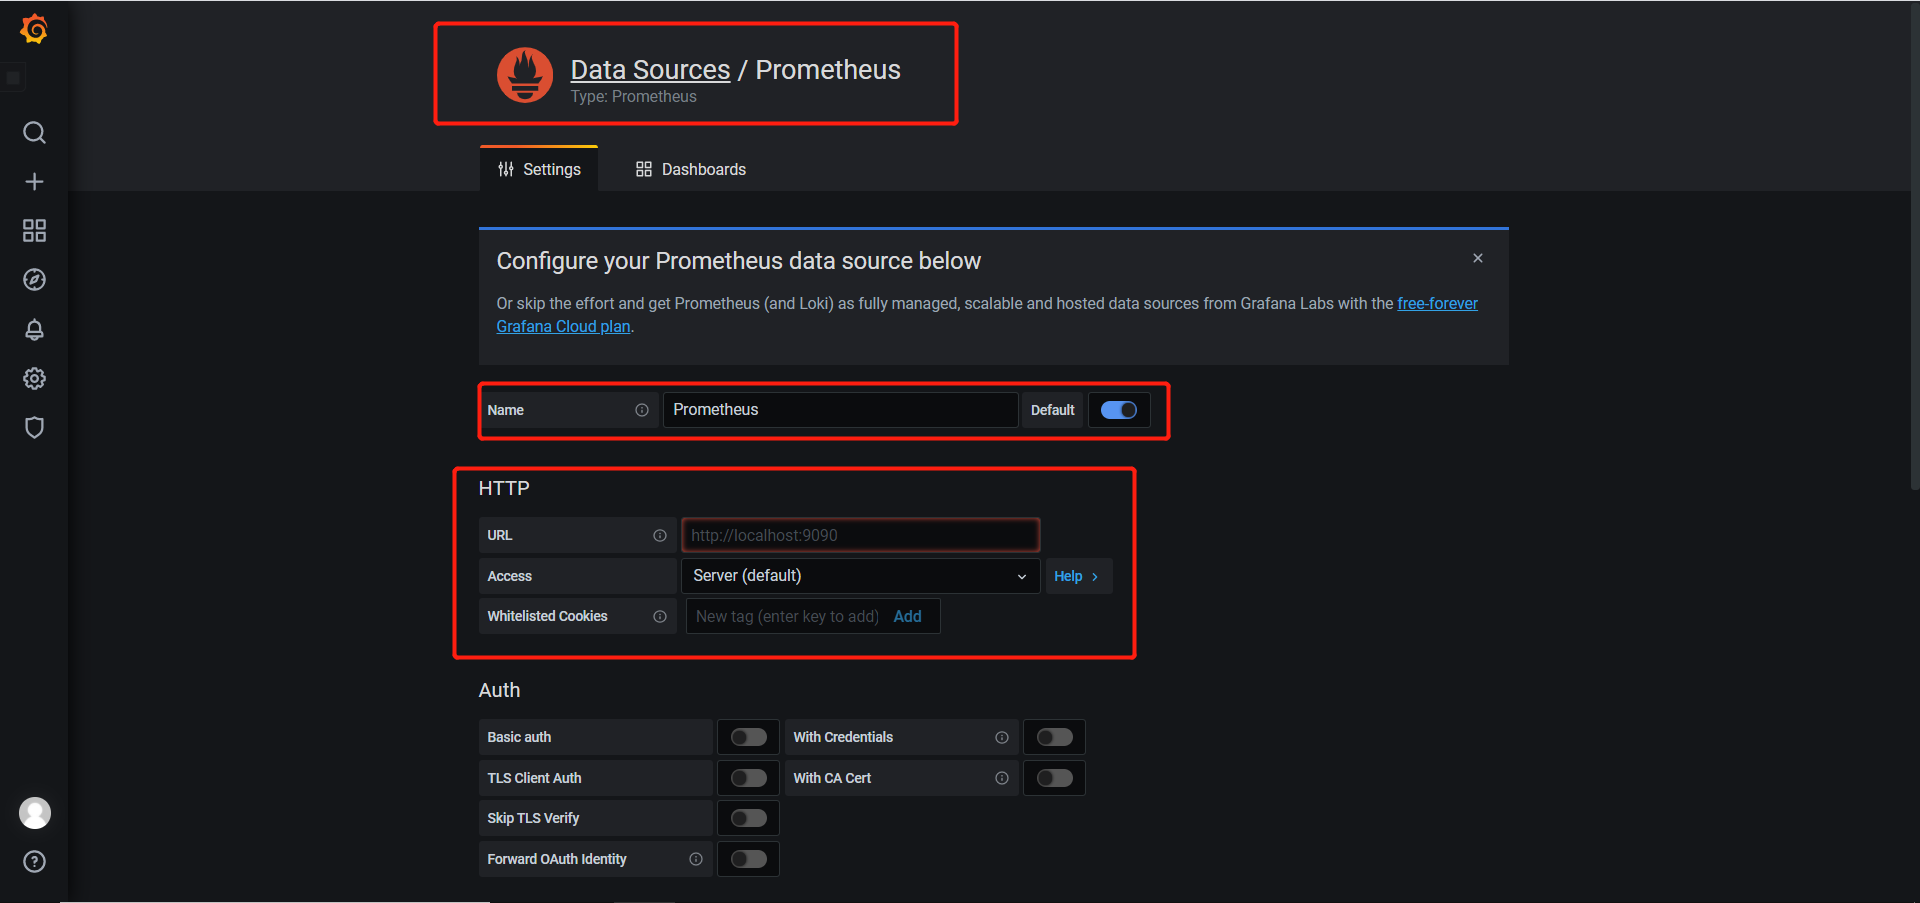
5.2 设置数据源
- Grafana -> Configuration -> Date Sources -> Prometheus
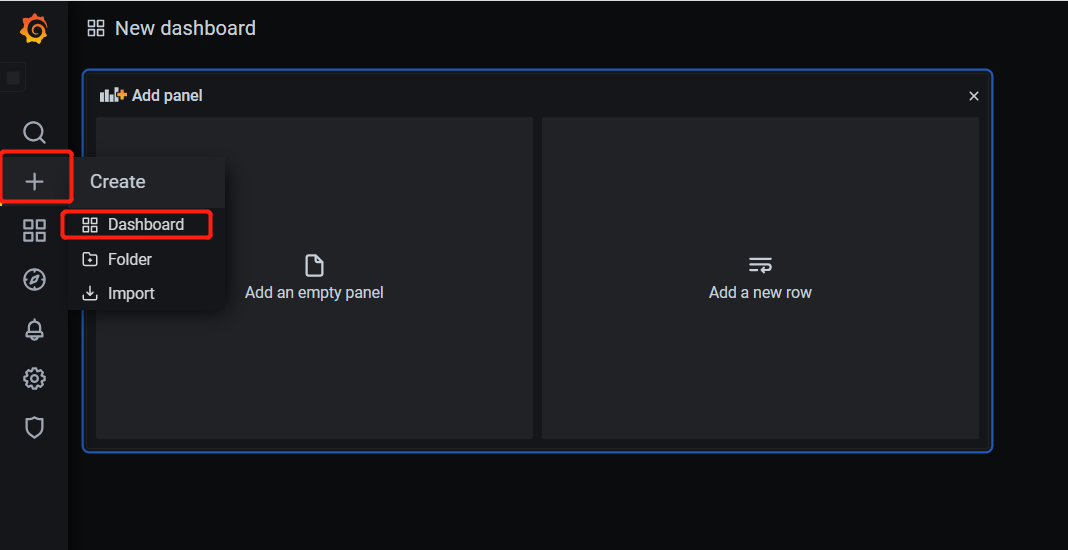
- New dashboard
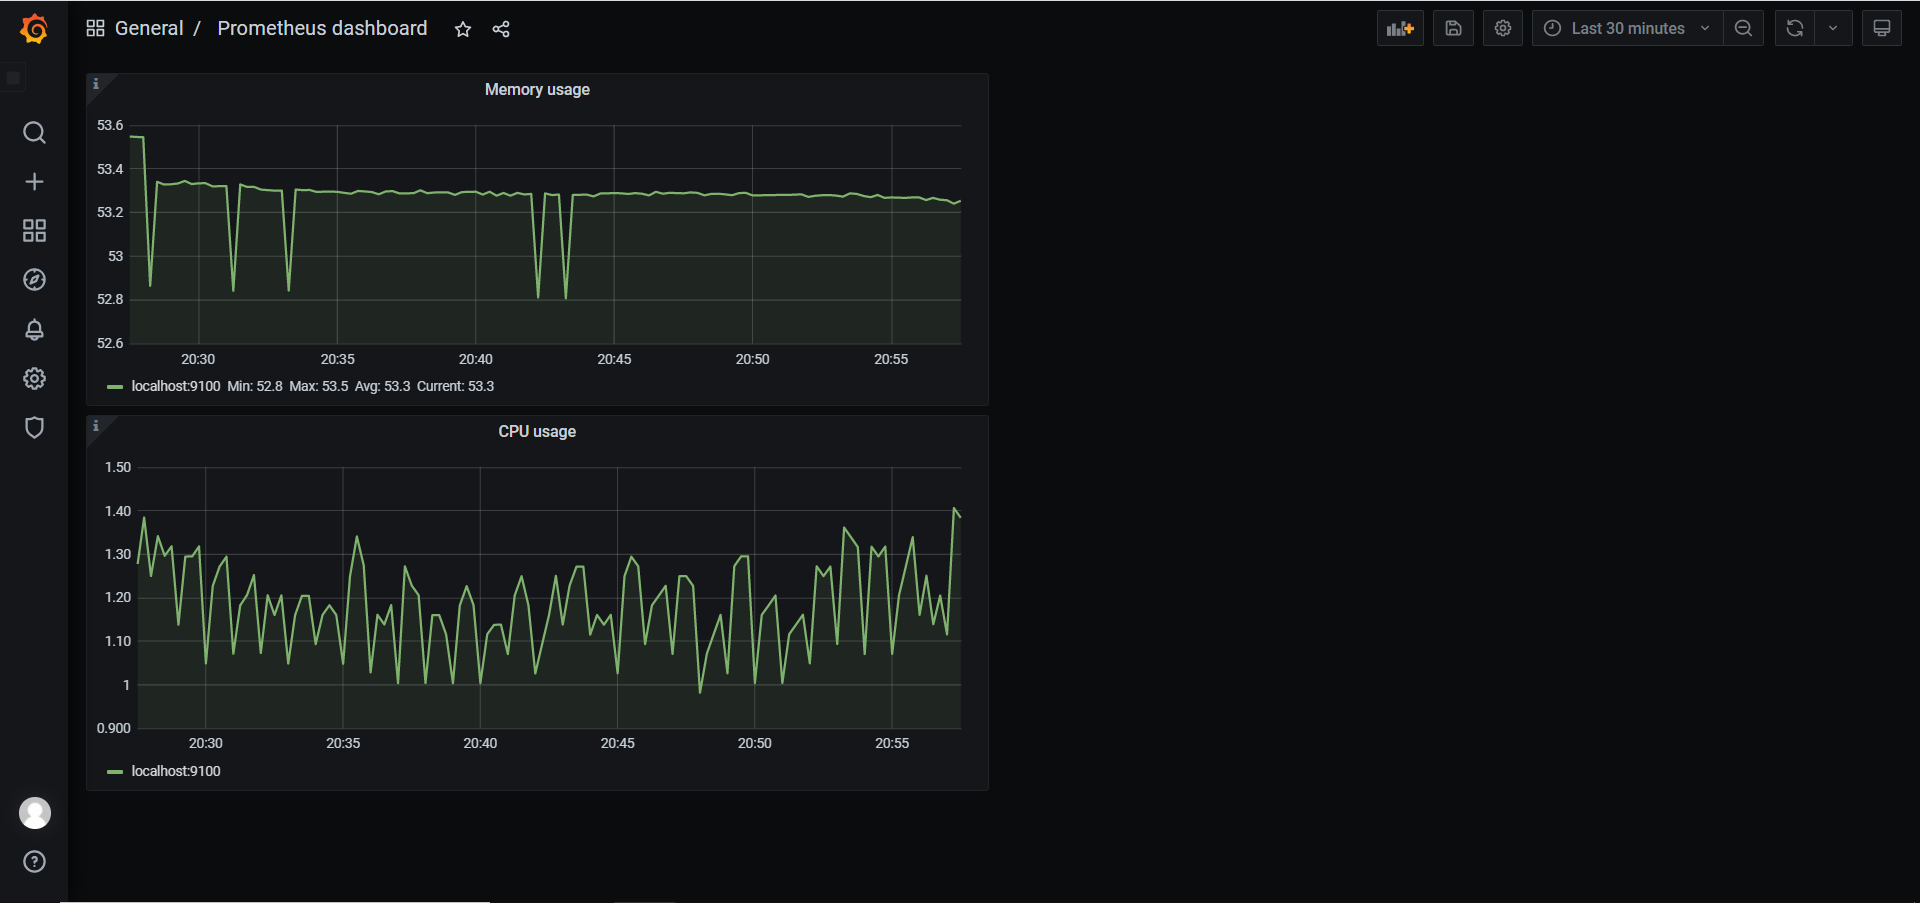
- 添加一个监控和CPU内存使用率的仪表盘
5.3 json备份和还原
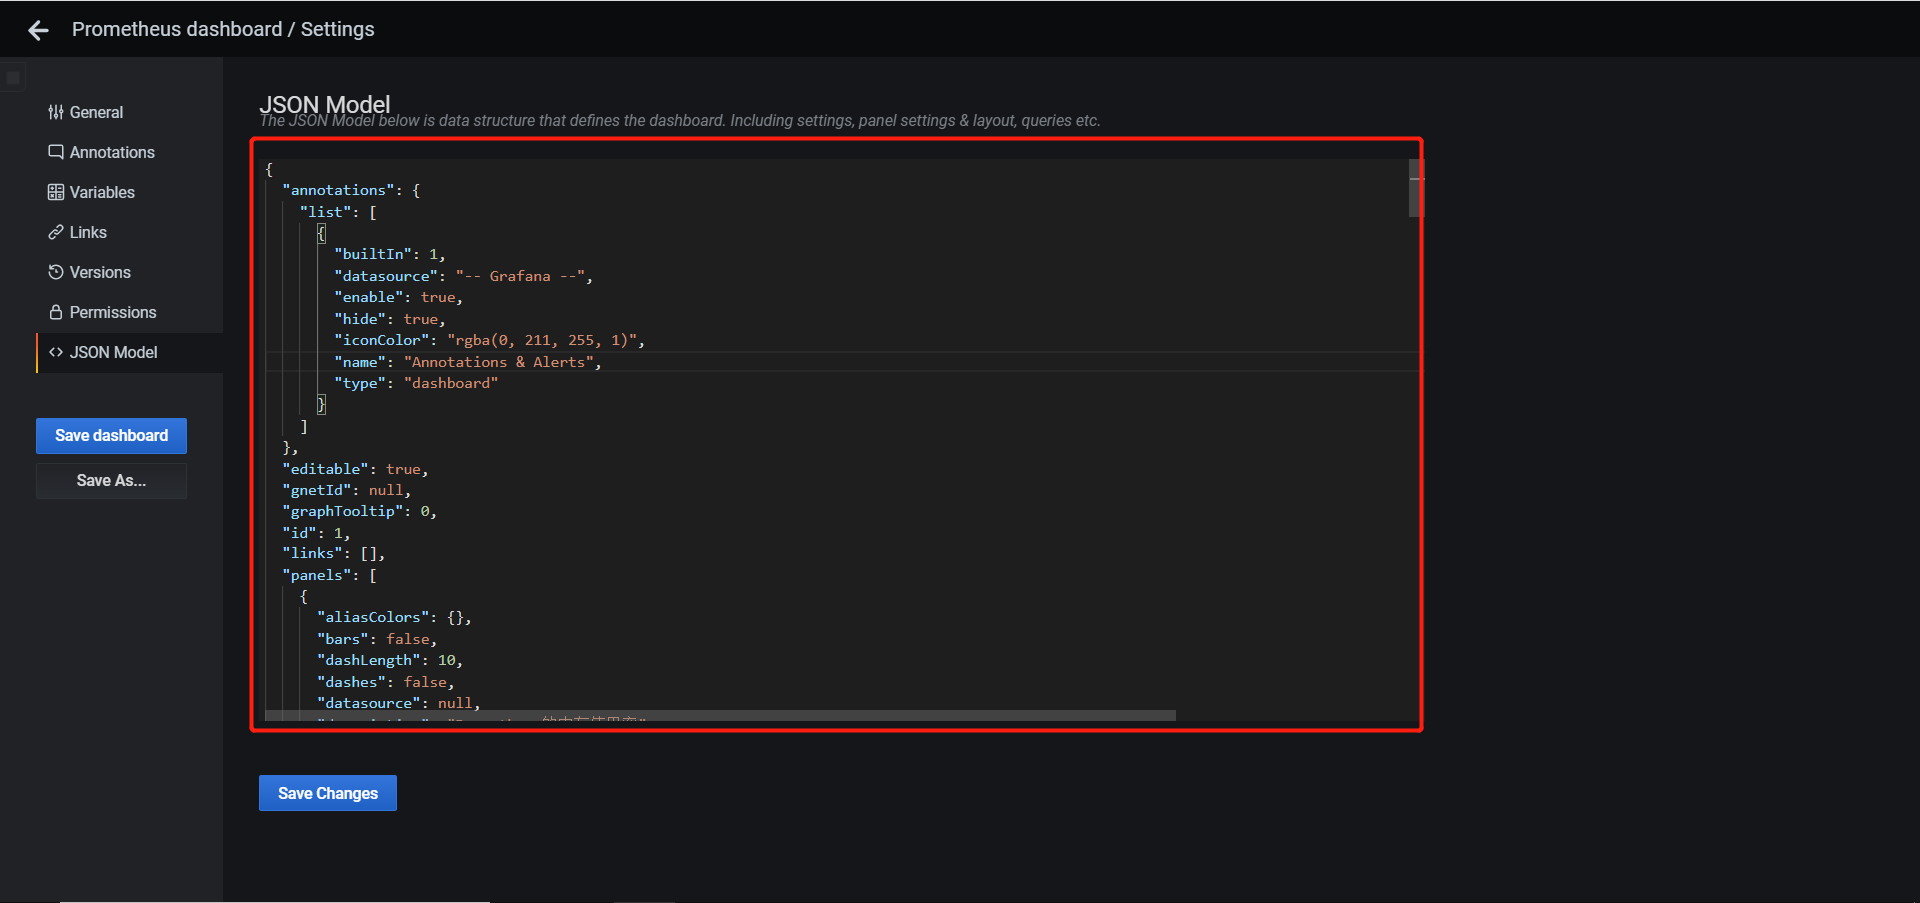
- 备份:dashboard -> Settings -> JSON Model,将里面内容保存为json文件
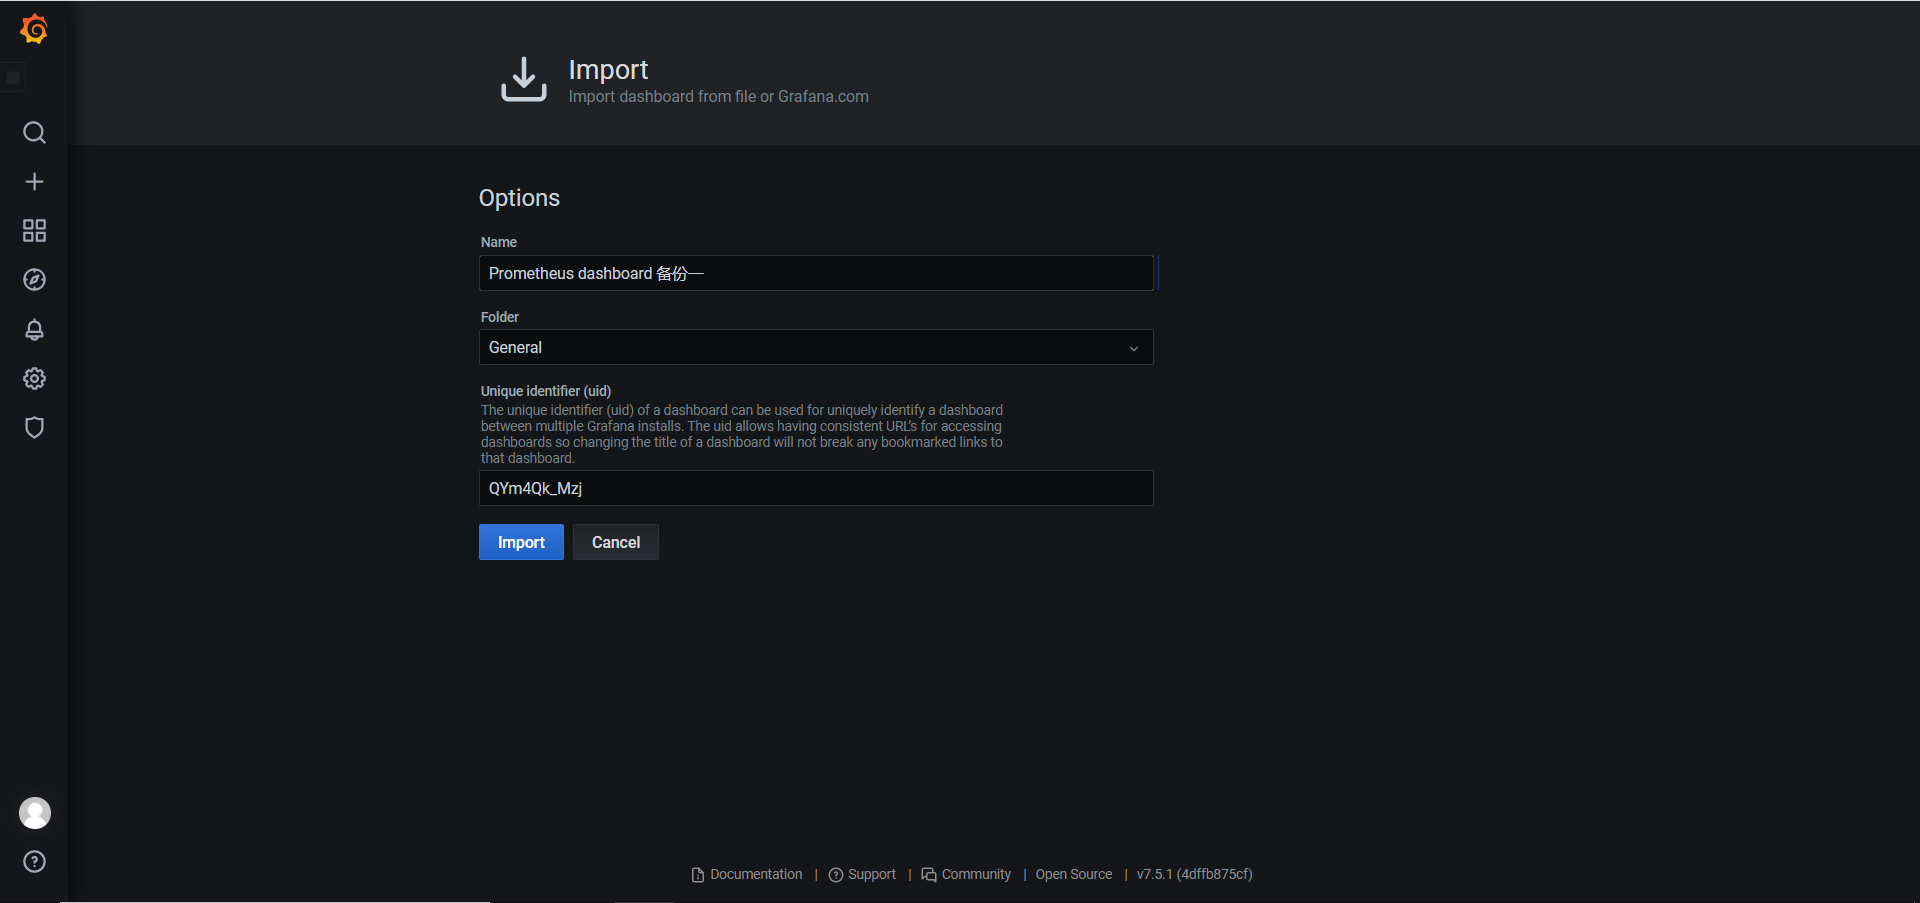
- 恢复:Create -> import
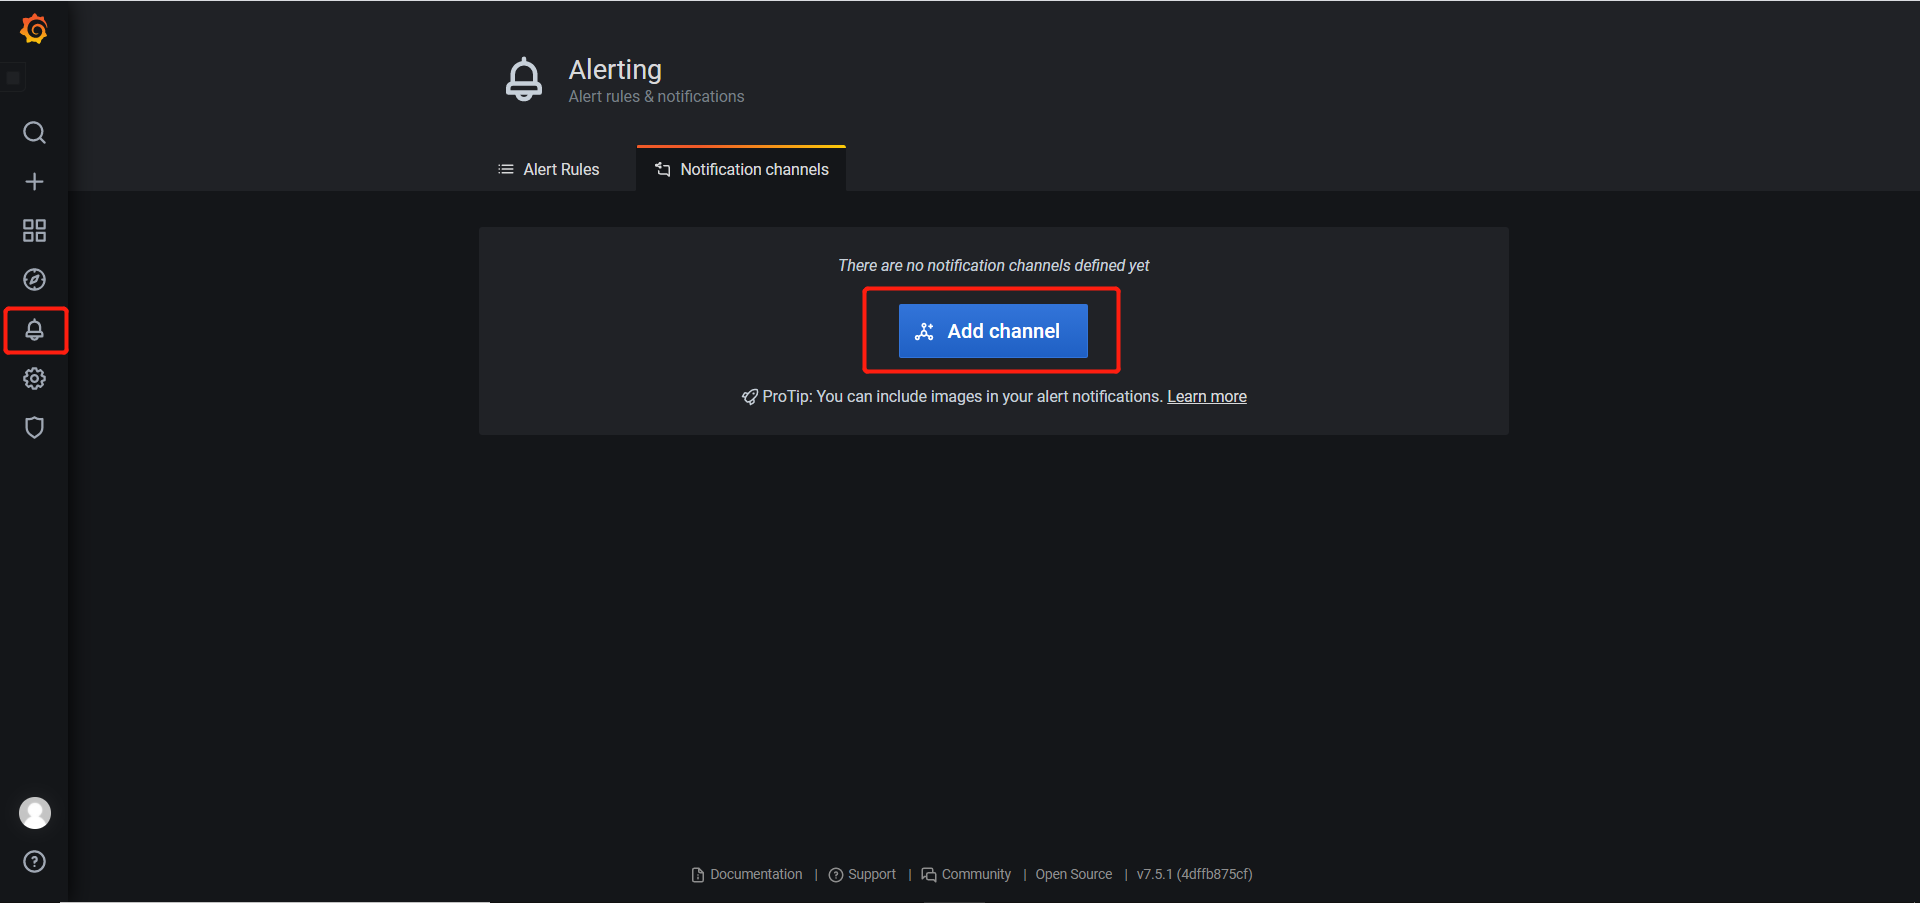
5.4 Grafana实现报警功能
- 配置Grafana文件
1 | 安装依赖和图形显示插件 |
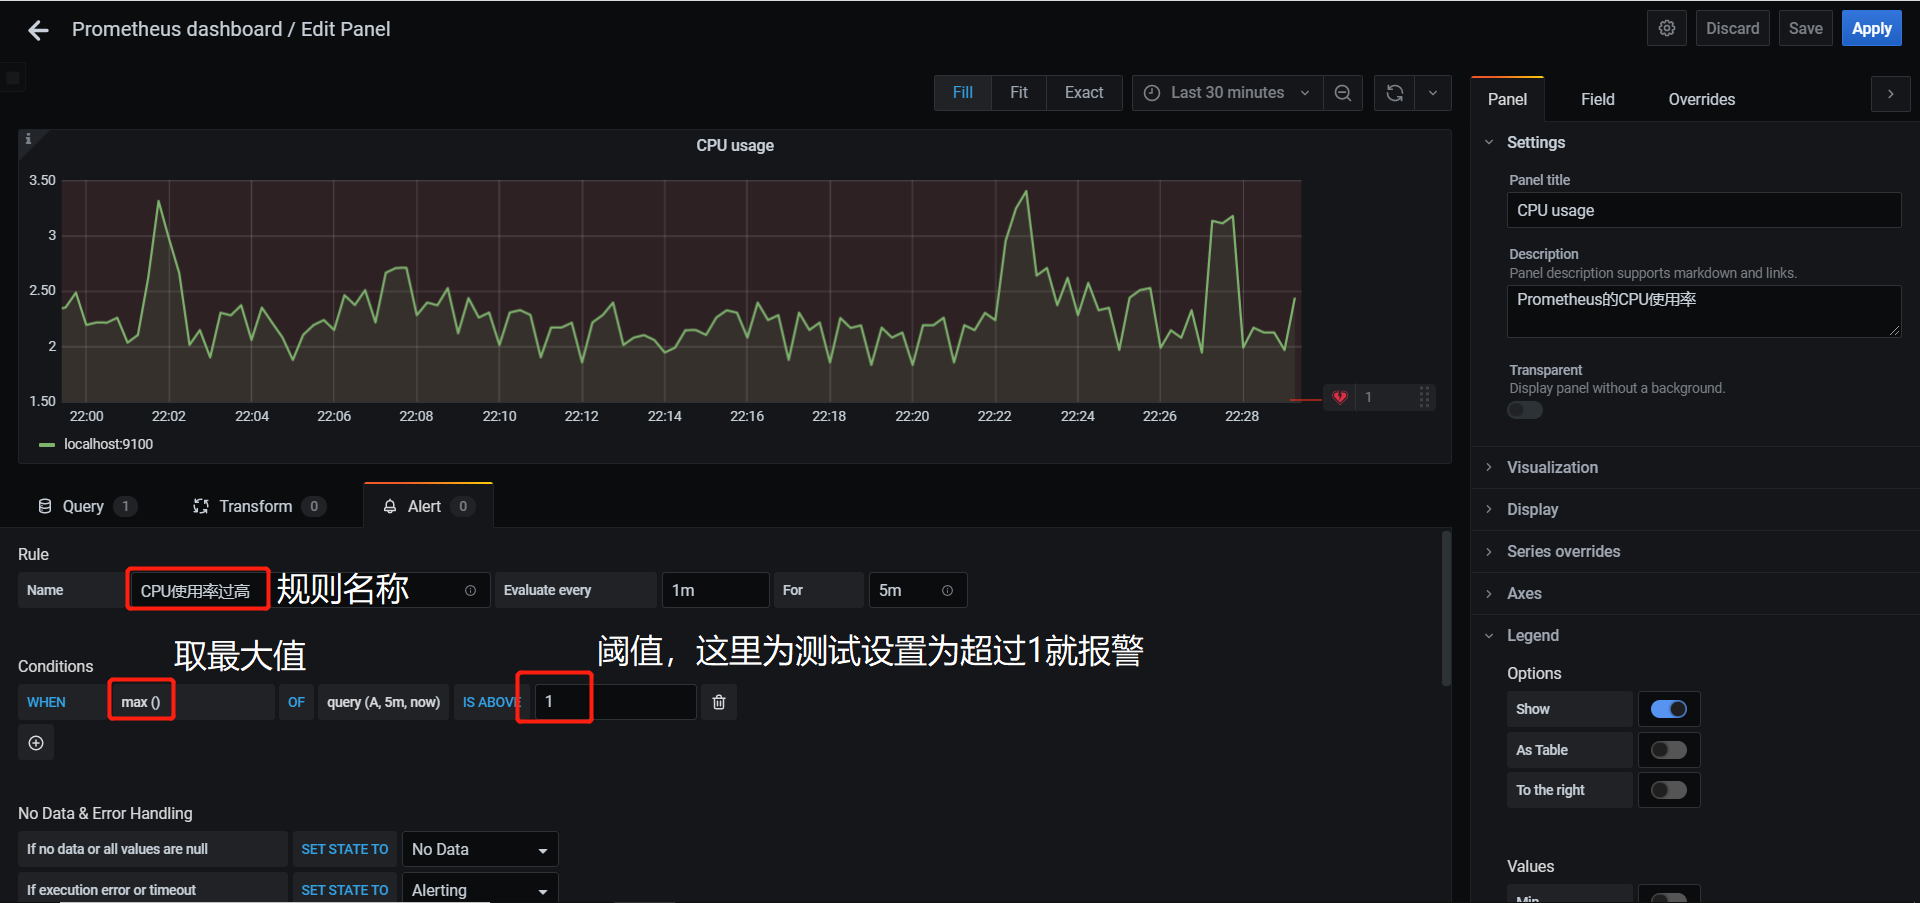
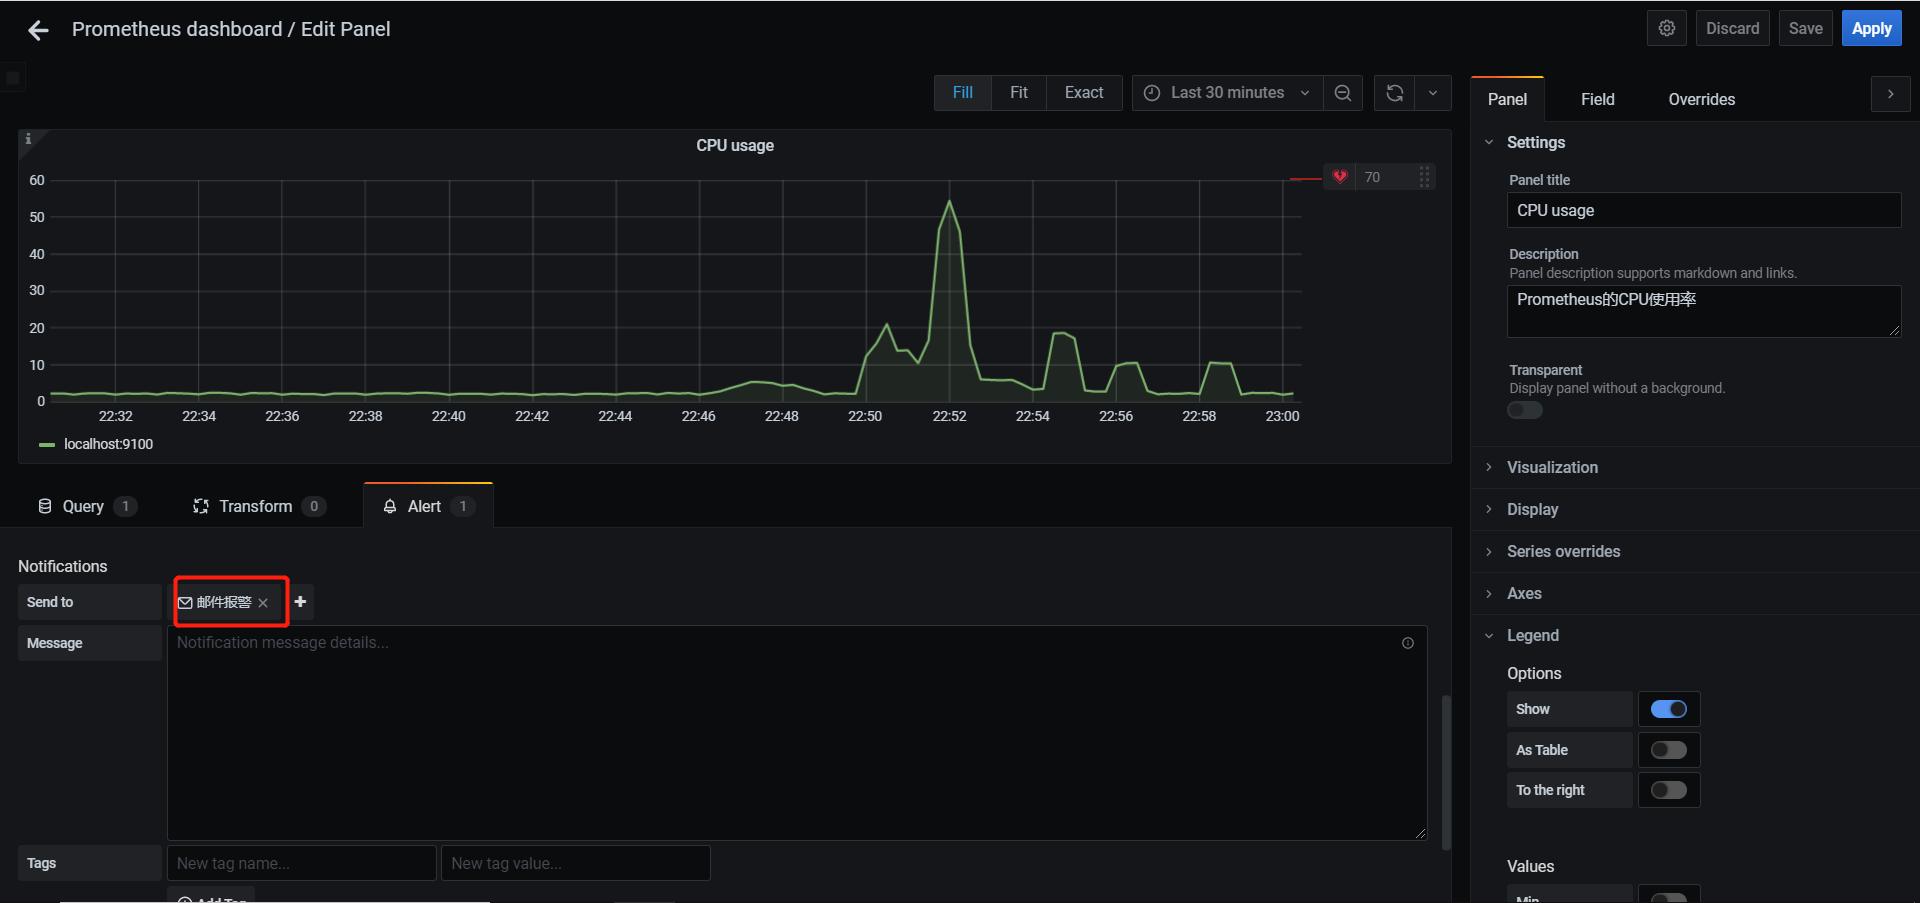
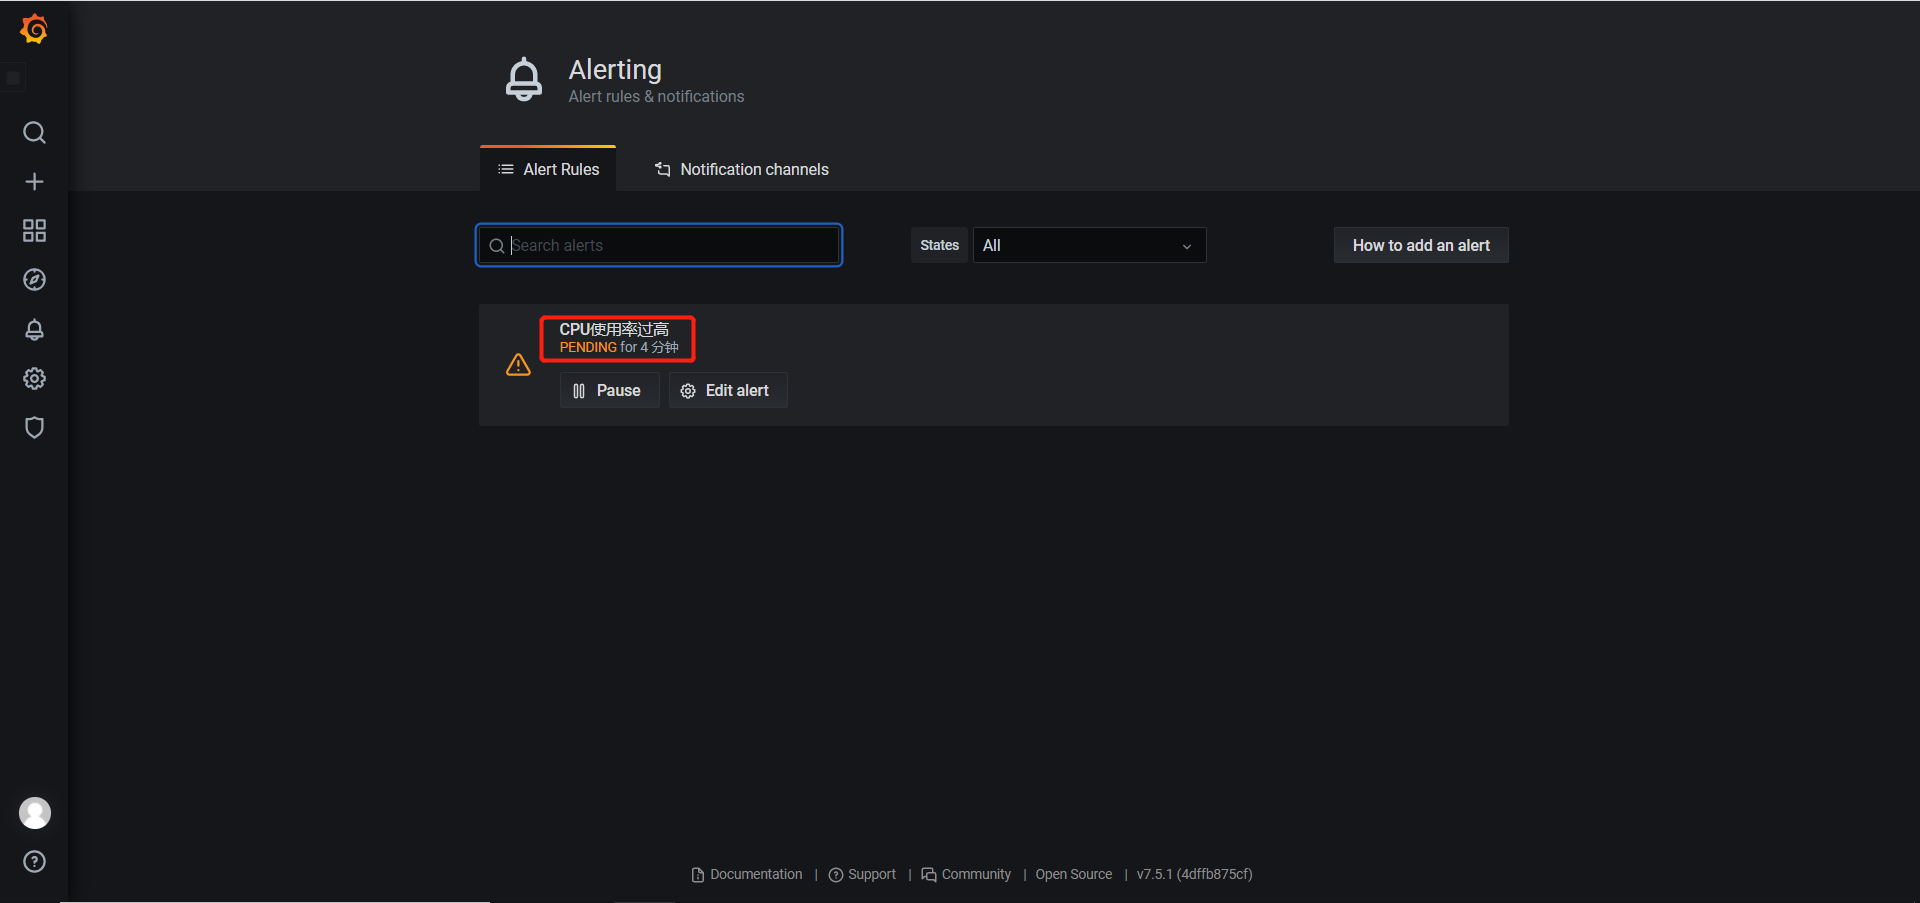
- 创建报警规则
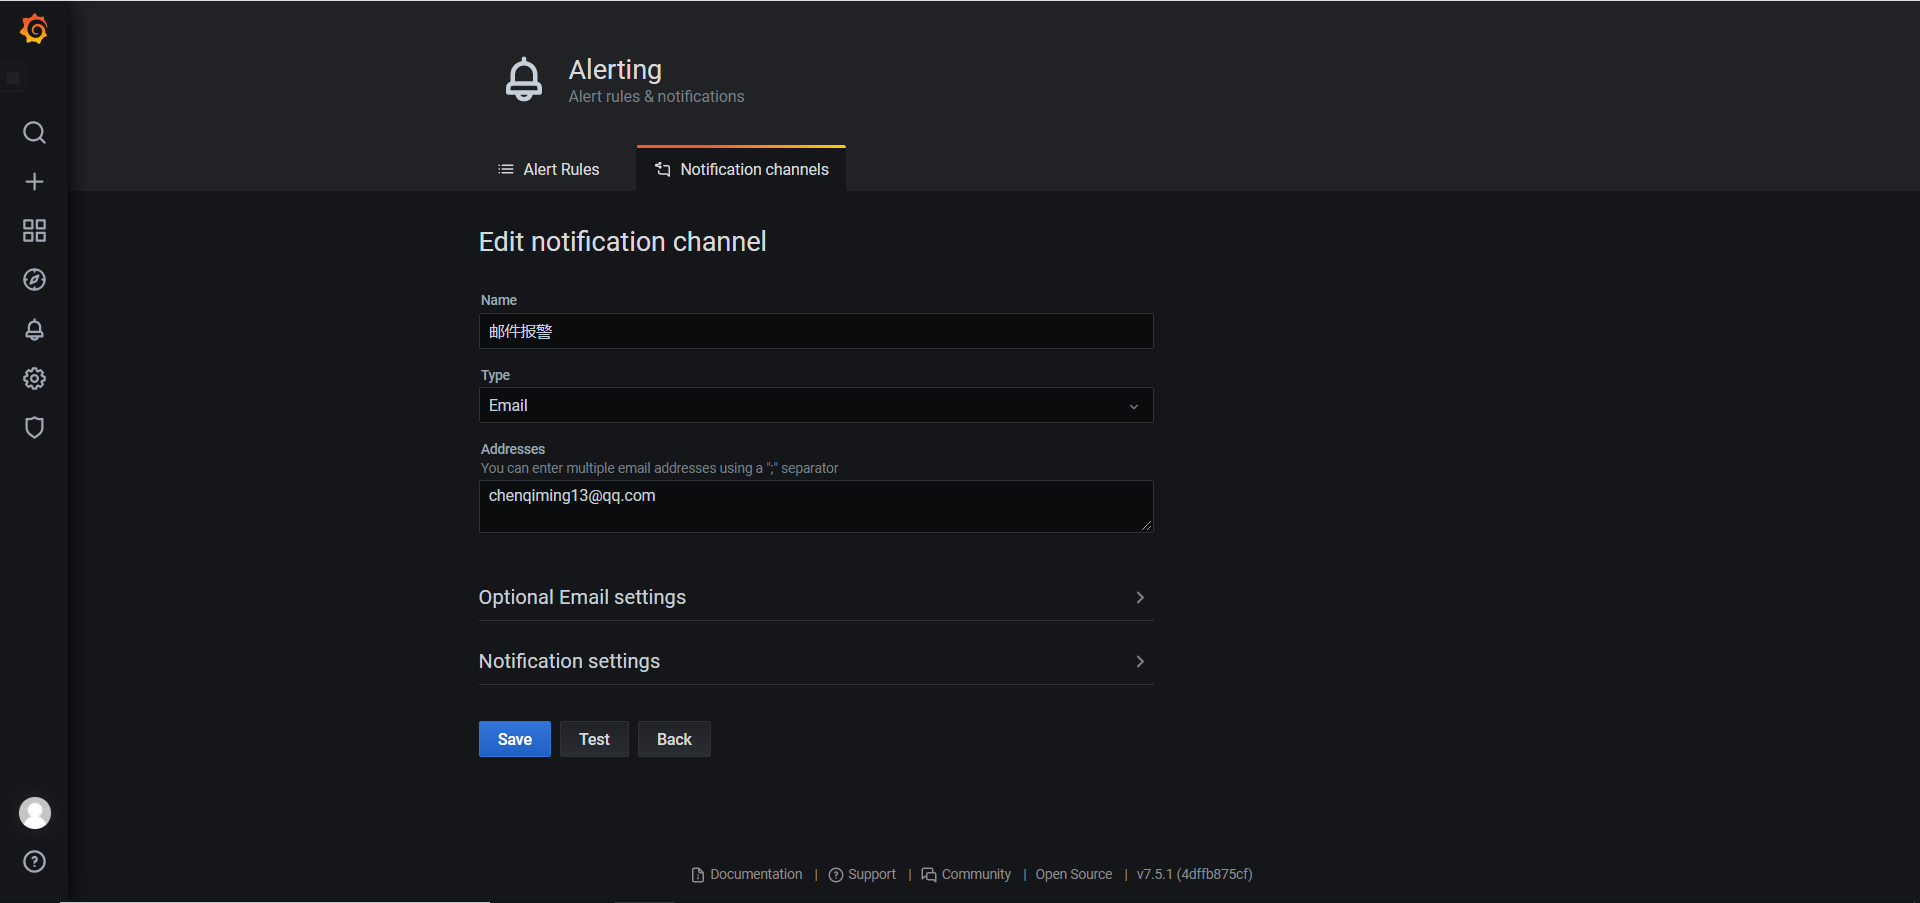
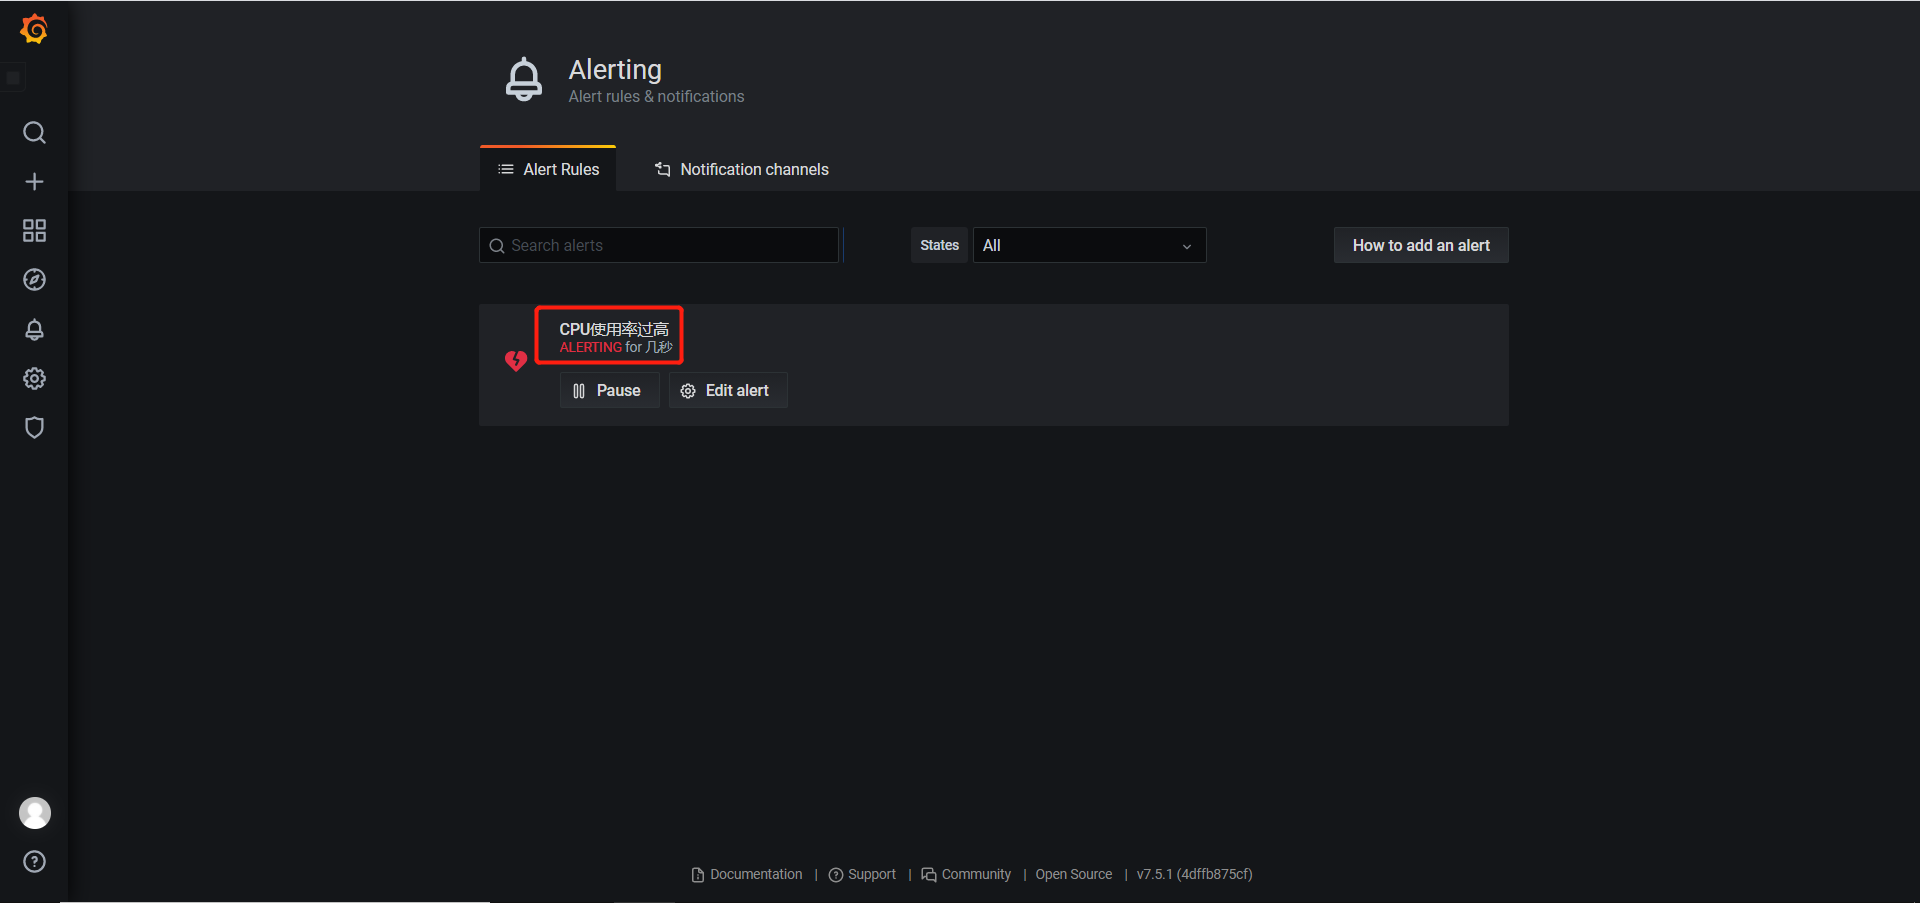
- 针对具体监控项,设置发送邮件阈值等,这里设置为发现超过阈值起5分钟后触发报警
/ 总容量)* 100,在Prometheus中表示为
1 | ((node_filesystem_size_bytes - node_filesystem_free_bytes) / node_filesystem_size_bytes) * 100 |
通过df -m可以看出计算出来的值是正确的

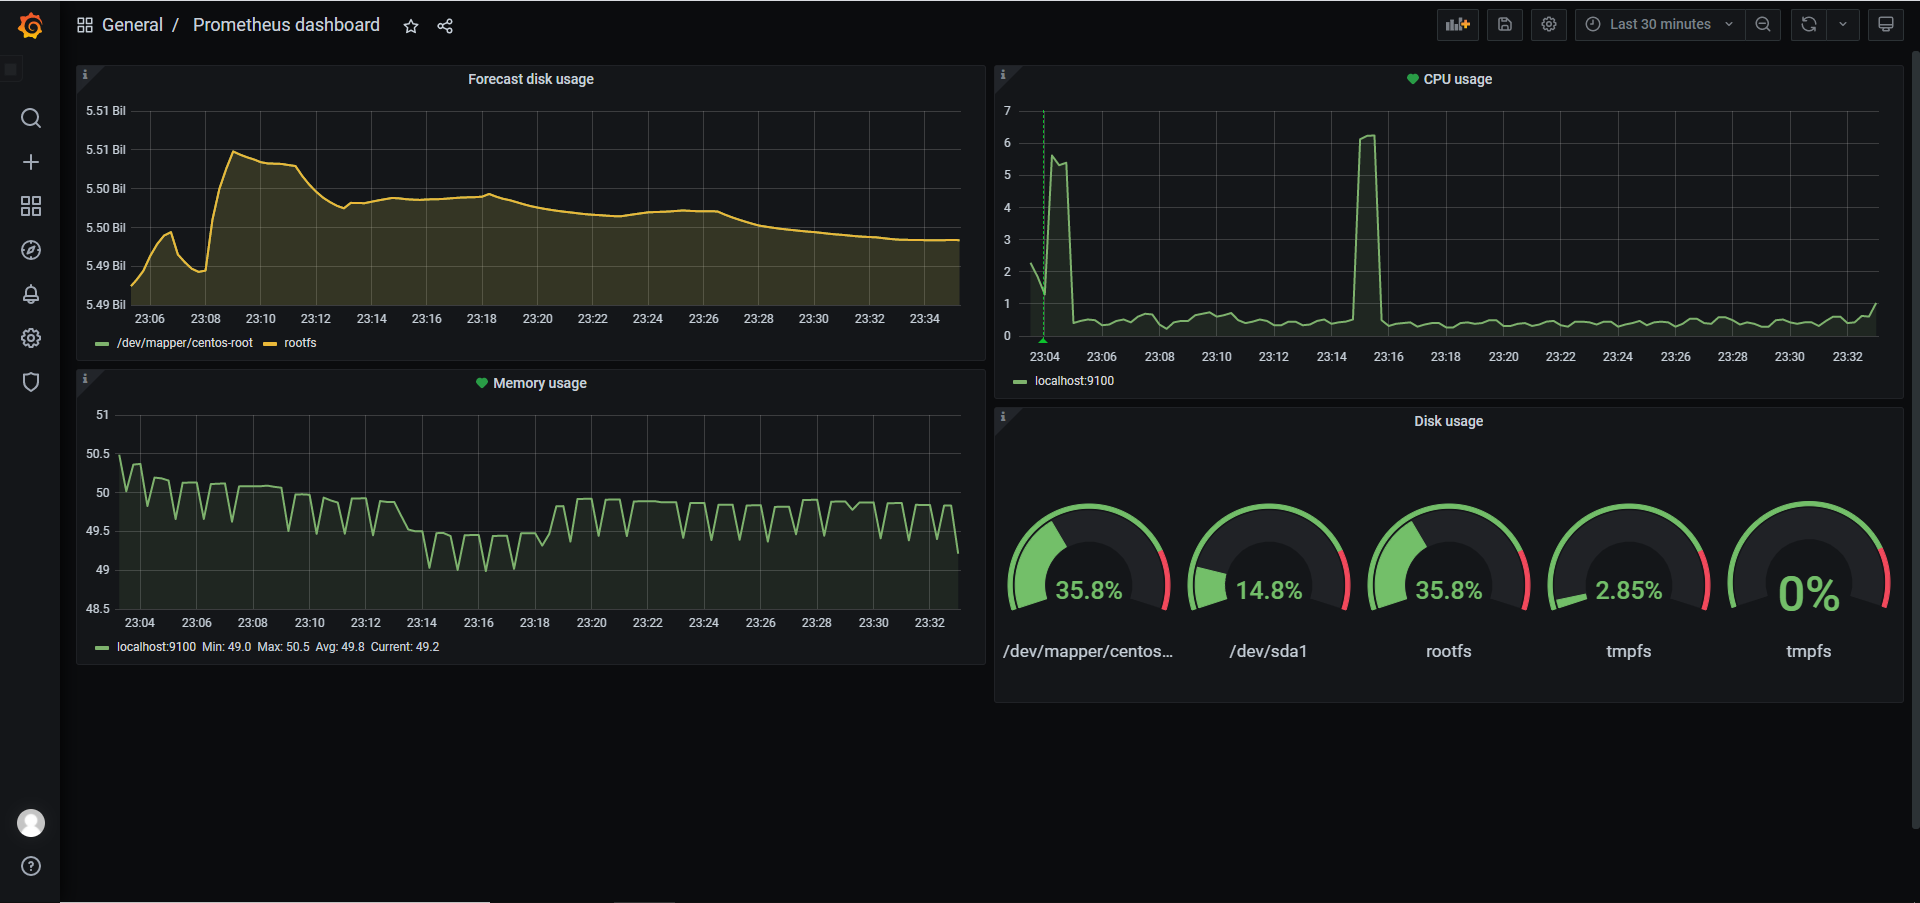
Prometheus提供了一个predict_linear函数可以预计多长时间磁盘爆满,例如当前这1个小时的磁盘可用率急剧下降,这种情况可能导致磁盘很快被写满,这时可以使用该函数,用当前1小时的数据去预测未来几个小时的状态,实现提前报警。
1 | 该式子表示用当前1小时的值来预测未来4小时后如果根目录下容量小于0则触发报警 |
在Grafana添加监控硬盘使用率和预测硬盘使用率的仪表盘
6.2 监控硬盘IO
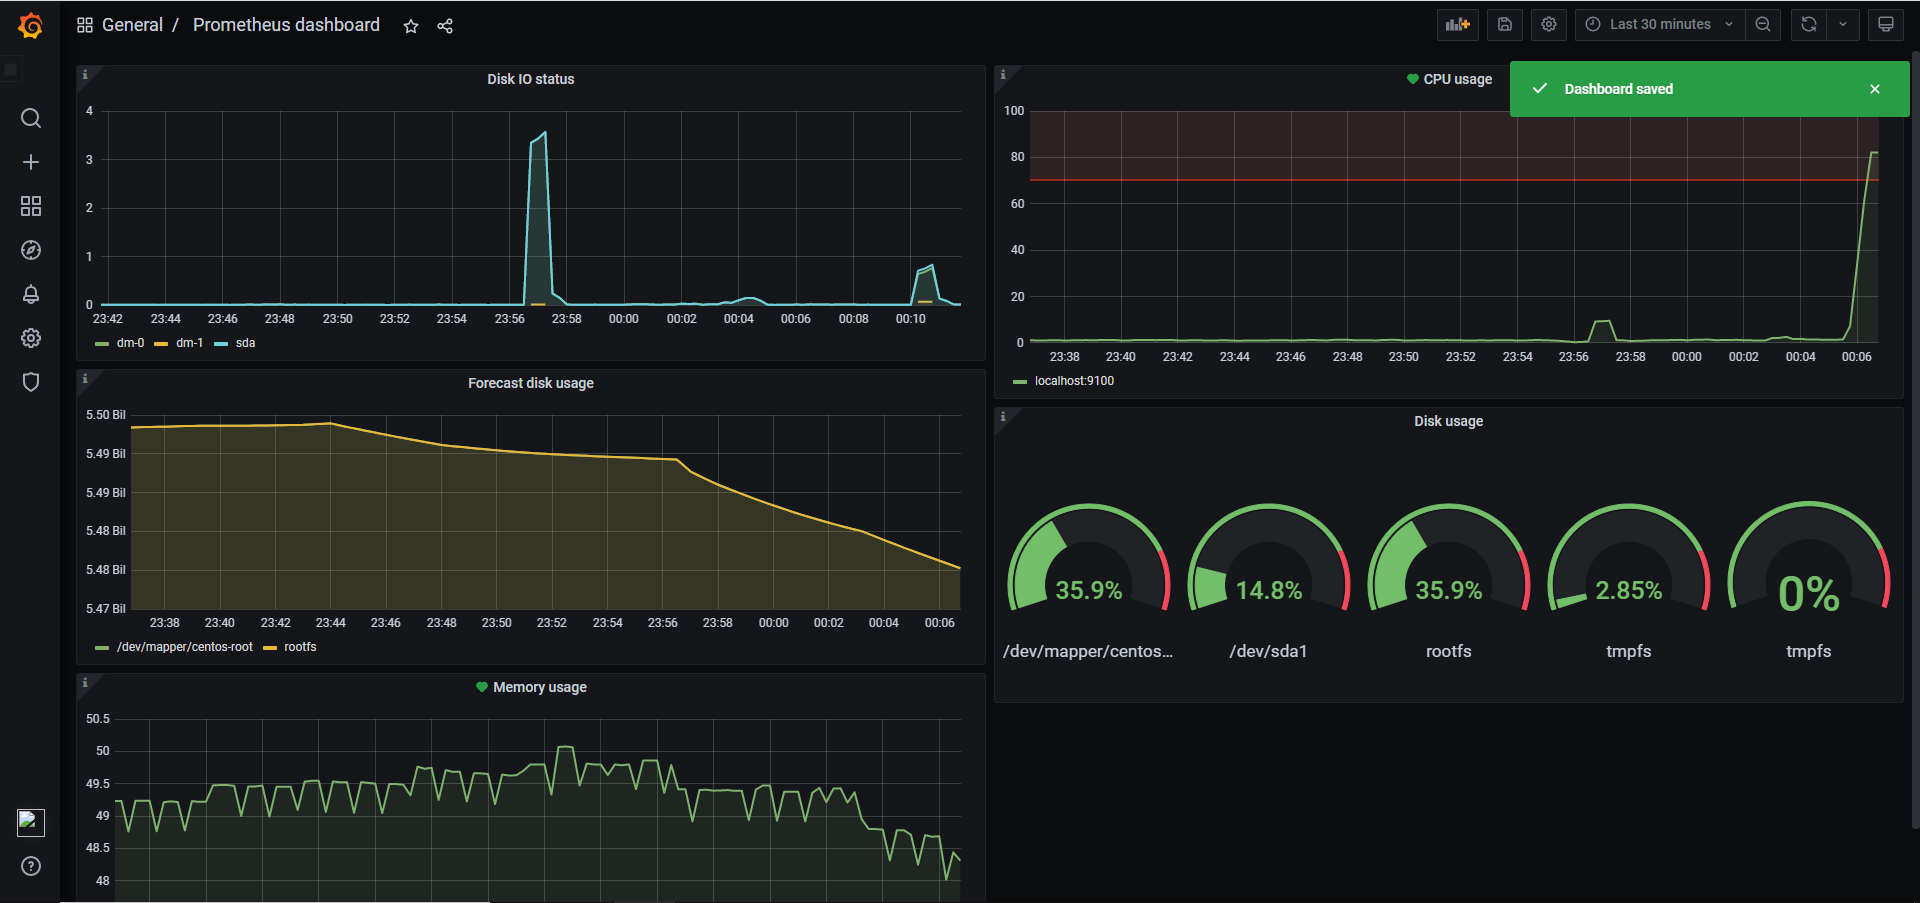
公式为:(读取时间 / 写入时间)/ 1024 / 1024,用rate函数取一分钟内读和写的字节增长率来计算,用Prometheus表示为
1 | ((rate(node_disk_read_bytes_total[1m]) + rate(node_disk_written_bytes_total[1m])) / 1024 / 1024) > 0 |
6.3 监控TCP_WAIT状态的数量
在被监控主机上编写监控脚本
1 | !/bin/bash |
6.4 监控文件描述符使用率
在linux中,每当进程打开一个文件时,系统就会为其分配一个唯一的整型文件描述符,用来标识这个文件,每个进程默认打开的文件描述符有三个,分别为标准输入、标准输出、标准错误,即stdin、stout、steer,用文件描述符来表示为0、1、2。
用命令可以查看目前系统的最大文件描述符限制,一般默认设置是1024。
1 | ulimit -n |
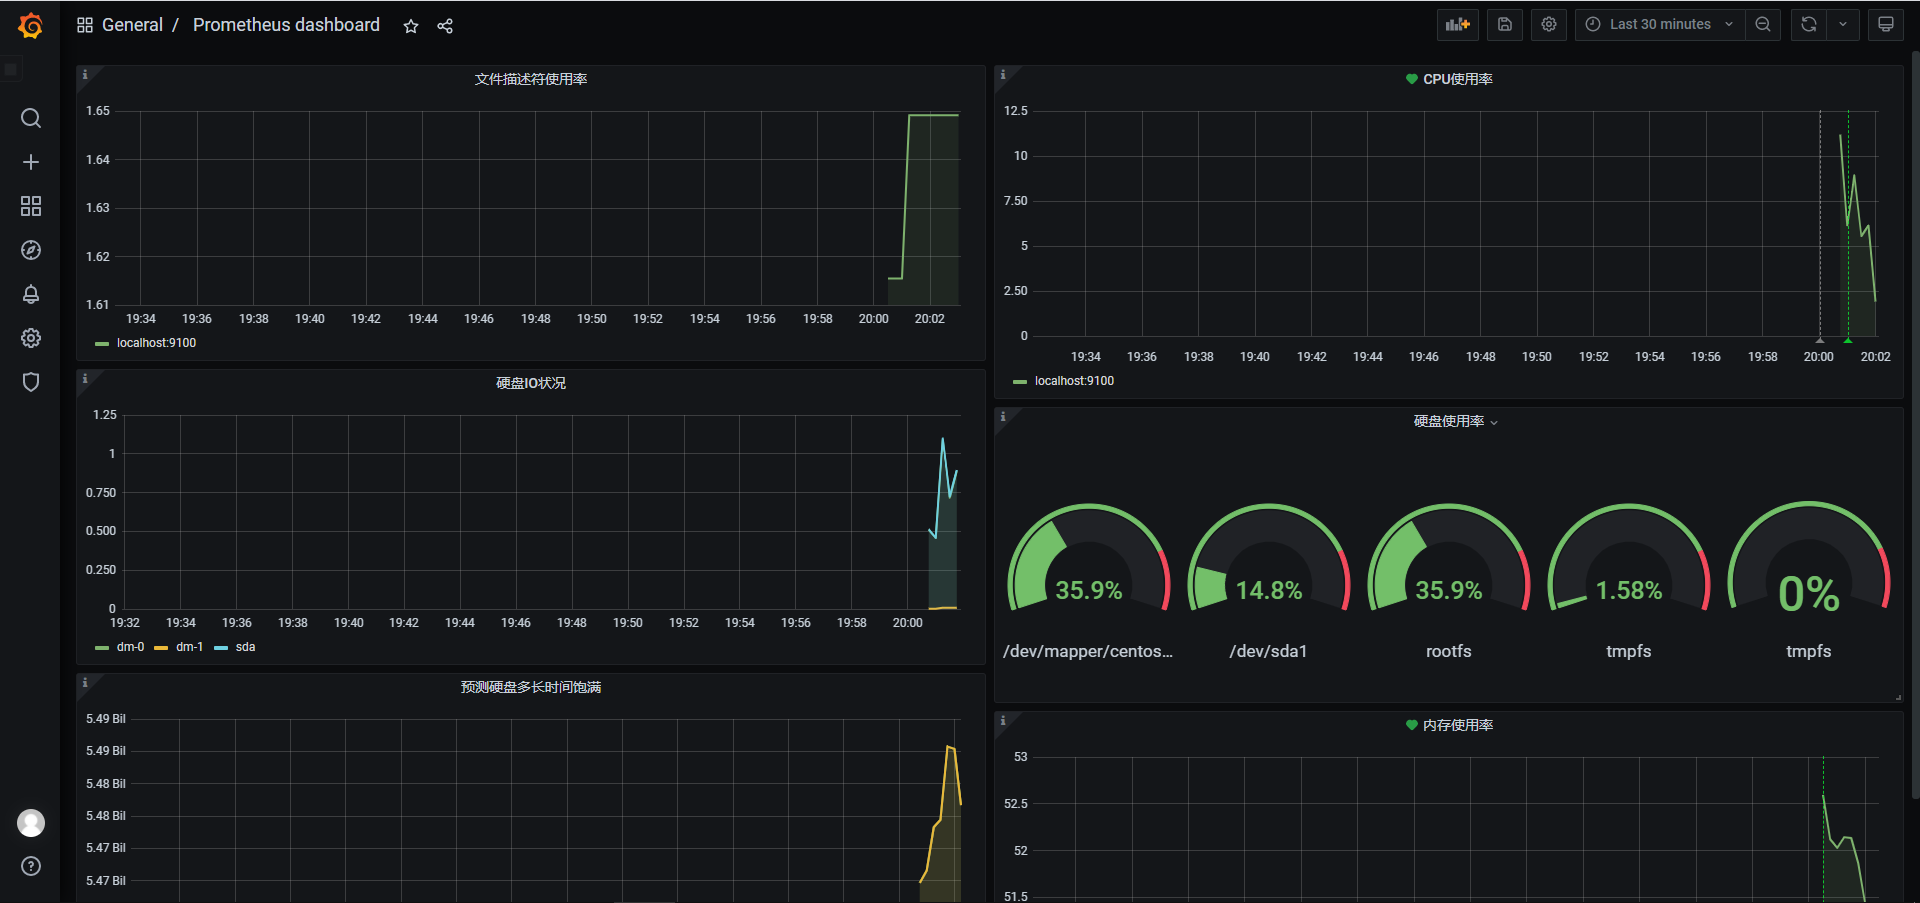
文件描述符使用率公式为:(已分配的文件描述符数量 / 最大文件描述符数量)* 100,在Prometheus中则表示为
1 | (node_filefd_allocated / node_filefd_maximum) * 100 |
6.5 网络延迟和丢包率监控
前面我们采用的都是简单的ping + ip地址来进行测试,实际上这样测试发出去的icmp数据包是非常小的,只适合用来测试网络是否连通,因此用以下命令来进行优化:
1 | ping -q ip地址 -s 500 -W 1000 -c 100 |
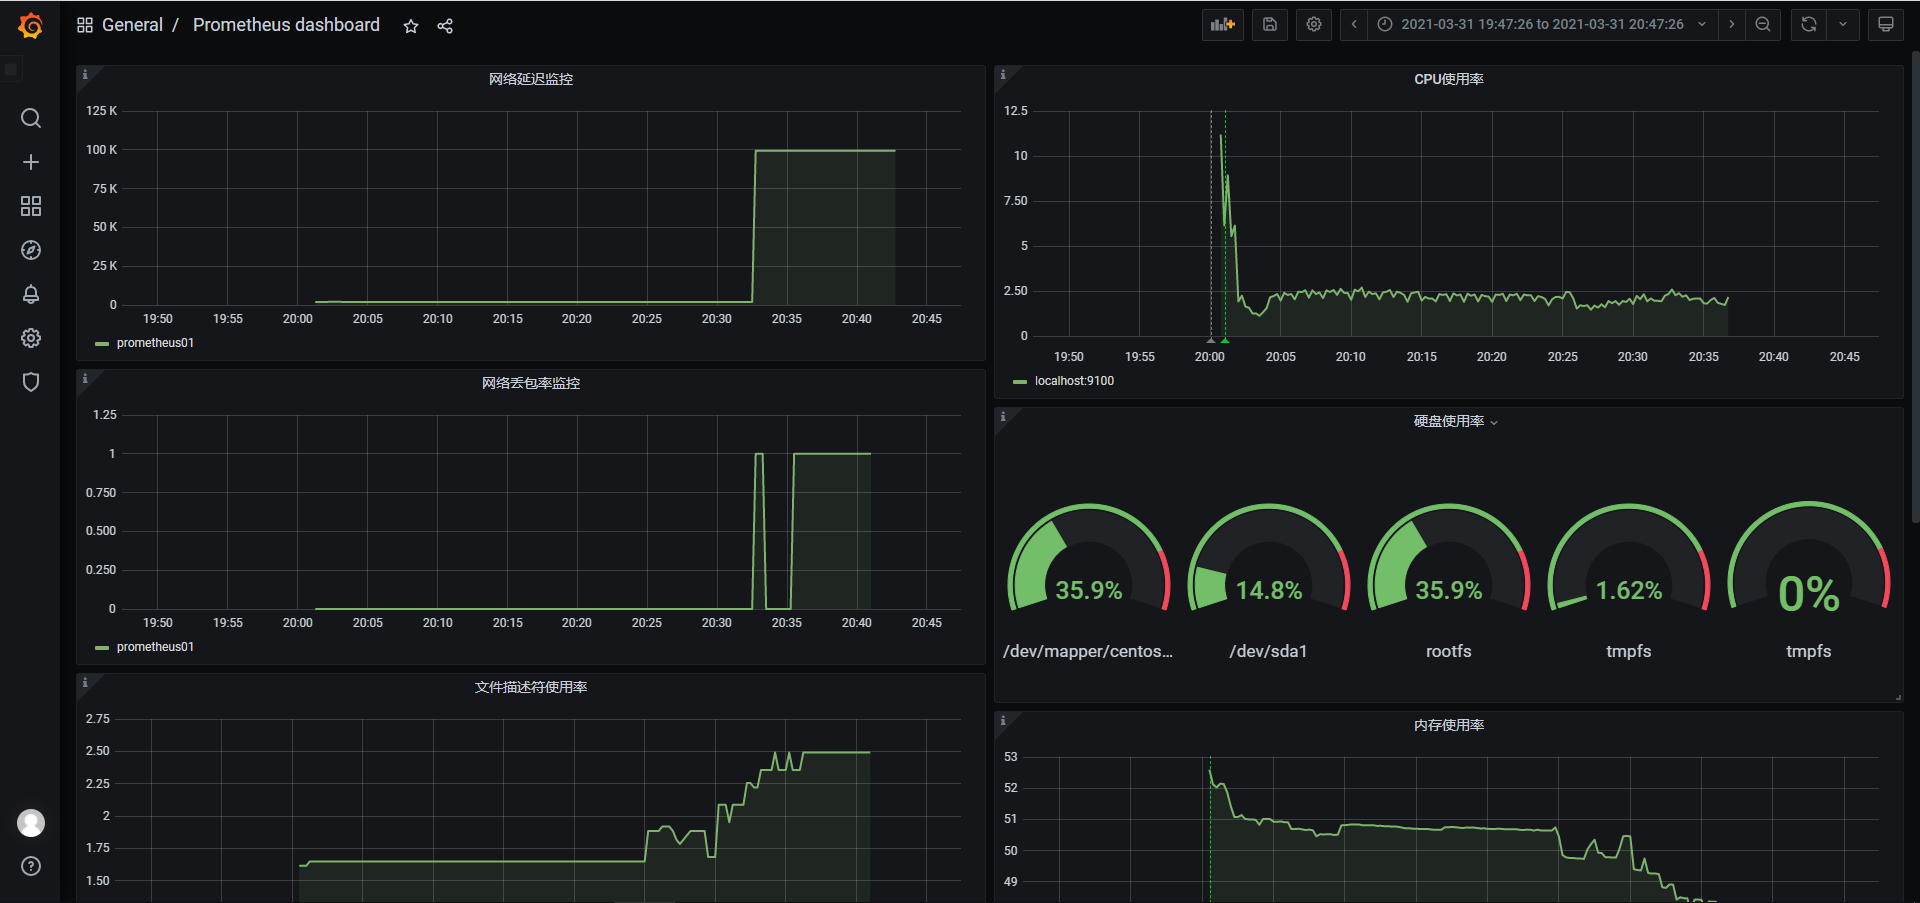
6.6 使用Pageduty实现报警
Pagerduty是一套付费监控报警系统,经常作为SRE/运维人员的监控报警工具,可以和市面上常见的监控工具直接整合。
- 创建新service

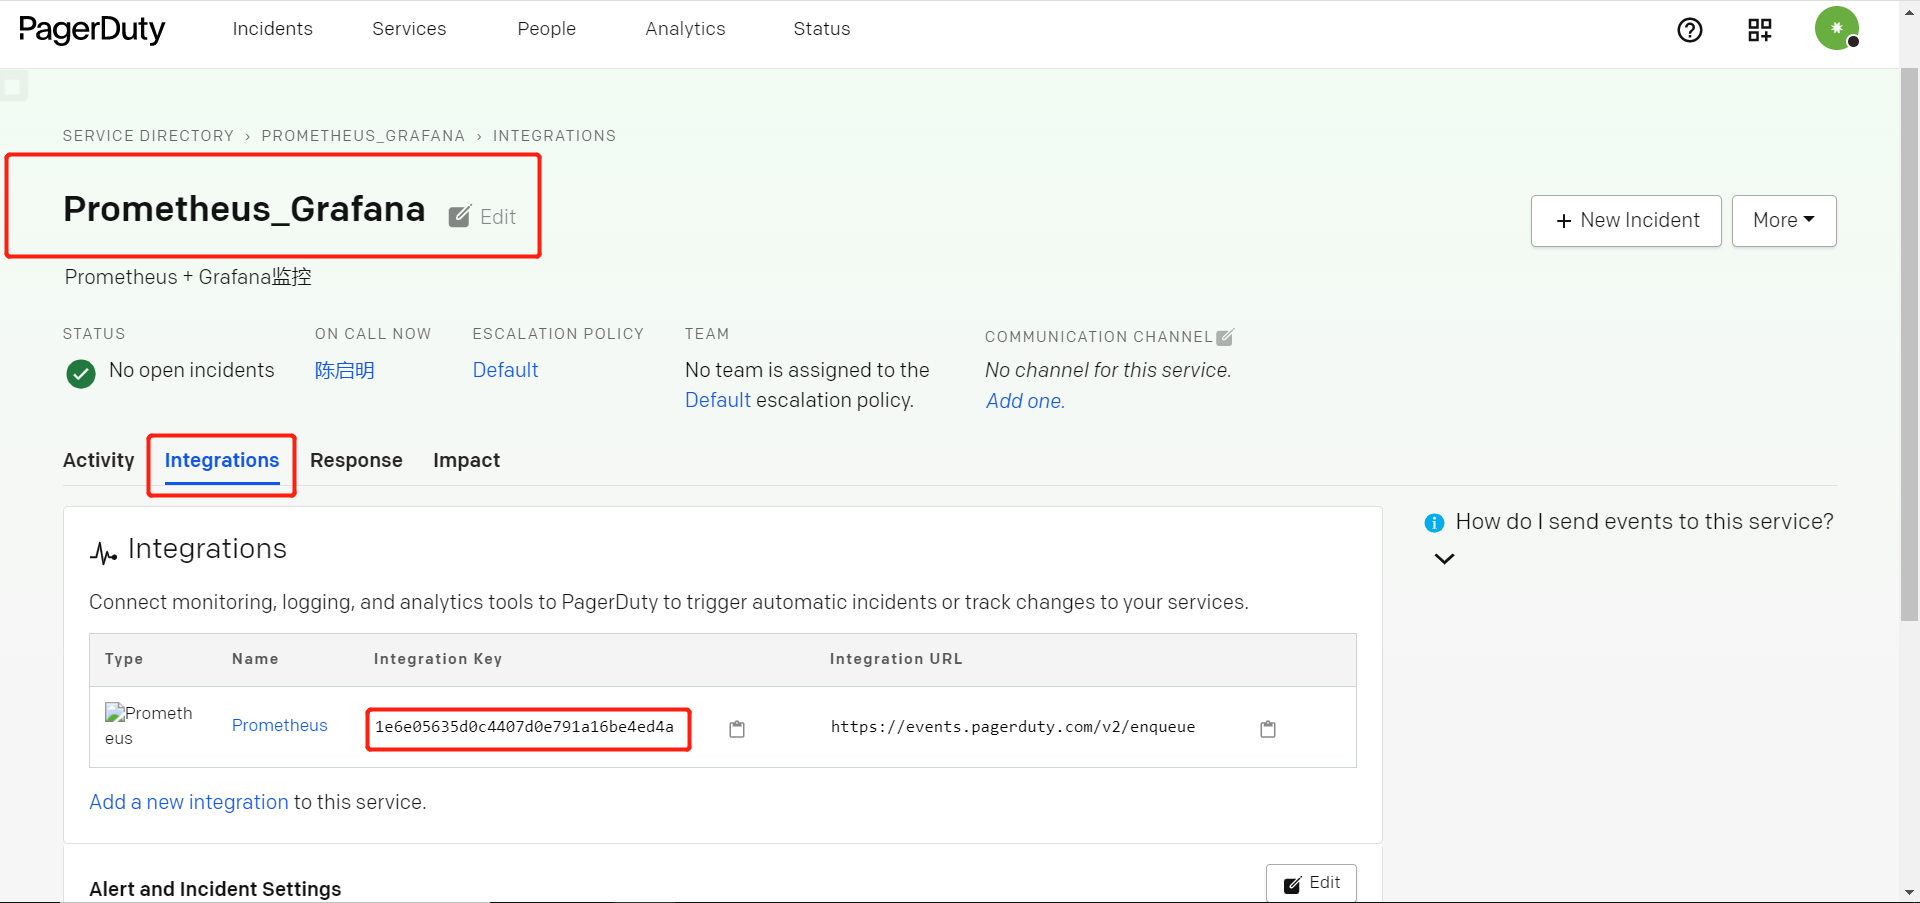
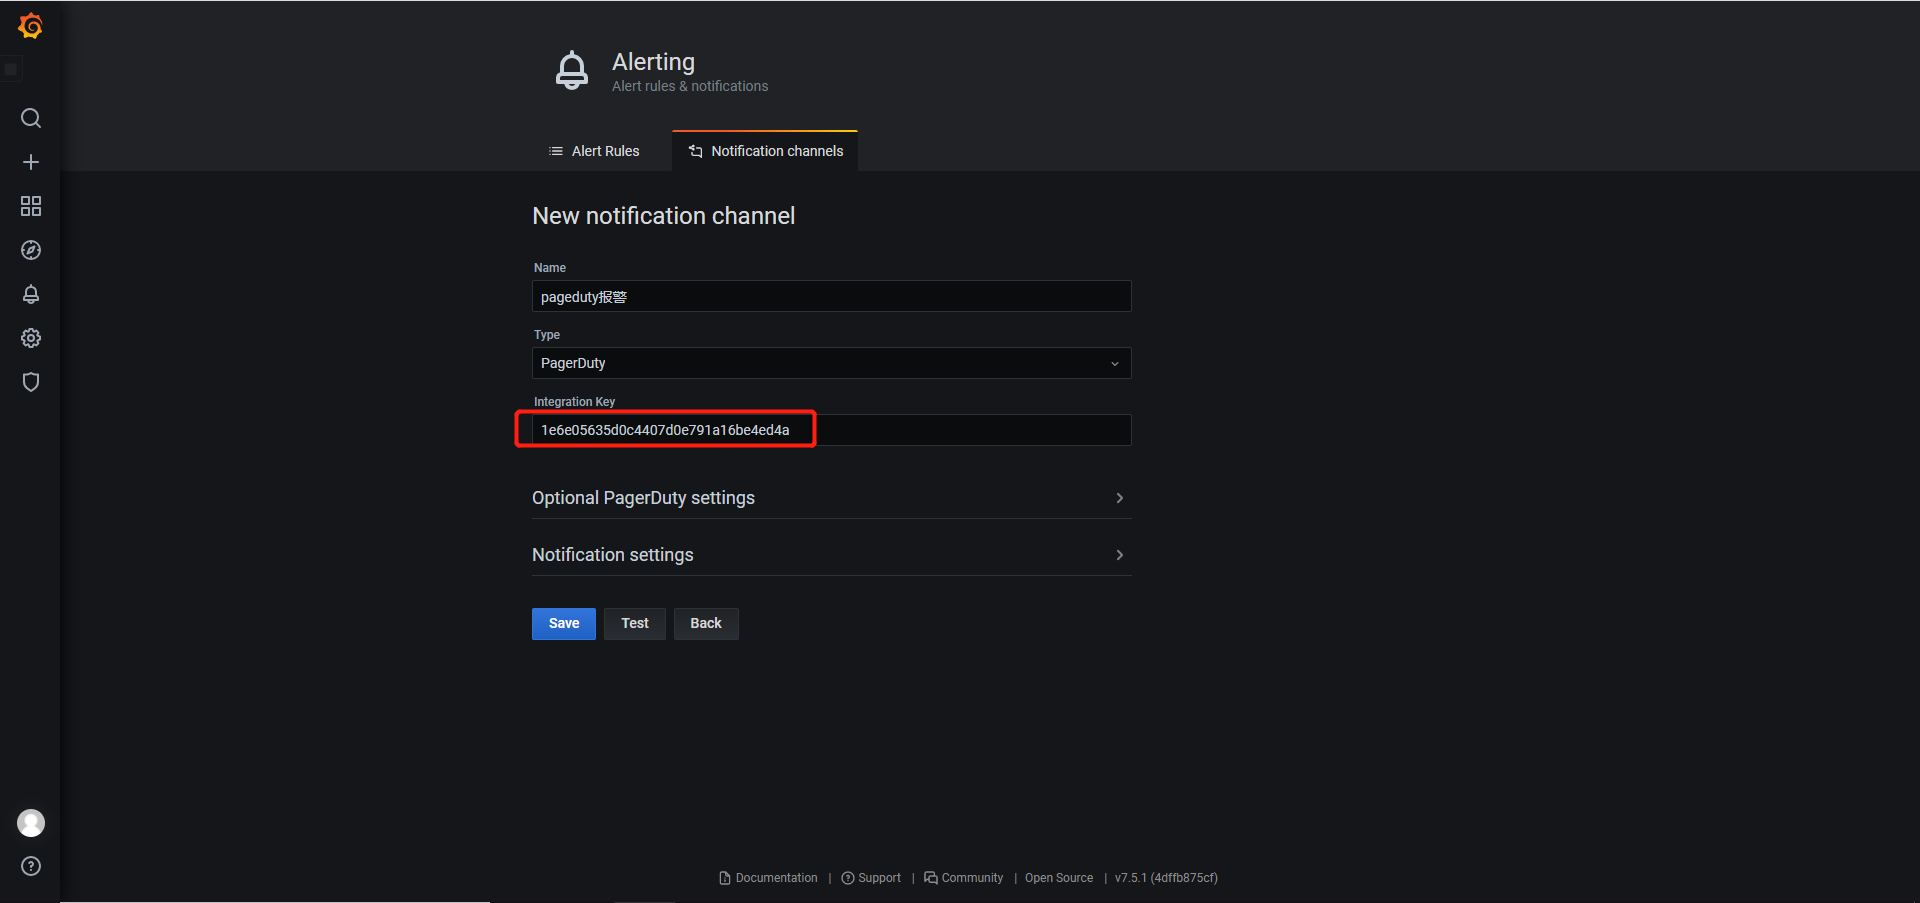
- 在Grafana新建报警渠道,并在仪表盘中设置为Pageduty报警
- 设置报警信息
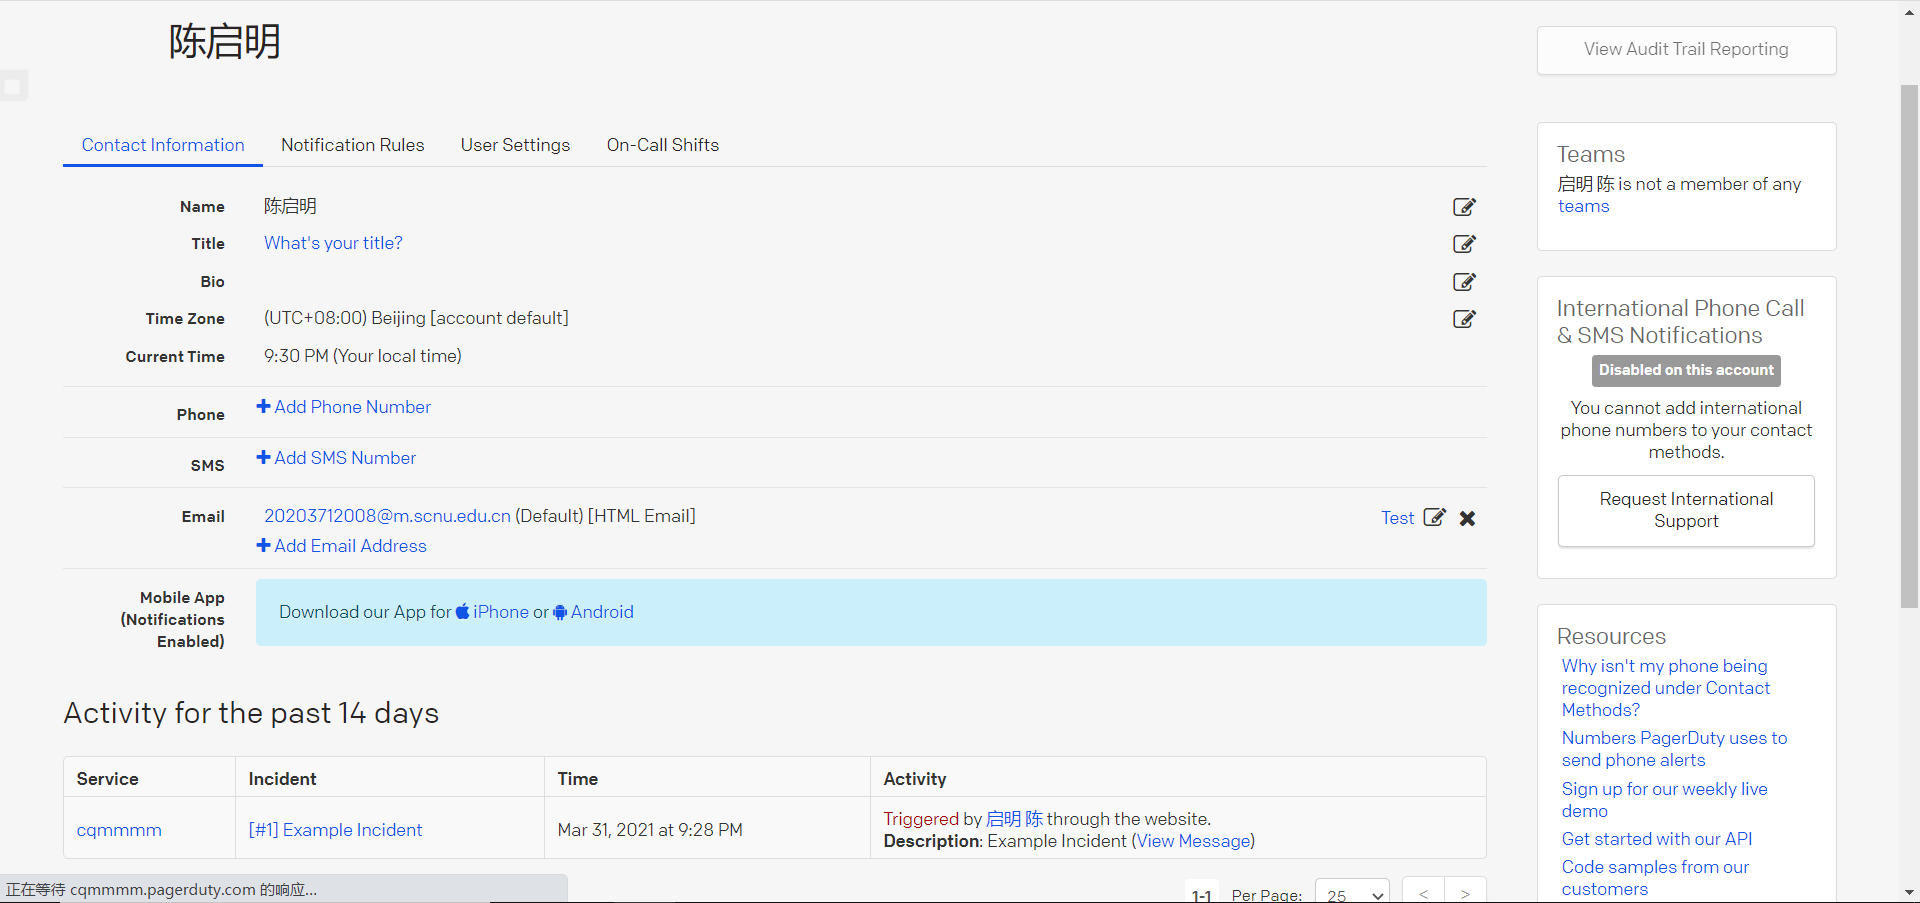
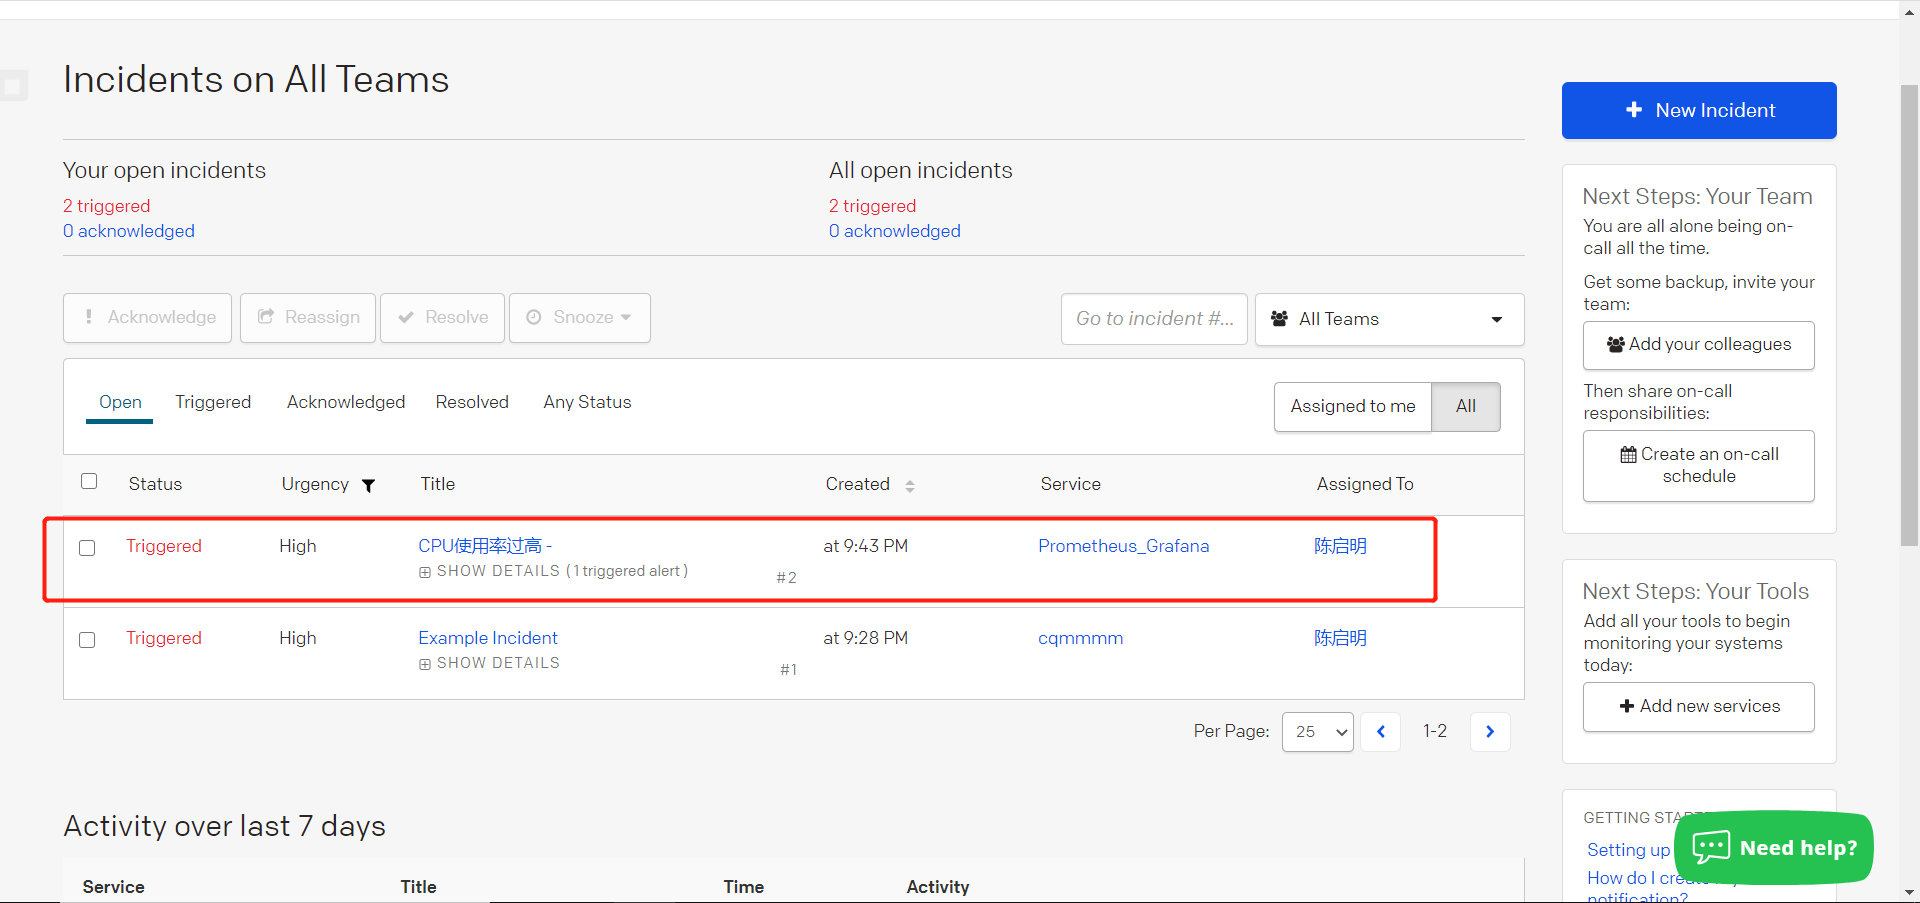
- 查看是否收到报警
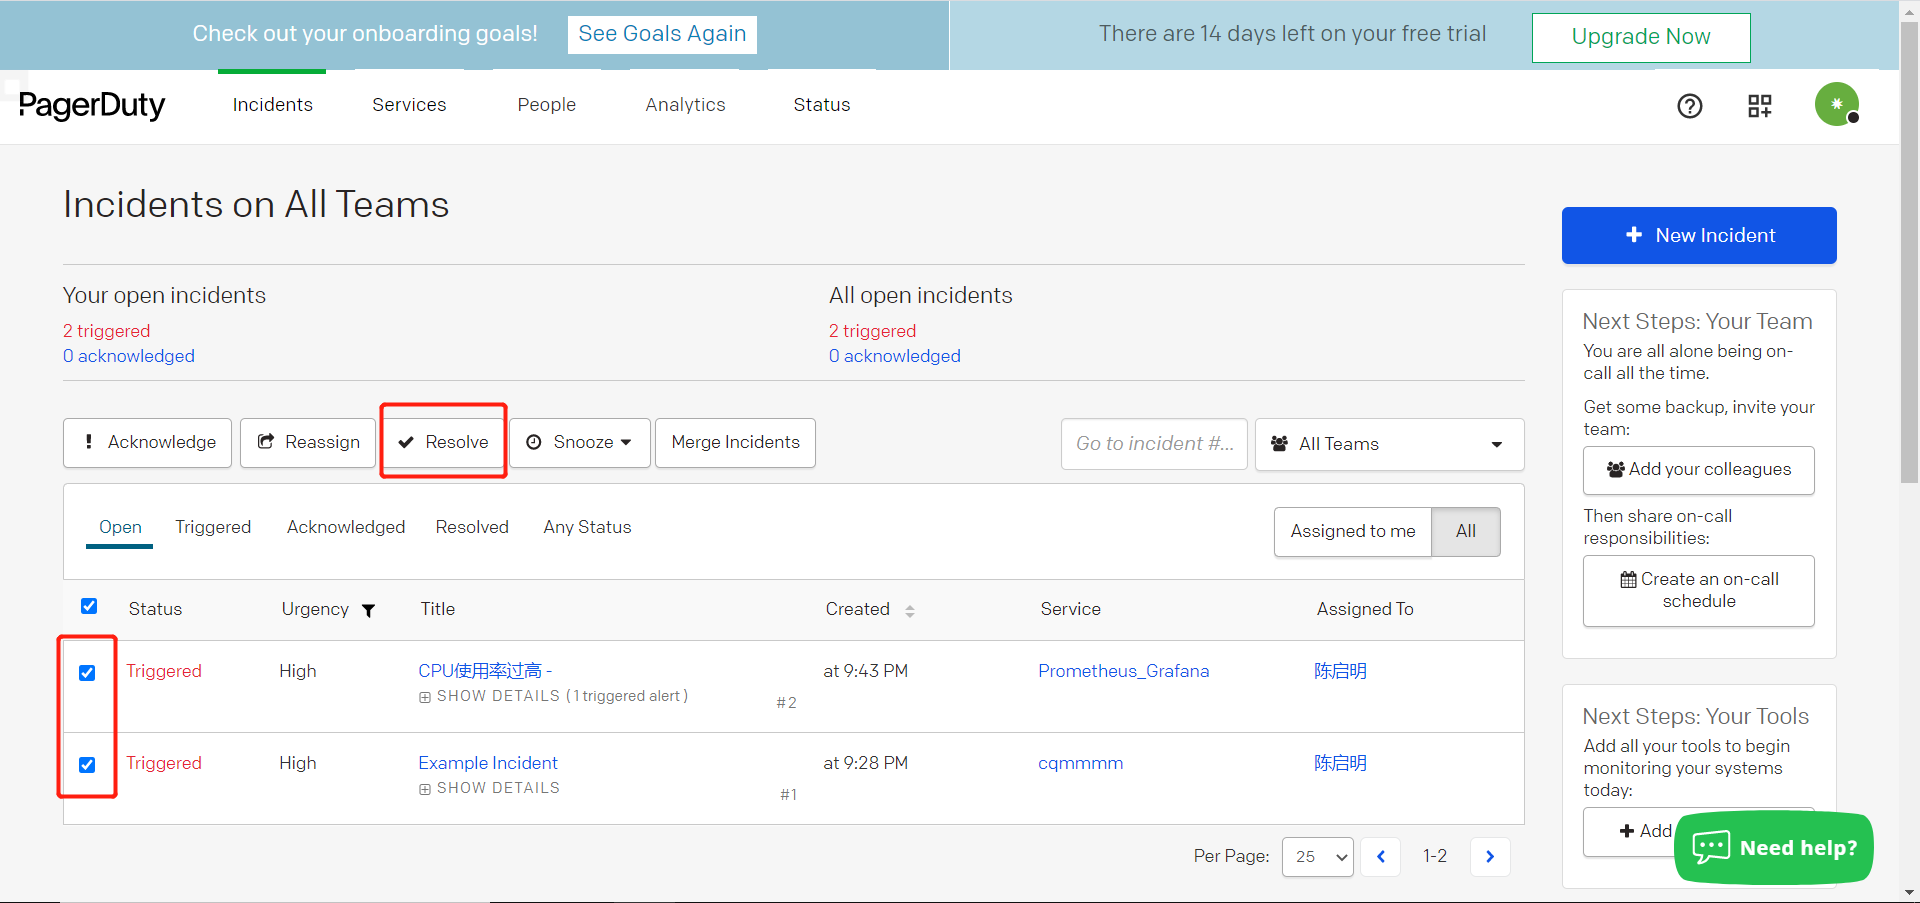
- 当问题解决可以点击已解决
install_url to use ShareThis. Please set it in _config.yml.