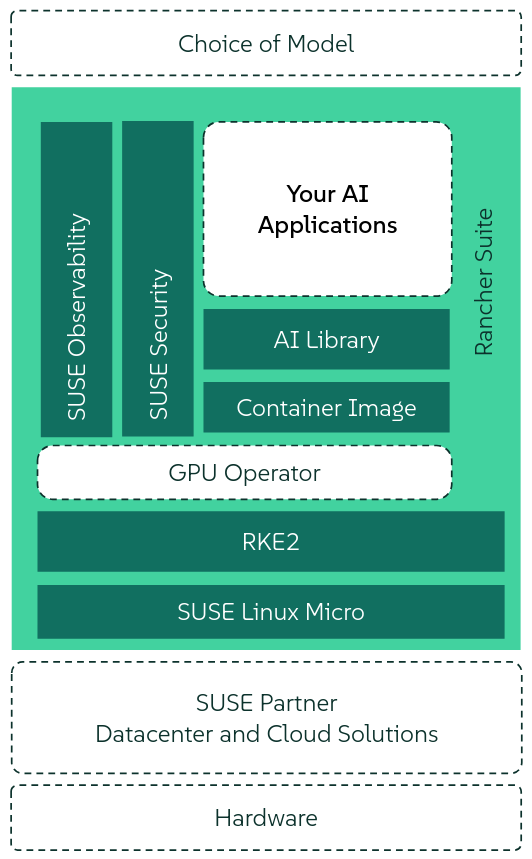
SUSE AI 是一个开放的生成式人工智能解决方案,主要包含以下组件:
- Ollama:简化本地设备上大型语言模型 (LLM) 安装和管理的平台。
- Open WebUI:Ollama LLM 运行程序的可扩展网络用户界面。
- Milvus:为生成式人工智能应用构建的向量数据库,性能损失最小。
部署参考链接:https://documentation.suse.com/suse-ai/1.0/html/AI-deployment-intro/index.html
安装前准备
安装 SUSE AI 前需要安装 cert-manager:
1
2
3
4
5
6
7
8
| helm repo add jetstack https://charts.jetstack.io
helm repo update
helm install \
cert-manager jetstack/cert-manager \
--namespace cert-manager \
--create-namespace \
--version v1.15.3 \
--set crds.enabled=true
|
还需要安装中间件使用的存储,这里使用 local-path:
1
| kubectl apply -f https://raw.githubusercontent.com/rancher/local-path-provisioner/v0.0.31/deploy/local-path-storage.yaml
|
其它安装前准备:
1
2
3
4
5
6
7
8
9
10
11
| kubectl create namespace suse-private-ai
kubectl create secret docker-registry application-collection \
--docker-server=dp.apps.rancher.io \
--docker-username=APPCO_USERNAME \
--docker-password=APPCO_USER_TOKEN \
-n suse-private-ai
helm registry login dp.apps.rancher.io/charts \
-u APPCO_USERNAME \
-p APPCO_USER_TOKEN
|
安装 Milvus
准备 Milvus 配置:
1
2
3
4
5
6
7
8
9
10
11
12
13
14
15
16
17
18
19
20
21
22
23
24
25
26
27
28
29
30
31
32
33
34
35
36
37
38
39
40
41
42
43
44
45
46
47
48
49
50
51
52
53
54
55
56
57
58
59
60
61
62
63
| cat <<EOF > milvus_custom_overrides.yaml
global:
imagePullSecrets:
- application-collection
cluster:
enabled: True
standalone:
persistence:
persistentVolumeClaim:
storageClass: local-path
etcd:
replicaCount: 1
persistence:
storageClassName: local-path
minio:
mode: standalone
replicas: 1
rootUser: "admin"
rootPassword: "adminminio"
persistence:
storageClass: local-path
resources:
requests:
memory: 1024Mi
persistence:
enabled: true
storageClass: local-path
accessMode: ReadWriteOnce
size: 10Gi
kafka:
enabled: true
name: kafka
replicaCount: 3
controller:
statefulset:
replicas: 1
broker:
enabled: true
statefulset:
replicas: 1
cluster:
listeners:
client:
protocol: 'PLAINTEXT'
controller:
protocol: 'PLAINTEXT'
persistence:
enabled: true
accessModes:
- ReadWriteOnce
resources:
requests:
storage: 5Gi
storageClassName: "local-path"
# 可选配置
extraConfigFiles:
user.yaml: |+
trace:
exporter: jaeger
sampleFraction: 1
jaeger:
url: "http://opentelemetry-collector.observability.svc.cluster.local:14268/api/traces"
EOF
|
如需自定义镜像仓库:
1
2
3
4
5
6
7
8
9
10
11
12
13
14
15
16
17
18
19
20
21
22
23
24
25
26
27
28
29
30
31
32
33
34
35
36
37
38
39
40
41
42
43
44
45
46
47
48
49
50
51
52
53
54
55
56
57
58
59
60
61
62
63
64
| cat <<EOF > milvus_custom_overrides.yaml
image:
all:
registry: harbor.warnerchen.com
repository: appco/containers/milvus
cluster:
enabled: True
standalone:
persistence:
persistentVolumeClaim:
storageClass: local-path
etcd:
replicaCount: 1
persistence:
storageClassName: local-path
minio:
mode: standalone
replicas: 1
rootUser: "admin"
rootPassword: "adminminio"
persistence:
storageClass: local-path
resources:
requests:
memory: 1024Mi
persistence:
enabled: true
storageClass: local-path
accessMode: ReadWriteOnce
size: 10Gi
kafka:
enabled: true
name: kafka
replicaCount: 3
controller:
statefulset:
replicas: 1
broker:
enabled: true
statefulset:
replicas: 1
cluster:
listeners:
client:
protocol: 'PLAINTEXT'
controller:
protocol: 'PLAINTEXT'
persistence:
enabled: true
accessModes:
- ReadWriteOnce
resources:
requests:
storage: 5Gi
storageClassName: "local-path"
# 可选配置
extraConfigFiles:
user.yaml: |+
trace:
exporter: jaeger
sampleFraction: 1
jaeger:
url: "http://opentelemetry-collector.observability.svc.cluster.local:14268/api/traces"
EOF
|
安装 Milvus:
1
2
3
| helm upgrade --install milvus oci://dp.apps.rancher.io/charts/milvus \
-n suse-private-ai \
--version 4.2.2 -f milvus_custom_overrides.yaml
|
安装 Ollama
准备 Ollama 配置:
1
2
3
4
5
6
7
8
9
10
11
12
13
14
15
16
17
18
19
20
21
22
23
| cat <<EOF > ollama_custom_overrides.yaml
global:
imagePullSecrets:
- application-collection
replicaCount: 1
runtimeClassName: "nvidia"
ingress:
enabled: false
defaultModel: "deepseek-r1:1.5b"
ollama:
models:
pull:
- "deepseek-r1:1.5b"
run:
- "deepseek-r1:1.5b"
gpu:
enabled: true
type: 'nvidia'
number: 1
persistentVolume:
enabled: true
storageClass: local-path
EOF
|
如需自定义镜像仓库:
1
2
3
4
5
6
7
8
9
10
11
12
13
14
15
16
17
18
19
20
21
22
23
24
| cat <<EOF > ollama_custom_overrides.yaml
image:
repository: appco/containers/ollama
registry: harbor.warnerchen.com
pullPolicy: IfNotPresent
replicaCount: 1
runtimeClassName: "nvidia"
ingress:
enabled: false
defaultModel: "deepseek-r1:1.5b"
ollama:
models:
pull:
- "deepseek-r1:1.5b"
run:
- "deepseek-r1:1.5b"
gpu:
enabled: true
type: 'nvidia'
number: 1
persistentVolume:
enabled: true
storageClass: local-path
EOF
|
安装 Ollama:
1
2
3
| helm upgrade --install ollama oci://dp.apps.rancher.io/charts/ollama \
-n suse-private-ai \
--version 0.6.8 -f ollama_custom_overrides.yaml
|
安装 Open WebUI
准备 Open WebUI 配置:
1
2
3
4
5
6
7
8
9
10
11
12
13
14
15
16
17
18
19
20
21
22
23
24
25
26
27
28
29
30
31
32
33
34
35
36
37
38
39
40
41
42
43
| cat <<EOF > owui_custom_overrides.yaml
global:
imagePullSecrets:
- application-collection
ollamaUrls:
- http://ollama.suse-private-ai.svc.cluster.local:11434
persistence:
enabled: true
storageClass: local-path
ollama:
enabled: false
pipelines:
enabled: false
ingress:
enabled: true
class: "nginx"
annotations:
nginx.ingress.kubernetes.io/ssl-redirect: "true"
host: suse-ai-open-webui.warnerchen.com
tls: true
extraEnvVars:
- name: DEFAULT_MODELS
value: "deepseek-r1:1.5b"
- name: DEFAULT_USER_ROLE
value: "user"
- name: WEBUI_NAME
value: "SUSE AI"
- name: GLOBAL_LOG_LEVEL
value: INFO
- name: RAG_EMBEDDING_MODEL
value: "sentence-transformers/all-MiniLM-L6-v2"
- name: VECTOR_DB
value: "milvus"
- name: MILVUS_URI
value: http://milvus.suse-private-ai.svc.cluster.local:19530
- name: INSTALL_NLTK_DATASETS
value: "true"
# 可选配置
- name: ENABLE_OTEL
value: "true"
- name: OTEL_EXPORTER_OTLP_ENDPOINT
value: http://opentelemetry-collector.observability.svc.cluster.local:4317
EOF
|
如需自定义镜像仓库:
1
2
3
4
5
6
7
8
9
10
11
12
13
14
15
16
17
18
19
20
21
22
23
24
25
26
27
28
29
30
31
32
33
34
35
36
37
38
39
40
41
42
43
44
| cat <<EOF > owui_custom_overrides.yaml
image:
registry: harbor.warnerchen.com
repository: appco/containers/open-webui
pullPolicy: IfNotPresent
ollamaUrls:
- http://ollama.suse-private-ai.svc.cluster.local:11434
persistence:
enabled: true
storageClass: local-path
ollama:
enabled: false
pipelines:
enabled: false
ingress:
enabled: true
class: "nginx"
annotations:
nginx.ingress.kubernetes.io/ssl-redirect: "true"
host: suse-ai-open-webui.warnerchen.com
tls: true
extraEnvVars:
- name: DEFAULT_MODELS
value: "deepseek-r1:1.5b"
- name: DEFAULT_USER_ROLE
value: "user"
- name: WEBUI_NAME
value: "SUSE AI"
- name: GLOBAL_LOG_LEVEL
value: INFO
- name: RAG_EMBEDDING_MODEL
value: "sentence-transformers/all-MiniLM-L6-v2"
- name: VECTOR_DB
value: "milvus"
- name: MILVUS_URI
value: http://milvus.suse-private-ai.svc.cluster.local:19530
- name: INSTALL_NLTK_DATASETS
value: "true"
# 可选配置
- name: ENABLE_OTEL
value: "true"
- name: OTEL_EXPORTER_OTLP_ENDPOINT
value: http://opentelemetry-collector.observability.svc.cluster.local:4317
EOF
|
安装 Open WebUI:
1
2
3
| helm upgrade --install open-webui oci://dp.apps.rancher.io/charts/open-webui \
-n suse-private-ai \
--version 0.6.9 -f owui_custom_overrides.yaml
|
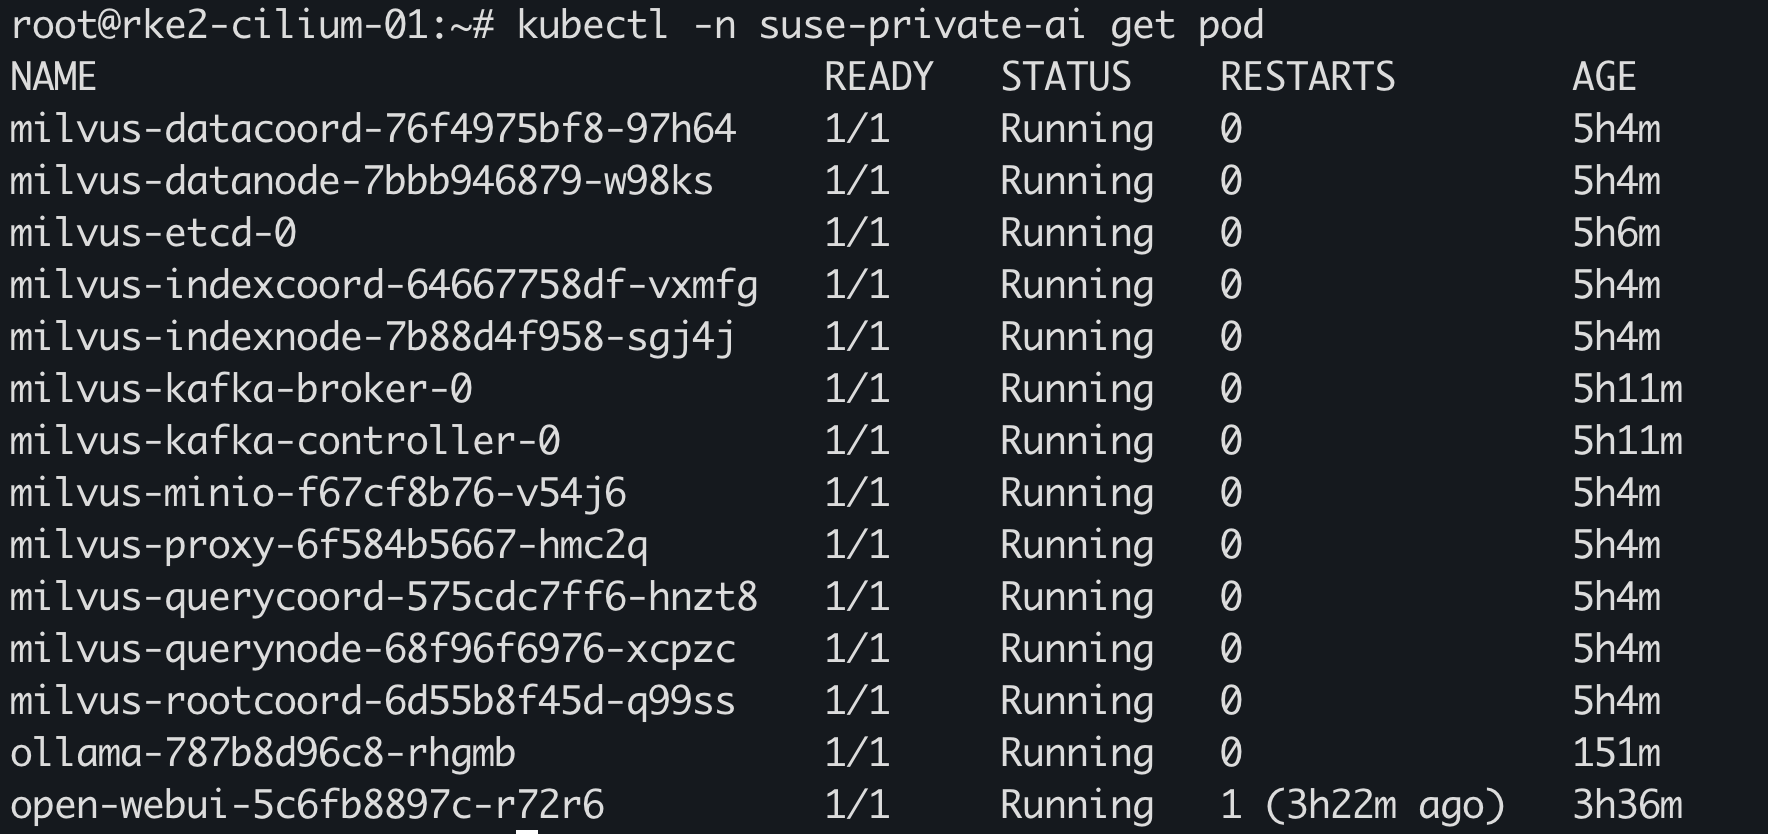
等待所有 Pod 正常运行:
1
2
3
4
5
6
7
8
9
10
11
12
13
14
15
16
17
18
19
20
21
22
23
| root@suse-o11y-01:~# helm -n suse-private-ai ls
NAME NAMESPACE REVISION UPDATED STATUS CHART APP VERSION
milvus suse-private-ai 1 2025-08-12 10:15:32.150413955 +0800 CST deployed milvus-4.2.2 2.4.6
ollama suse-private-ai 1 2025-08-12 11:34:18.24052066 +0800 CST deployed ollama-1.16.0 0.6.8
open-webui suse-private-ai 2 2025-08-12 15:48:17.10667584 +0800 CST deployed open-webui-6.13.0 0.6.9
root@suse-o11y-01:~# kubectl -n suse-private-ai get pod
NAME READY STATUS RESTARTS AGE
milvus-datacoord-d46f8c674-67m2v 1/1 Running 2 (2d8h ago) 2d8h
milvus-datanode-58664f8c67-4ms2s 1/1 Running 2 (2d8h ago) 2d8h
milvus-etcd-0 1/1 Running 0 2d8h
milvus-indexcoord-849df85749-tvt2s 1/1 Running 0 2d8h
milvus-indexnode-7bbb6bd84-znpb6 1/1 Running 1 (2d8h ago) 2d8h
milvus-kafka-broker-0 1/1 Running 0 2d8h
milvus-kafka-controller-0 1/1 Running 0 2d8h
milvus-minio-7f9f9b4d76-949cr 1/1 Running 0 2d8h
milvus-proxy-57c54df4d5-ggcnk 1/1 Running 2 (2d8h ago) 2d8h
milvus-querycoord-85845fcf56-kt7h5 1/1 Running 2 (2d8h ago) 2d8h
milvus-querynode-67fff4f47d-82482 1/1 Running 2 (2d8h ago) 2d8h
milvus-rootcoord-bd7958978-ssrmz 1/1 Running 2 (2d8h ago) 2d8h
ollama-85cf4f777b-r9nkv 1/1 Running 0 79m
open-webui-0 1/1 Running 0 2m45s
open-webui-redis-7c65fd96bb-67n6s 1/1 Running 0 2d6h
|
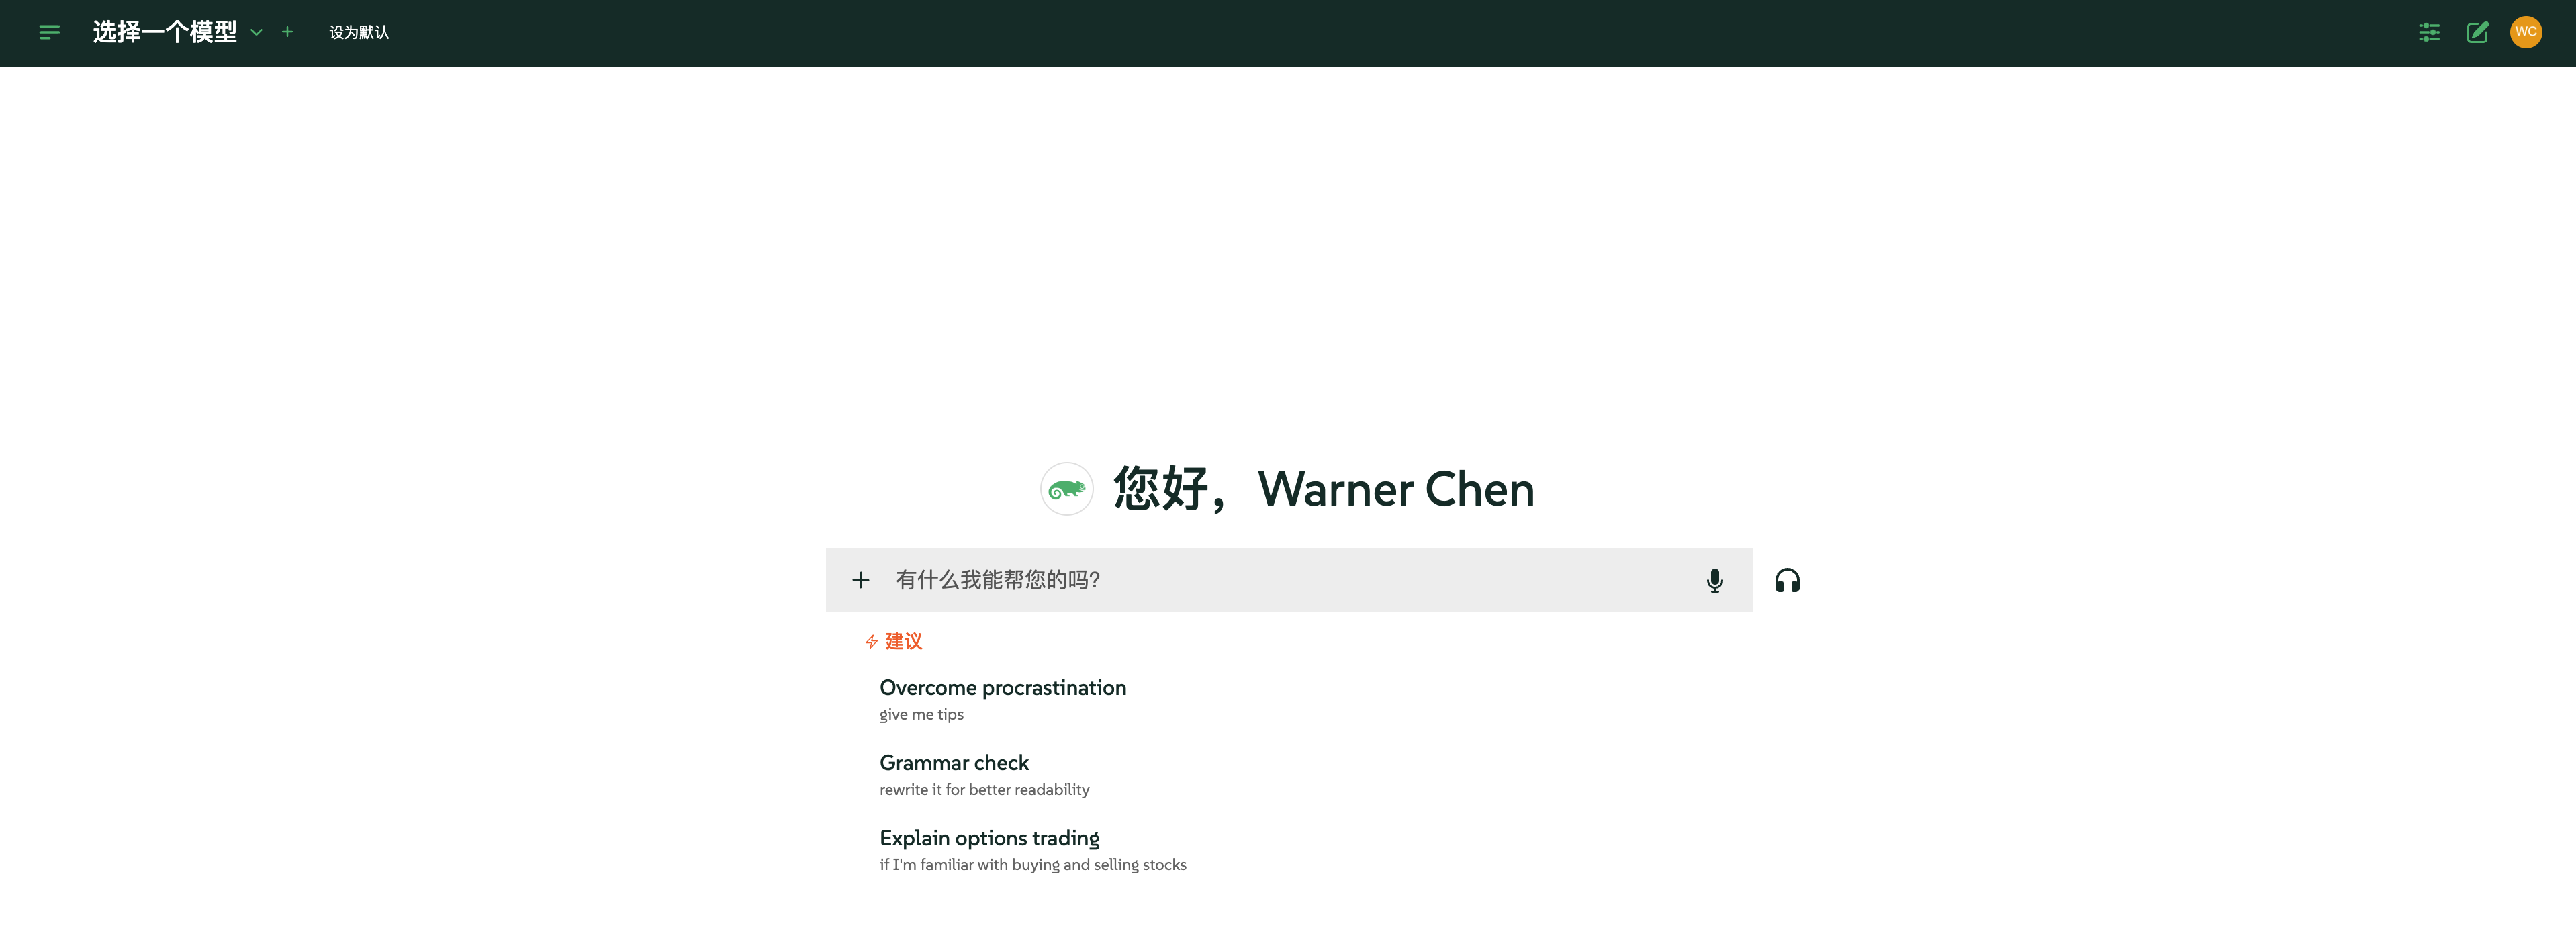
访问 Open WebUI:
选择模型进行对话:
可以看到 Ollama 调用 GPU:
