容器网络实现

容器的网络是基于 Linux 的 网络命名空间(Network Namespace)虚拟网络设备(veth pair) 实现的。

Linux veth pair

veth pair 是成对出现的一种虚拟网络设备接口,从一端进入的报文将会在另一端出现。可以把 veth pair 看成一条网线两端连接的两张以太网卡。只要将 veth pair 每一段分别接入不同的 Namespace,那么这两个 Namespace 就可以相互通信了。

实验,创建两个 Namespace:

1
2
3
4
5
root@docker-test-1:~# ip netns add ns1
root@docker-test-1:~# ip netns add ns2
root@docker-test-1:~# ip netns list
ns2
ns1

创建一个 veth pair

1
2
3
4
5
6
7
8
root@docker-test-1:~# ip link add veth-ns1 type veth peer name veth-ns2
root@docker-test-1:~# ip link show
...
4: veth-ns2@veth-ns1: <BROADCAST,MULTICAST,M-DOWN> mtu 1500 qdisc noop state DOWN mode DEFAULT group default qlen 1000
link/ether ba:d1:a3:cc:9e:e5 brd ff:ff:ff:ff:ff:ff
5: veth-ns1@veth-ns2: <BROADCAST,MULTICAST,M-DOWN> mtu 1500 qdisc noop state DOWN mode DEFAULT group default qlen 1000
link/ether 3e:d7:85:d6:1a:f5 brd ff:ff:ff:ff:ff:ff
...

veth pair 一端接入放入 ns1,另一端接入 ns2,这样就相当于采用网线将两个 Network Namespace 连接起来了:

1
2
root@docker-test-1:~# ip link set veth-ns1 netns ns1
root@docker-test-1:~# ip link set veth-ns2 netns ns2

为这对 veth pair 设置 IP,使其在同一个子网中:

1
2
root@docker-test-1:~# ip -n ns1 addr add 192.168.1.1/24 dev veth-ns1
root@docker-test-1:~# ip -n ns2 addr add 192.168.1.2/24 dev veth-ns2

将两张网卡的状态设置为 up

1
2
root@docker-test-1:~# ip -n ns1 link set veth-ns1 up
root@docker-test-1:~# ip -n ns2 link set veth-ns2 up

需要指定 Namespace 才能看到网卡信息:

1
2
3
4
5
6
7
8
9
10
11
12
13
14
15
16
17
18
19
root@docker-test-1:~# ip netns exec ns1 ifconfig
veth-ns1: flags=4163<UP,BROADCAST,RUNNING,MULTICAST> mtu 1500
inet 192.168.1.1 netmask 255.255.255.0 broadcast 0.0.0.0
inet6 fe80::3cd7:85ff:fed6:1af5 prefixlen 64 scopeid 0x20<link>
ether 3e:d7:85:d6:1a:f5 txqueuelen 1000 (Ethernet)
RX packets 23 bytes 1818 (1.8 KB)
RX errors 0 dropped 0 overruns 0 frame 0
TX packets 24 bytes 1888 (1.8 KB)
TX errors 0 dropped 0 overruns 0 carrier 0 collisions 0

root@docker-test-1:~# ip netns exec ns2 ifconfig
veth-ns2: flags=4163<UP,BROADCAST,RUNNING,MULTICAST> mtu 1500
inet 192.168.1.2 netmask 255.255.255.0 broadcast 0.0.0.0
inet6 fe80::b8d1:a3ff:fecc:9ee5 prefixlen 64 scopeid 0x20<link>
ether ba:d1:a3:cc:9e:e5 txqueuelen 1000 (Ethernet)
RX packets 24 bytes 1888 (1.8 KB)
RX errors 0 dropped 0 overruns 0 frame 0
TX packets 23 bytes 1818 (1.8 KB)
TX errors 0 dropped 0 overruns 0 carrier 0 collisions 0

测试连通性:

1
2
3
4
5
6
7
8
9
root@docker-test-1:~# ip netns exec ns1 ping -c 3 192.168.1.2
PING 192.168.1.2 (192.168.1.2) 56(84) bytes of data.
64 bytes from 192.168.1.2: icmp_seq=1 ttl=64 time=0.057 ms
64 bytes from 192.168.1.2: icmp_seq=2 ttl=64 time=0.042 ms
64 bytes from 192.168.1.2: icmp_seq=3 ttl=64 time=0.058 ms

--- 192.168.1.2 ping statistics ---
3 packets transmitted, 3 received, 0% packet loss, time 2048ms
rtt min/avg/max/mdev = 0.042/0.052/0.058/0.007 ms

Linux Bridge

Linux veth pair 设备能够实现两个 Network Namespace 的互连,但如果有更多 Namespace,就不能只用 veth pair 了。

针对这种情况,Linux 提供了虚拟网桥,用于连接多个 Namespace 之间的网络连通。

实验,创建三个 Namespace:

1
2
3
4
5
6
7
8
root@test-1:~# for i in 1 2 3; do
ip netns add ns$i
done

root@test-1:~# ip netns list
ns1
ns2
ns3
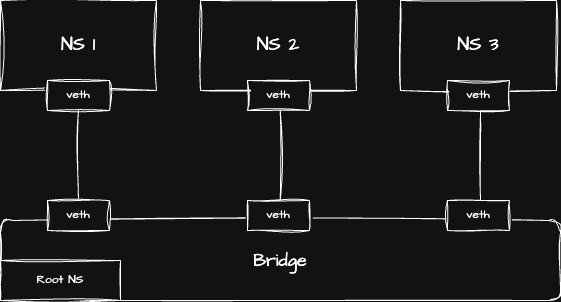
创建 bridge

1
2
3
4
5
6
7
8
root@test-1:~# apt -y install bridge-utils
root@test-1:~# brctl addbr virtual-bridge
root@test-1:~# ip link set virtual-bridge up
root@test-1:~# brctl show
bridge name bridge id STP enabled interfaces
virtual-bridge 8000.12a3b9386462 no veth-ns1-br
veth-ns2-br
veth-ns3-br

创建三个 veth pair,每个 veth pair 的一端连接 Namespace,并设置 IP,另一端与 Bridge 连接:

1
2
3
4
5
6
7
8
9
root@test-1:~# for i in 1 2 3; do
ip link add veth-ns$i type veth peer name veth-ns${i}-br
ip link set veth-ns$i netns ns$i
ip -n ns$i addr add 192.168.1.$i/24 dev veth-ns$i
ip -n ns$i link set veth-ns$i up
ip -n ns$i link set lo up
ip link set veth-ns${i}-br up
brctl addif virtual-bridge veth-ns${i}-br
done

测试连通性:

1
2
3
4
5
6
7
8
9
10
11
12
13
14
15
16
17
18
19
root@test-1:~# ip netns exec ns1 ping -c 3 192.168.1.2
PING 192.168.1.2 (192.168.1.2) 56(84) bytes of data.
64 bytes from 192.168.1.2: icmp_seq=1 ttl=64 time=0.073 ms
64 bytes from 192.168.1.2: icmp_seq=2 ttl=64 time=0.110 ms
64 bytes from 192.168.1.2: icmp_seq=3 ttl=64 time=0.055 ms

--- 192.168.1.2 ping statistics ---
3 packets transmitted, 3 received, 0% packet loss, time 2035ms
rtt min/avg/max/mdev = 0.055/0.079/0.110/0.022 ms

root@test-1:~# ip netns exec ns1 ping -c 3 192.168.1.3
PING 192.168.1.3 (192.168.1.3) 56(84) bytes of data.
64 bytes from 192.168.1.3: icmp_seq=1 ttl=64 time=0.071 ms
64 bytes from 192.168.1.3: icmp_seq=2 ttl=64 time=0.051 ms
64 bytes from 192.168.1.3: icmp_seq=3 ttl=64 time=0.049 ms

--- 192.168.1.3 ping statistics ---
3 packets transmitted, 3 received, 0% packet loss, time 2035ms
rtt min/avg/max/mdev = 0.049/0.057/0.071/0.009 ms

这里的 bridge 只扮演了二层设备的角色,就可以实现同一子网下的两个 Namespace 的通信。

如果 Namespace 里传出来的报文要访问宿主机或者是公网,那么 bridge 就无法实现了,因为报文只能到达 bridge 本身。

1
2
root@test-1:~# ip netns exec ns1 ping 223.5.5.5
ping: connect: Network is unreachable

子 Namespace 访问 Root Namespace

Linux Bridge 即可以扮演二层交换机,也可作为三层交换机或者路由器使用,只需为 bridge 设置 IP,并作为子 Namespace 的默认网关,这样数据包就可以通过 bridge 来到 root Namespace。

需要注意的是,如果要使 Linux Bridge 扮演三层设备的角色,需要开启 IP 转发:

1
2
3
4
5
# 临时性设置,如要持久化,需要在 /etc/sysctl.conf 中配置
root@test-1:~# sysctl -w net.ipv4.ip_forward=1
net.ipv4.ip_forward = 1
root@test-1:~# sysctl -a | grep "net.ipv4.ip_forward"
net.ipv4.ip_forward = 1

bridge 设置 IP,并将其作为子 Namespace 的默认网关:

1
2
3
4
root@test-1:~# ip addr add local 192.168.1.254/24 dev virtual-bridge
root@test-1:~# for i in 1 2 3;do
ip netns exec ns$i ip route add default via 192.168.1.254
done

访问 Root Namespace,即访问宿主机网络栈的网络:

1
2
3
4
5
6
7
8
9
10
# 访问宿主机网卡 IP
root@test-1:~# ip netns exec ns1 ping -c 3 172.16.16.141
PING 172.16.16.141 (172.16.16.141) 56(84) bytes of data.
64 bytes from 172.16.16.141: icmp_seq=1 ttl=64 time=0.049 ms
64 bytes from 172.16.16.141: icmp_seq=2 ttl=64 time=0.049 ms
64 bytes from 172.16.16.141: icmp_seq=3 ttl=64 time=0.052 ms

--- 172.16.16.141 ping statistics ---
3 packets transmitted, 3 received, 0% packet loss, time 2029ms
rtt min/avg/max/mdev = 0.049/0.050/0.052/0.001 ms

子 Namespace 访问外网

此时的子 Namespace 还是无法访问外网的:

1
2
3
4
root@test-1:~# ip netns exec ns1 ping -c 3 223.5.5.5
PING 223.5.5.5 (223.5.5.5) 56(84) bytes of data.
--- 223.5.5.5 ping statistics ---
3 packets transmitted, 0 received, 100% packet loss, time 2030ms

这是因为子 Namespace 的报文可以被转发出去,但回包会有问题,回包的目的 IP 是子 Namespace 网卡的 IP,但节点并没有到子 Namespace 网卡 IP 的路由。

所以需要在宿主机设置一条 SNAT(源地址转换) 的规则,子 Namespace 的报文到达 bridge 的时候,将源地址改为宿主机 IP:

1
root@test-1:~# iptables -t nat -A POSTROUTING -s 192.168.1.0/24 ! -o virtual-bridge -j MASQUERADE

然后子 Namespace 就可以访问外网了:

1
2
3
4
5
6
7
8
9
root@test-1:~# ip netns exec ns1 ping -c 3 223.5.5.5
PING 223.5.5.5 (223.5.5.5) 56(84) bytes of data.
64 bytes from 223.5.5.5: icmp_seq=1 ttl=115 time=4.28 ms
64 bytes from 223.5.5.5: icmp_seq=2 ttl=115 time=4.25 ms
64 bytes from 223.5.5.5: icmp_seq=3 ttl=115 time=4.36 ms

--- 223.5.5.5 ping statistics ---
3 packets transmitted, 3 received, 0% packet loss, time 2003ms
rtt min/avg/max/mdev = 4.246/4.292/4.356/0.046 ms

端口映射

如果想要将子 Namespace 里的端口发布给外部网络进行访问,就需要使用 DNAT(目的地址转换)

ns1 中启动一个 HTTP 服务:

1
2
root@test-1:~# ip netns exec ns1 python3 -m http.server --bind 192.168.1.1 80
Serving HTTP on 192.168.1.1 port 80 (http://192.168.1.1:80/) ...

创建 DNAT 规则,将报文的目的地址和端口进行修改再转发:

1
2
3
4
5
6
7
8
9
10
11
12
13
14
15
16
17
18
19
20
21
# 为来自外部的流量做 DNAT
root@test-1:~# iptables -t nat -A PREROUTING -d 172.16.16.141 -p tcp -m tcp --dport 80 -j DNAT --to-destination 192.168.1.1:80

# 为来自 host 自己的流量做 DNAT(因为本地流量不会经过 PREROUTING chain)
root@test-1:~# iptables -t nat -A OUTPUT -d 172.16.16.141 -p tcp -m tcp --dport 80 -j DNAT --to-destination 192.168.1.1:80

root@test-1:~# iptables -t nat -nL
Chain PREROUTING (policy ACCEPT)
target prot opt source destination
DNAT tcp -- 0.0.0.0/0 172.16.16.141 tcp dpt:80 to:192.168.1.1:80

Chain INPUT (policy ACCEPT)
target prot opt source destination

Chain OUTPUT (policy ACCEPT)
target prot opt source destination
DNAT tcp -- 0.0.0.0/0 172.16.16.141 tcp dpt:80 to:192.168.1.1:80

Chain POSTROUTING (policy ACCEPT)
target prot opt source destination
MASQUERADE all -- 192.168.1.0/24 0.0.0.0/0

br_netfilter 是 Linux 内核中的一个模块,全称是 bridge netfilter,它的作用是让经过 Linux Bridge 的网络流量也能被 iptables/nftables 处理:

1
root@test-1:~# modprobe br_netfilter

尝试访问:

1
2
3
4
5
6
7
8
9
10
11
12
13
14
root@test-1:~# curl 172.16.16.141:80 -I
HTTP/1.0 200 OK
Server: SimpleHTTP/0.6 Python/3.10.12
Date: Tue, 03 Jun 2025 11:01:50 GMT
Content-type: text/html; charset=utf-8
Content-Length: 666

warnerchen at MacBookAir in [~]
19:02:12 › curl 172.16.16.141:80 -I
HTTP/1.0 200 OK
Server: SimpleHTTP/0.6 Python/3.10.12
Date: Tue, 03 Jun 2025 11:02:13 GMT
Content-type: text/html; charset=utf-8
Content-Length: 666

容器网络场景基本就是上面提到的,宿主机不同容器之间的访问、容器访问外网、外部访问容器。

Docker 的四种网络模式

Docker 可以为容器提供四种网络模式。

  • Host:如果启动容器的时候指定 --net host,那么这个容器不会被分配一个单独的 Network Namespace,而是与宿主机共用一个。
  • None:如果启动容器的时候指定 --net none,这个容器会被分配一个单独的 Network Namespace,但不会有任何网络配置,网卡/IP 等都需要手动配置。
  • Bridge:网桥是 Docker 启动容器的默认网络模式,安装好 Docker 后宿主机会有一个 docker0 网桥,且被设置了 IP,这个 IP 就是容器的默认网关,且容器 virt pair 的一端都接在 docker0 网桥上。
  • Container:如果启动容器的时候指定 --net container:xxx,则是指定新创建的容器和已经存在的一个容器共享一个 Network Namespace,而不是和宿主机共享。新创建的容器不会创建自己的网卡,配置自己的 IP,而是和一个指定的容器共享 IP、端口范围等。
Author

Warner Chen

Posted on

2025-06-03

Updated on

2025-06-03

Licensed under

You need to set install_url to use ShareThis. Please set it in _config.yml.
You forgot to set the business or currency_code for Paypal. Please set it in _config.yml.

Comments

You forgot to set the shortname for Disqus. Please set it in _config.yml.