通过 SUSE AI Observability Extension,能够实现在 SUSE O11y 监控 SUSE AI。
参考文档:https://documentation.suse.com/suse-ai/1.0/html/AI-deployment-intro/index.html
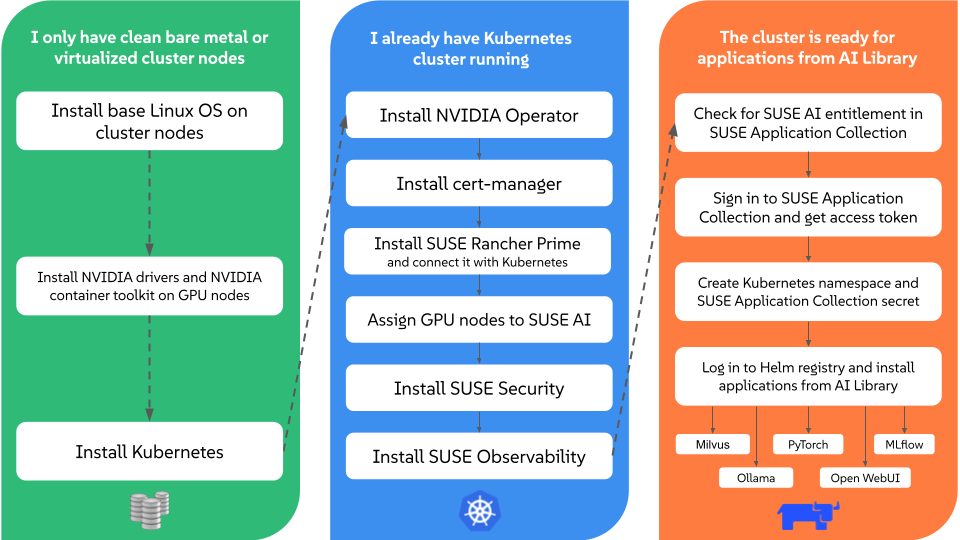
部署流程如下:
此处将 SUSE O11y 和 SUSE AI 部署在一个 RKE2 集群中,该集群需要有 GPU 节点。
参考文档:https://warnerchen.github.io/2024/12/17/RKE-RKE2-%E8%8A%82%E7%82%B9%E9%85%8D%E7%BD%AE-Nvidia-Container-Toolkit
1
2
3
4
5
6
7
8
9
10
11
12
13
14
15
16
17
18
19
20
21
root@gpu-0:~# nvidia-smi Thu Aug 14 14:51:56 2025 +-----------------------------------------------------------------------------------------+ | NVIDIA-SMI 570.169 Driver Version: 570.169 CUDA Version: 12.8 | |-----------------------------------------+------------------------+----------------------+ | GPU Name Persistence-M | Bus-Id Disp.A | Volatile Uncorr. ECC | | Fan Temp Perf Pwr:Usage/Cap | Memory-Usage | GPU-Util Compute M. | | | | MIG M. | |=========================================+========================+======================| | 0 Tesla P4 Off | 00000000:03:00.0 Off | 0 | | N/A 41C P8 7W / 75W | 3MiB / 7680MiB | 0% Default | | | | N/A | +-----------------------------------------+------------------------+----------------------+ +-----------------------------------------------------------------------------------------+ | Processes: | | GPU GI CI PID Type Process name GPU Memory | | ID ID Usage | |=========================================================================================| | No running processes found | +-----------------------------------------------------------------------------------------+
部署 RKE2 集群 此处省略部署步骤,需要将 GPU 节点注册至 RKE2 集群:
1
2
3
4
5
6
root@suse-o11y-01:~# kubectl get nodes NAME STATUS ROLES AGE VERSION gpu-0 Ready worker 2d3h v1.30.13+rke2r1 suse-o11y-01 Ready control-plane,etcd,master,worker 28d v1.30.13+rke2r1 suse-o11y-02 Ready control-plane,etcd,master,worker 78d v1.30.13+rke2r1 suse-o11y-03 Ready control-plane,etcd,master,worker 78d v1.30.13+rke2r1
添加至集群后,添加 Label:
1 kubectl label node gpu-0 accelerator=nvidia-gpu
在 GPU 节点,执行下面的命令:
1
2
echo PATH=$PATH :/usr/local/nvidia/toolkit >> /etc/default/rke2-agentsystemctl restart rke2-agent
安装 GPU Operator 参考文档:https://warnerchen.github.io/2024/12/17/RKE-RKE2-%E8%8A%82%E7%82%B9%E9%85%8D%E7%BD%AE-Nvidia-Container-Toolkit/#%E5%AE%89%E8%A3%85-GPU-Operator
1
2
3
4
5
6
7
8
9
10
11
12
13
14
15
16
17
18
root@suse-o11y-01:~# helm -n gpu-operator ls NAME NAMESPACE REVISION UPDATED STATUS CHART APP VERSION gpu-operator-v25-1754905550 gpu-operator 1 2025-08-11 09:45:50.859496738 +0000 UTC deployed gpu-operator-v25.3.2 v25.3.2 root@suse-o11y-01:~# kubectl -n gpu-operator get pod NAME READY STATUS RESTARTS AGE gpu-feature-discovery-wfqdb 1/1 Running 0 2d4h gpu-operator-664ff6658f-w8kms 1/1 Running 0 2d21h gpu-operator-v25-1754905550-node-feature-discovery-gc-8544t2xrm 1/1 Running 0 2d21h gpu-operator-v25-1754905550-node-feature-discovery-master-rlmtl 1/1 Running 0 2d21h gpu-operator-v25-1754905550-node-feature-discovery-worker-cwmnd 1/1 Running 0 2d21h gpu-operator-v25-1754905550-node-feature-discovery-worker-ltnf2 1/1 Running 0 2d21h gpu-operator-v25-1754905550-node-feature-discovery-worker-sv68s 1/1 Running 0 2d4h gpu-operator-v25-1754905550-node-feature-discovery-worker-xhf67 1/1 Running 0 2d21h nvidia-container-toolkit-daemonset-ktjc8 1/1 Running 0 2d4h nvidia-cuda-validator-ztqzg 0/1 Completed 0 2d3h nvidia-dcgm-exporter-2cxkm 1/1 Running 0 2d4h nvidia-device-plugin-daemonset-xldvb 1/1 Running 0 2d4h nvidia-operator-validator-fbvjf 1/1 Running 0 2d4h
部署 SUSE Observability 参考文档:https://warnerchen.github.io/2025/03/03/SUSE-Observability-%E4%BD%BF%E7%94%A8%E9%9A%8F%E8%AE%B0/
由于 SUSE AI 也部署在该集群,所以也部署了 SUSE O11y Agent:
1
2
3
4
5
6
7
8
9
10
11
12
13
14
15
16
17
18
19
20
21
22
23
24
25
26
27
28
29
root@suse-o11y-01:~# kubectl -n suse-observability get pod NAME READY STATUS RESTARTS AGE suse-observability-agent-checks-agent-796bd7545c-85rjh 1/1 Running 0 2d suse-observability-agent-cluster-agent-7dc4cf749f-pjrjl 1/1 Running 0 2d suse-observability-agent-logs-agent-b59hf 1/1 Running 0 2d suse-observability-agent-logs-agent-b6pfb 1/1 Running 0 2d suse-observability-agent-logs-agent-bbscp 1/1 Running 0 2d suse-observability-agent-logs-agent-zf5vb 1/1 Running 0 2d suse-observability-agent-node-agent-9ftf2 2/2 Running 0 2d suse-observability-agent-node-agent-h7fcb 2/2 Running 1 (41h ago) 2d suse-observability-agent-node-agent-k5snl 2/2 Running 9 (43h ago) 2d suse-observability-agent-node-agent-kplqr 2/2 Running 2 (33h ago) 2d suse-observability-clickhouse-shard0-0 2/2 Running 0 3d suse-observability-correlate-56c76b747b-xmfqb 1/1 Running 2 (3d ago) 3d suse-observability-e2es-54dff667c9-8bszc 1/1 Running 2 (3d ago) 3d suse-observability-elasticsearch-master-0 1/1 Running 0 3d suse-observability-hbase-stackgraph-0 1/1 Running 0 3d suse-observability-hbase-tephra-0 1/1 Running 0 3d suse-observability-kafka-0 2/2 Running 10 (3d ago) 3d suse-observability-kafkaup-operator-kafkaup-d7c687c47-49q7g 1/1 Running 0 3d suse-observability-otel-collector-0 1/1 Running 0 3d suse-observability-prometheus-elasticsearch-exporter-c4587sgltv 1/1 Running 0 3d suse-observability-receiver-7cbffd6684-wqbzl 1/1 Running 2 (3d ago) 3d suse-observability-router-9b56b74c7-s672n 1/1 Running 0 3d suse-observability-server-69b9666fb9-4xtfs 1/1 Running 1 (3d ago) 3d suse-observability-ui-7f87bff97b-ql6dn 2/2 Running 0 3d suse-observability-victoria-metrics-0-0 1/1 Running 0 3d suse-observability-vmagent-0 1/1 Running 0 3d suse-observability-zookeeper-0 1/1 Running 0 3d
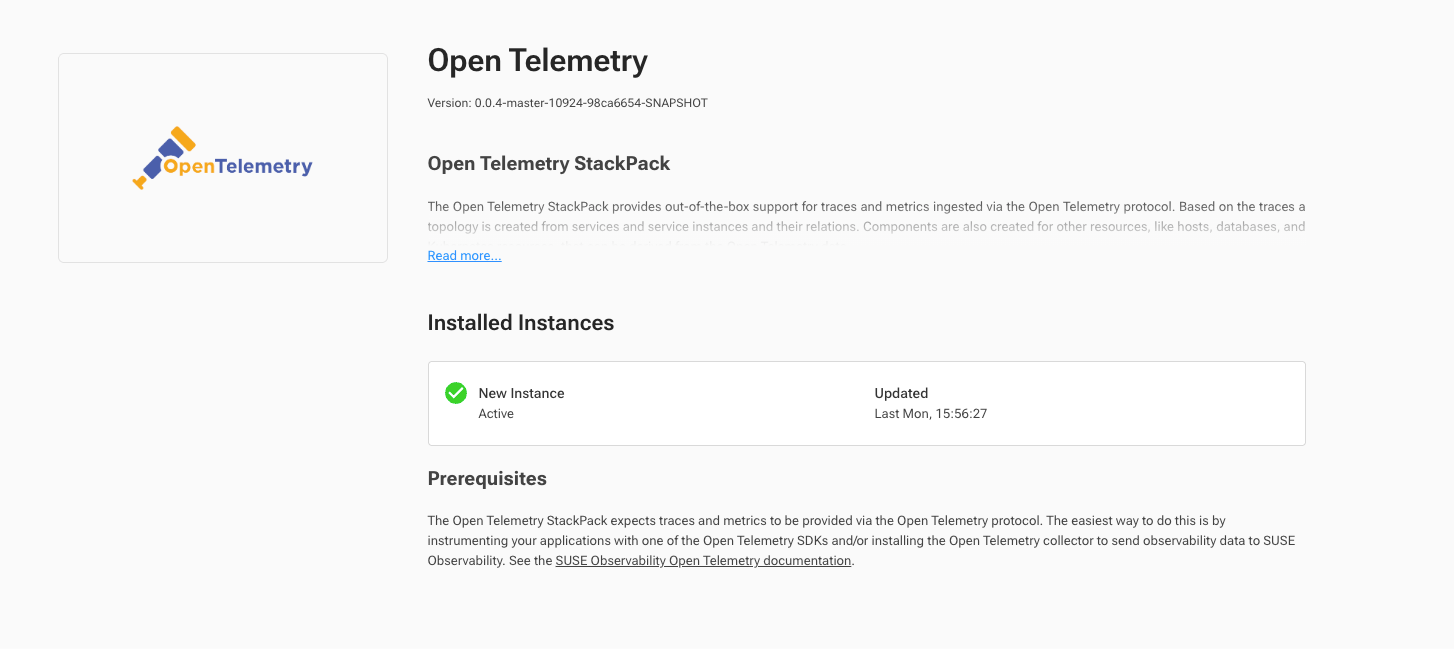
在 UI 中开启 Open Telemetry StackPack:
获取 SUSE Application Collection 凭证 SUSE AI Observability Extension 和 SUSE AI 的 Helm Chart 和镜像都需要从 SUSE Application Collection 获取,所以需要准备凭证:https://docs.apps.rancher.io/get-started/authentication/
使用凭证:
1
2
3
4
5
6
7
8
9
kubectl create secret docker-registry application-collection \ --docker-server=dp.apps.rancher.io \ --docker-username=APPCO_USERNAME \ --docker-password=APPCO_USER_TOKEN \ -n <your_namespace> helm registry login dp.apps.rancher.io/charts \ -u APPCO_USERNAME \ -p APPCO_USER_TOKEN
由于国内从 dp.apps.rancher.io 获取镜像较慢,可以使用国内加速:https://artifacts.cnrancher.com/app-collection/
部署 SUSE AI Observability Extension 准备 SUSE AI Observability Extension 配置文件:
1
2
3
4
5
6
7
8
9
10
11
cat <<EOF > genai_values.yaml global: imagePullSecrets: - application-collection # 与 SUSE O11y 在同一个集群,可以直接使用集群内部地址 # 如果不在一个集群,需要使用 HTTPS,且暂时不支持自签证书 serverUrl: http://suse-observability-router.suse-observability.svc.cluster.local:8080 apiKey: xxx tokenType: api apiToken: xxx clusterName: suse-o11y-with-suse-ai
执行安装:
1 helm -n suse-observability upgrade --install suse-ai-observability-extension oci://dp.apps.rancher.io/charts/suse-ai-observability-extension -f genai_values.yaml --version 1.0.4
1
2
3
4
5
6
7
8
9
10
11
root@suse-o11y-01:~# helm -n suse-observability ls NAME NAMESPACE REVISION UPDATED STATUS CHART APP VERSION suse-ai-observability-extension suse-observability 3 2025-08-12 15:02:30.393347003 +0800 CST deployed suse-ai-observability-extension-1.0.2 1.0.4 suse-observability suse-observability 1 2025-08-11 14:40:03.659351484 +0800 CST deployed suse-observability-2.3.7 7.0.0-snapshot.20250722112540-master-34e65ce suse-observability-agent suse-observability 2 2025-08-12 15:12:18.710129279 +0800 CST deployed suse-observability-agent-1.0.56 3.0.0 root@suse-o11y-01:~# kubectl -n suse-observability get pod NAME READY STATUS RESTARTS AGE suse-ai-observability-extension-29252596-bk7st 0/1 Completed 0 86s suse-ai-observability-extension-init-dgtx7 0/1 Completed 0 2d ...
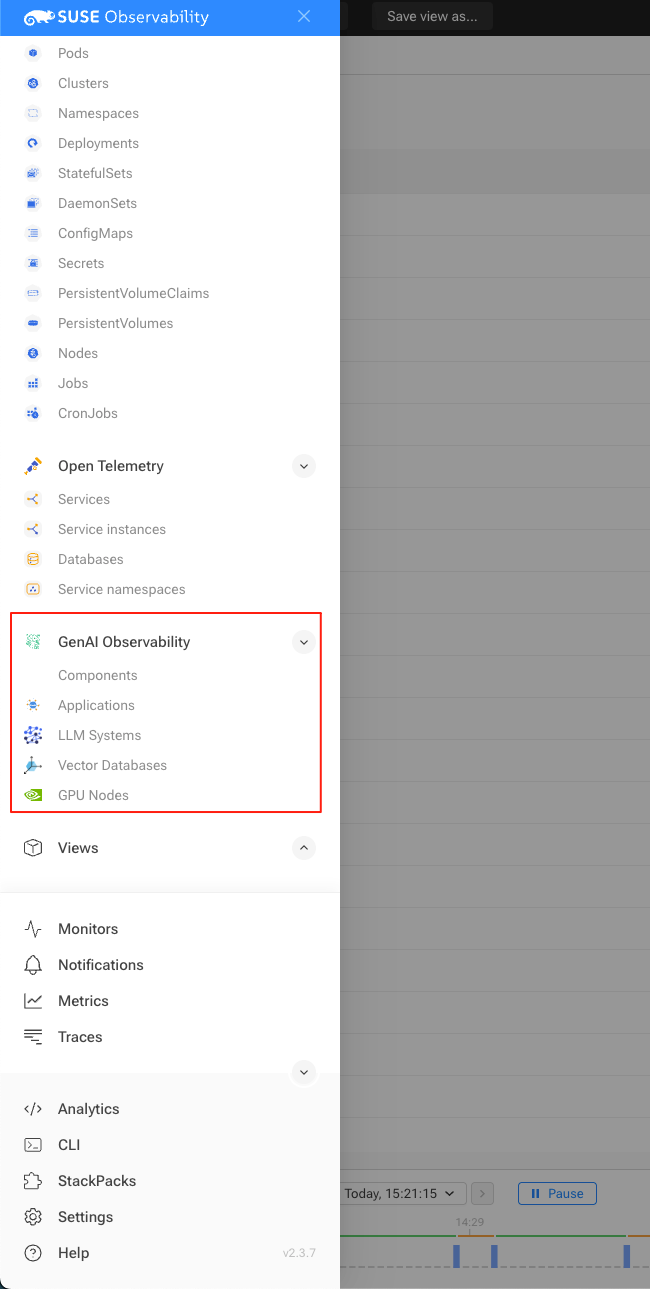
部署完成后,即可在 SUSE O11y 看到 GenAI Observability:
部署 OpenTelemetry Collector 1 2 3 4 kubectl create namespace observability kubectl create secret generic open-telemetry-collector \ --namespace observability \ --from-literal=API_KEY='SUSE_OBSERVABILITY_API_KEY'
准备配置文件:
1 2 3 4 5 6 7 8 9 10 11 12 13 14 15 16 17 18 19 20 21 22 23 24 25 26 27 28 29 30 31 32 33 34 35 36 37 38 39 40 41 42 43 44 45 46 47 48 49 50 51 52 53 54 55 56 57 58 59 60 61 62 63 64 65 66 67 68 69 70 71 72 73 74 75 76 77 78 79 80 81 82 83 84 85 86 87 88 89 90 91 92 93 94 95 96 97 98 99 100 101 102 103 104 105 106 107 108 109 110 111 112 113 cat <<EOF > otel_values.yaml global: imagePullSecrets: - application-collection extraEnvsFrom: - secretRef: name: open-telemetry-collector mode: deployment ports: metrics: enabled: true presets: kubernetesAttributes: enabled: true extractAllPodLabels: true config: receivers: prometheus: config: scrape_configs: - job_name: 'gpu-metrics' scrape_interval: 10s scheme: http kubernetes_sd_configs: - role: endpoints namespaces: names: - gpu-operator - job_name: 'milvus' scrape_interval: 15s metrics_path: '/metrics' static_configs: - targets: ['milvus.suse-private-ai.svc.cluster.local:9091'] exporters: otlp: endpoint: https://suse-observability-otlp.warnerchen.com:443 headers: Authorization: "SUSEObservability ${env:API_KEY}" tls: insecure_skip_verify: true processors: tail_sampling: decision_wait: 10s policies: - name: rate-limited-composite type: composite composite: max_total_spans_per_second: 500 policy_order: [errors, slow-traces, rest] composite_sub_policy: - name: errors type: status_code status_code: status_codes: [ ERROR ] - name: slow-traces type: latency latency: threshold_ms: 1000 - name: rest type: always_sample rate_allocation: - policy: errors percent: 33 - policy: slow-traces percent: 33 - policy: rest percent: 34 resource: attributes: - key: k8s.cluster.name action: upsert value: suse-o11y-with-suse-ai - key: service.instance.id from_attribute: k8s.pod.uid action: insert filter/dropMissingK8sAttributes: error_mode: ignore traces: span: - resource.attributes["k8s.node.name"] == nil - resource.attributes["k8s.pod.uid"] == nil - resource.attributes["k8s.namespace.name"] == nil - resource.attributes["k8s.pod.name"] == nil connectors: spanmetrics: metrics_expiration: 5m namespace: otel_span routing/traces: error_mode: ignore table: - statement: route() pipelines: [traces/sampling, traces/spanmetrics] service: extensions: - health_check pipelines: traces: receivers: [otlp, jaeger] processors: [filter/dropMissingK8sAttributes, memory_limiter, resource] exporters: [routing/traces] traces/spanmetrics: receivers: [routing/traces] processors: [] exporters: [spanmetrics] traces/sampling: receivers: [routing/traces] processors: [tail_sampling, batch] exporters: [debug, otlp] metrics: receivers: [otlp, spanmetrics, prometheus] processors: [memory_limiter, resource, batch] exporters: [debug, otlp]
执行安装:
1
2
3
helm upgrade --install opentelemetry-collector \ oci://dp.apps.rancher.io/charts/opentelemetry-collector \ -f otel-values.yaml --namespace observability --version 0.131.0
1
2
3
4
5
6
7
root@suse-o11y-01:~# helm -n observability ls NAME NAMESPACE REVISION UPDATED STATUS CHART APP VERSION opentelemetry-collector observability 2 2025-08-12 10:36:15.656142655 +0800 CST deployed opentelemetry-collector-0.130.1 0.131.0 root@suse-o11y-01:~# kubectl -n observability get pod NAME READY STATUS RESTARTS AGE opentelemetry-collector-fd675cb5d-lfnnc 1/1 Running 0 2d4h
在 OpenTelemetry Collector 中配置的 GPU 指标收集器需要创建自定义 RBAC 规则:
1
2
3
4
5
6
7
8
9
10
11
12
13
14
15
16
17
18
19
20
21
22
23
24
25
26
27
28
29
cat <<EOF | kubectl apply -f - apiVersion: rbac.authorization.k8s.io/v1 kind: Role metadata: name: suse-observability-otel-scraper rules: - apiGroups: - "" resources: - services - endpoints verbs: - list - watch --- apiVersion: rbac.authorization.k8s.io/v1 kind: RoleBinding metadata: name: suse-observability-otel-scraper roleRef: apiGroup: rbac.authorization.k8s.io kind: Role name: suse-observability-otel-scraper subjects: - kind: ServiceAccount name: opentelemetry-collector namespace: observability EOF
部署 SUSE AI 参考文档:https://warnerchen.github.io/2025/02/19/SUSE-AI-%E4%BD%BF%E7%94%A8%E9%9A%8F%E8%AE%B0/
1
2
3
4
5
6
7
8
9
10
11
12
13
14
15
16
17
18
19
20
21
22
23
root@suse-o11y-01:~# helm -n suse-private-ai ls NAME NAMESPACE REVISION UPDATED STATUS CHART APP VERSION milvus suse-private-ai 1 2025-08-12 10:15:32.150413955 +0800 CST deployed milvus-4.2.2 2.4.6 ollama suse-private-ai 1 2025-08-12 11:34:18.24052066 +0800 CST deployed ollama-1.16.0 0.6.8 open-webui suse-private-ai 2 2025-08-12 15:48:17.10667584 +0800 CST deployed open-webui-6.13.0 0.6.9 root@suse-o11y-01:~# kubectl -n suse-private-ai get pod NAME READY STATUS RESTARTS AGE milvus-datacoord-d46f8c674-67m2v 1/1 Running 2 (2d8h ago) 2d8h milvus-datanode-58664f8c67-4ms2s 1/1 Running 2 (2d8h ago) 2d8h milvus-etcd-0 1/1 Running 0 2d8h milvus-indexcoord-849df85749-tvt2s 1/1 Running 0 2d8h milvus-indexnode-7bbb6bd84-znpb6 1/1 Running 1 (2d8h ago) 2d8h milvus-kafka-broker-0 1/1 Running 0 2d8h milvus-kafka-controller-0 1/1 Running 0 2d8h milvus-minio-7f9f9b4d76-949cr 1/1 Running 0 2d8h milvus-proxy-57c54df4d5-ggcnk 1/1 Running 2 (2d8h ago) 2d8h milvus-querycoord-85845fcf56-kt7h5 1/1 Running 2 (2d8h ago) 2d8h milvus-querynode-67fff4f47d-82482 1/1 Running 2 (2d8h ago) 2d8h milvus-rootcoord-bd7958978-ssrmz 1/1 Running 2 (2d8h ago) 2d8h ollama-85cf4f777b-r9nkv 1/1 Running 0 79m open-webui-0 1/1 Running 0 2m45s open-webui-redis-7c65fd96bb-67n6s 1/1 Running 0 2d6h
测试 Instrumented Application Open WebUI Pipeline 是一个模型推理/处理后端,用来扩展除了 OpenAI API 以外的模型来源,如本地部署的 Ollama 等。
Python OpenLIT SDK 是一个基于 OpenTelemetry 封装的可观测性采集工具,专门用来监控和追踪大语言模型(LLM)应用的运行情况。
此处使用 Open WebUI Pipeline 调用 Python 代码,再由 Python 调用 Ollama,并通过 OpenLIT SDK 生成数据传输到 OpenTelemetry Collector 中。
Python 代码参考:https://github.com/SUSE/suse-ai-observability-extension/blob/main/integrations/oi-pipelines/openlit.py
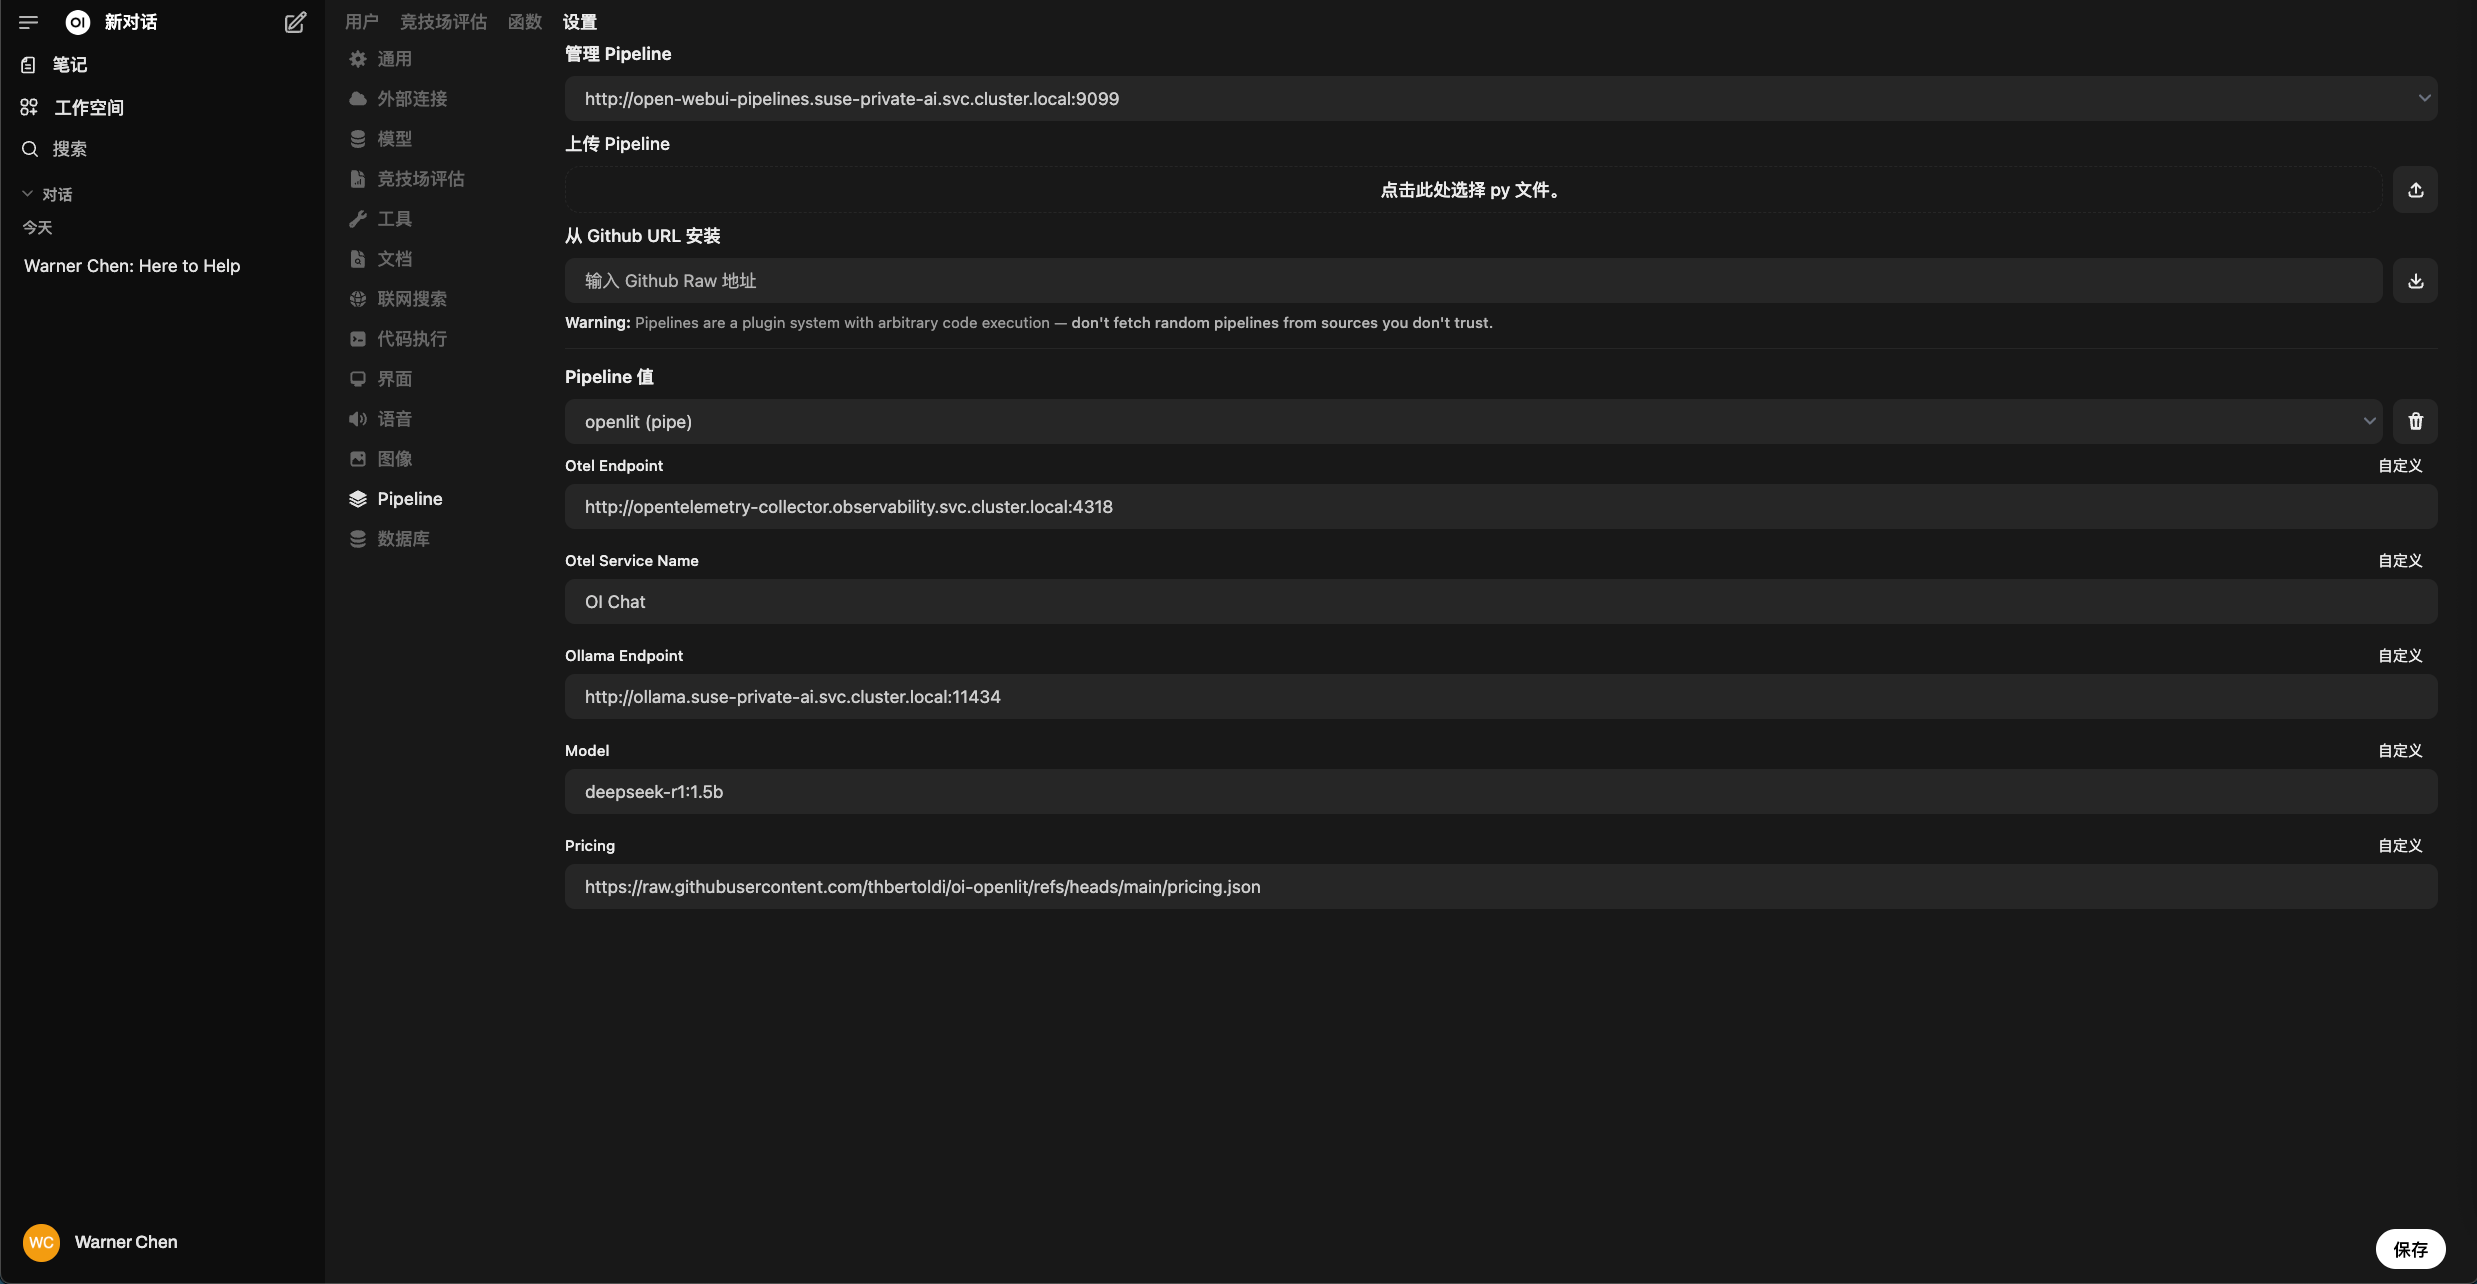
Open WebUI 需要启用 Pipeline,在 owui_custom_overrides.yaml 中修改:
1
2
3
4
5
6
7
8
9
pipelines: enabled: true extraEnvVars: - name: PIPELINES_URLS value: "https://github.com/SUSE/suse-ai-observability-extension/blob/main/integrations/oi-pipelines/openlit.py" - name: PIPELINES_API_KEY value: "xxx"
更新后会生成 Pipeline Workload:
1
2
root@suse-o11y-01:~# kubectl -n suse-private-ai get pod | grep pipeline open-webui-pipelines-5b87fb8b8b-fnn62 1/1 Running 0 44m
在 Open WebUI 中设置凭证,默认情况下密码为 0p3n-w3bu!:
在 Pipeline 界面,查看 Open WebUI 是否可以连接到 Pipeline:
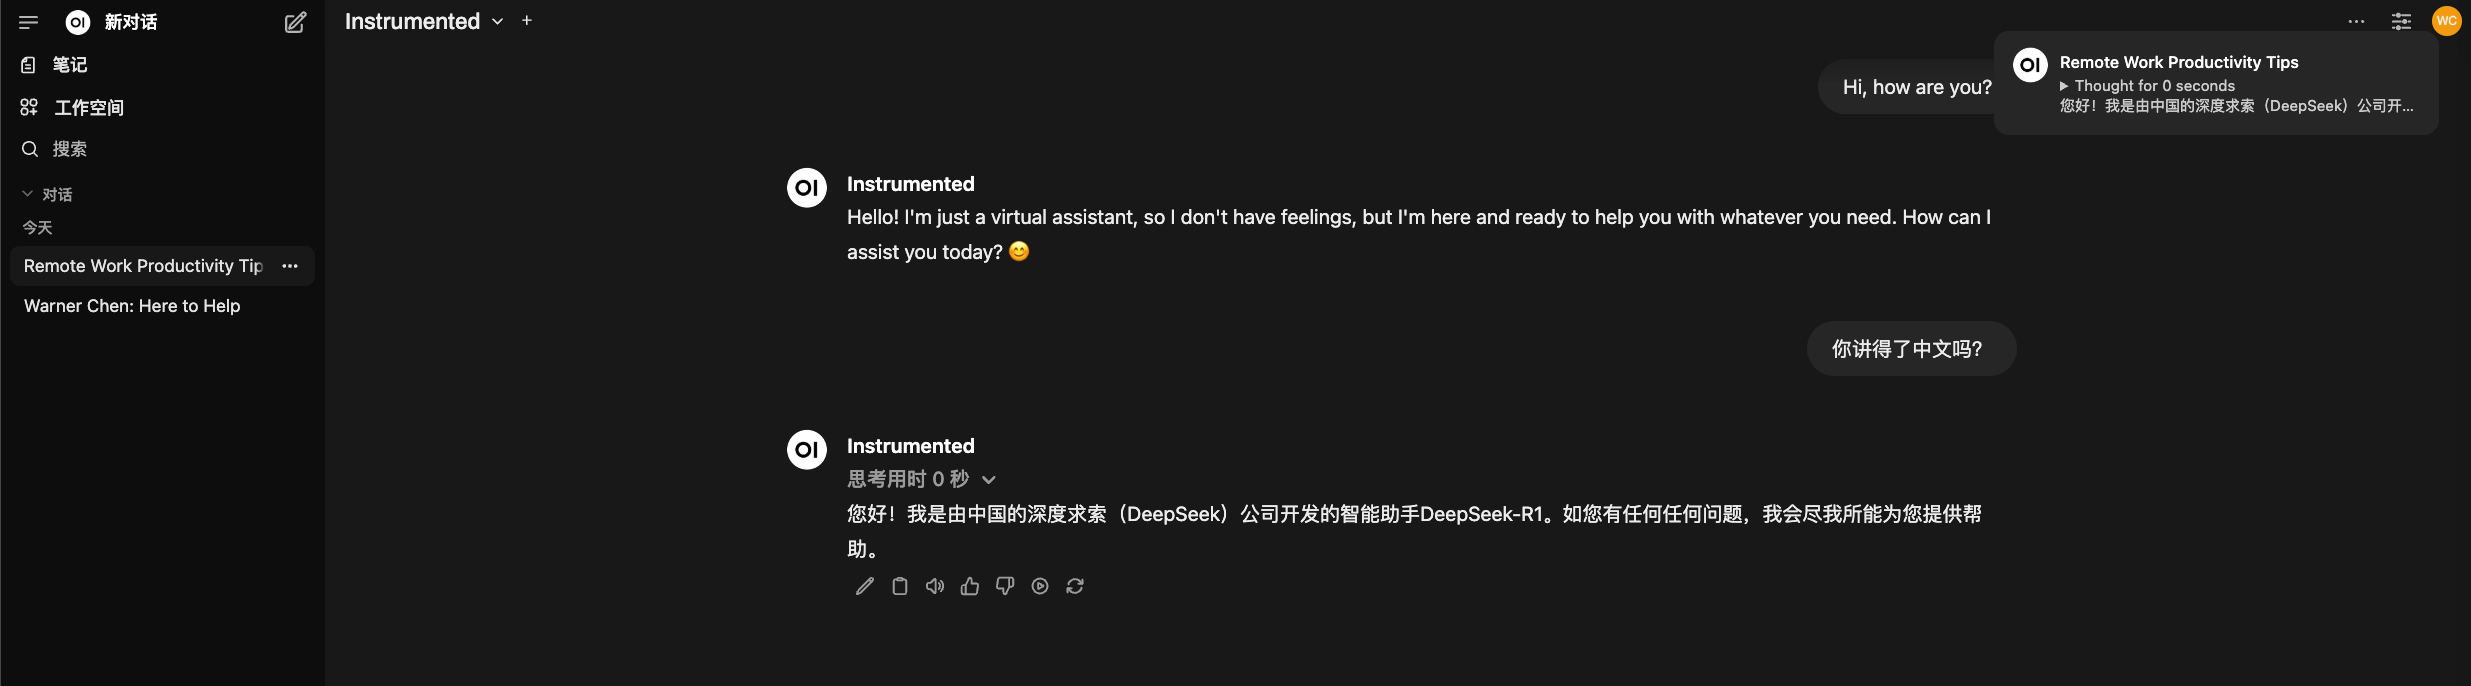
在新对话中,模型选择 Instrumented,尝试进行对话:
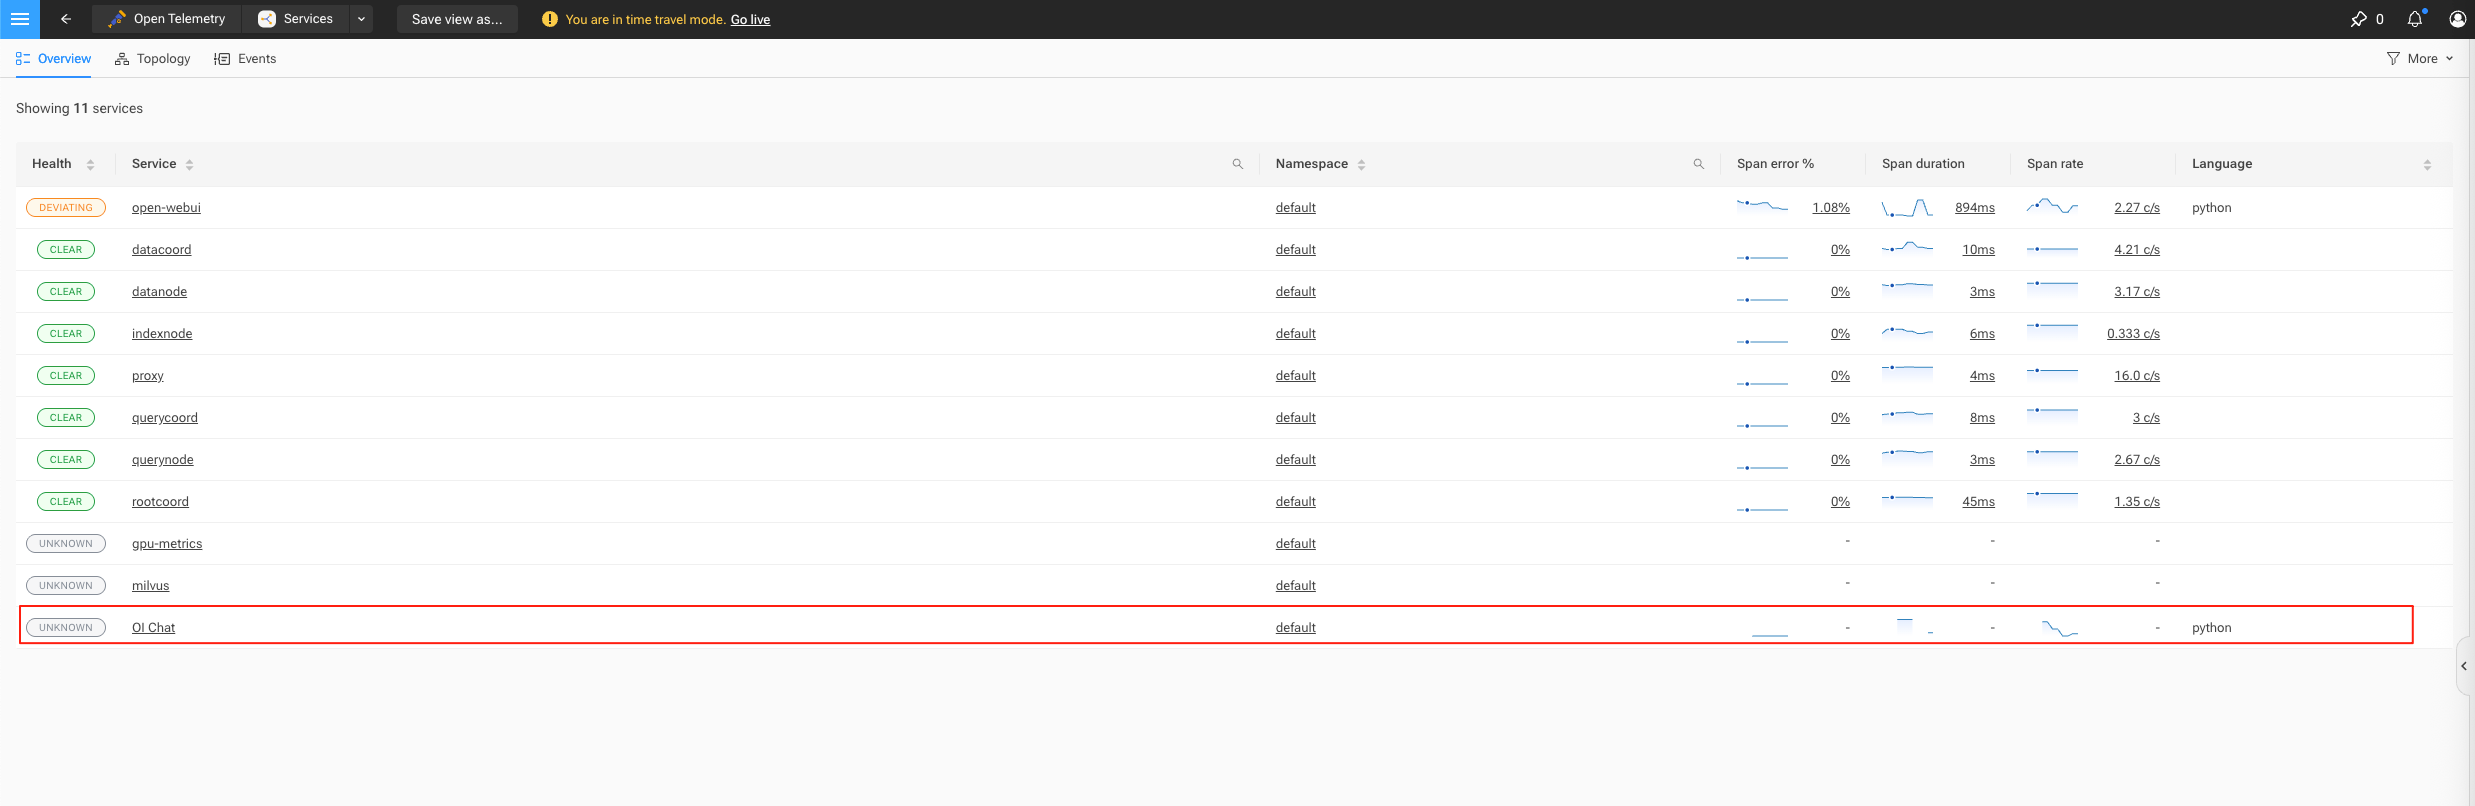
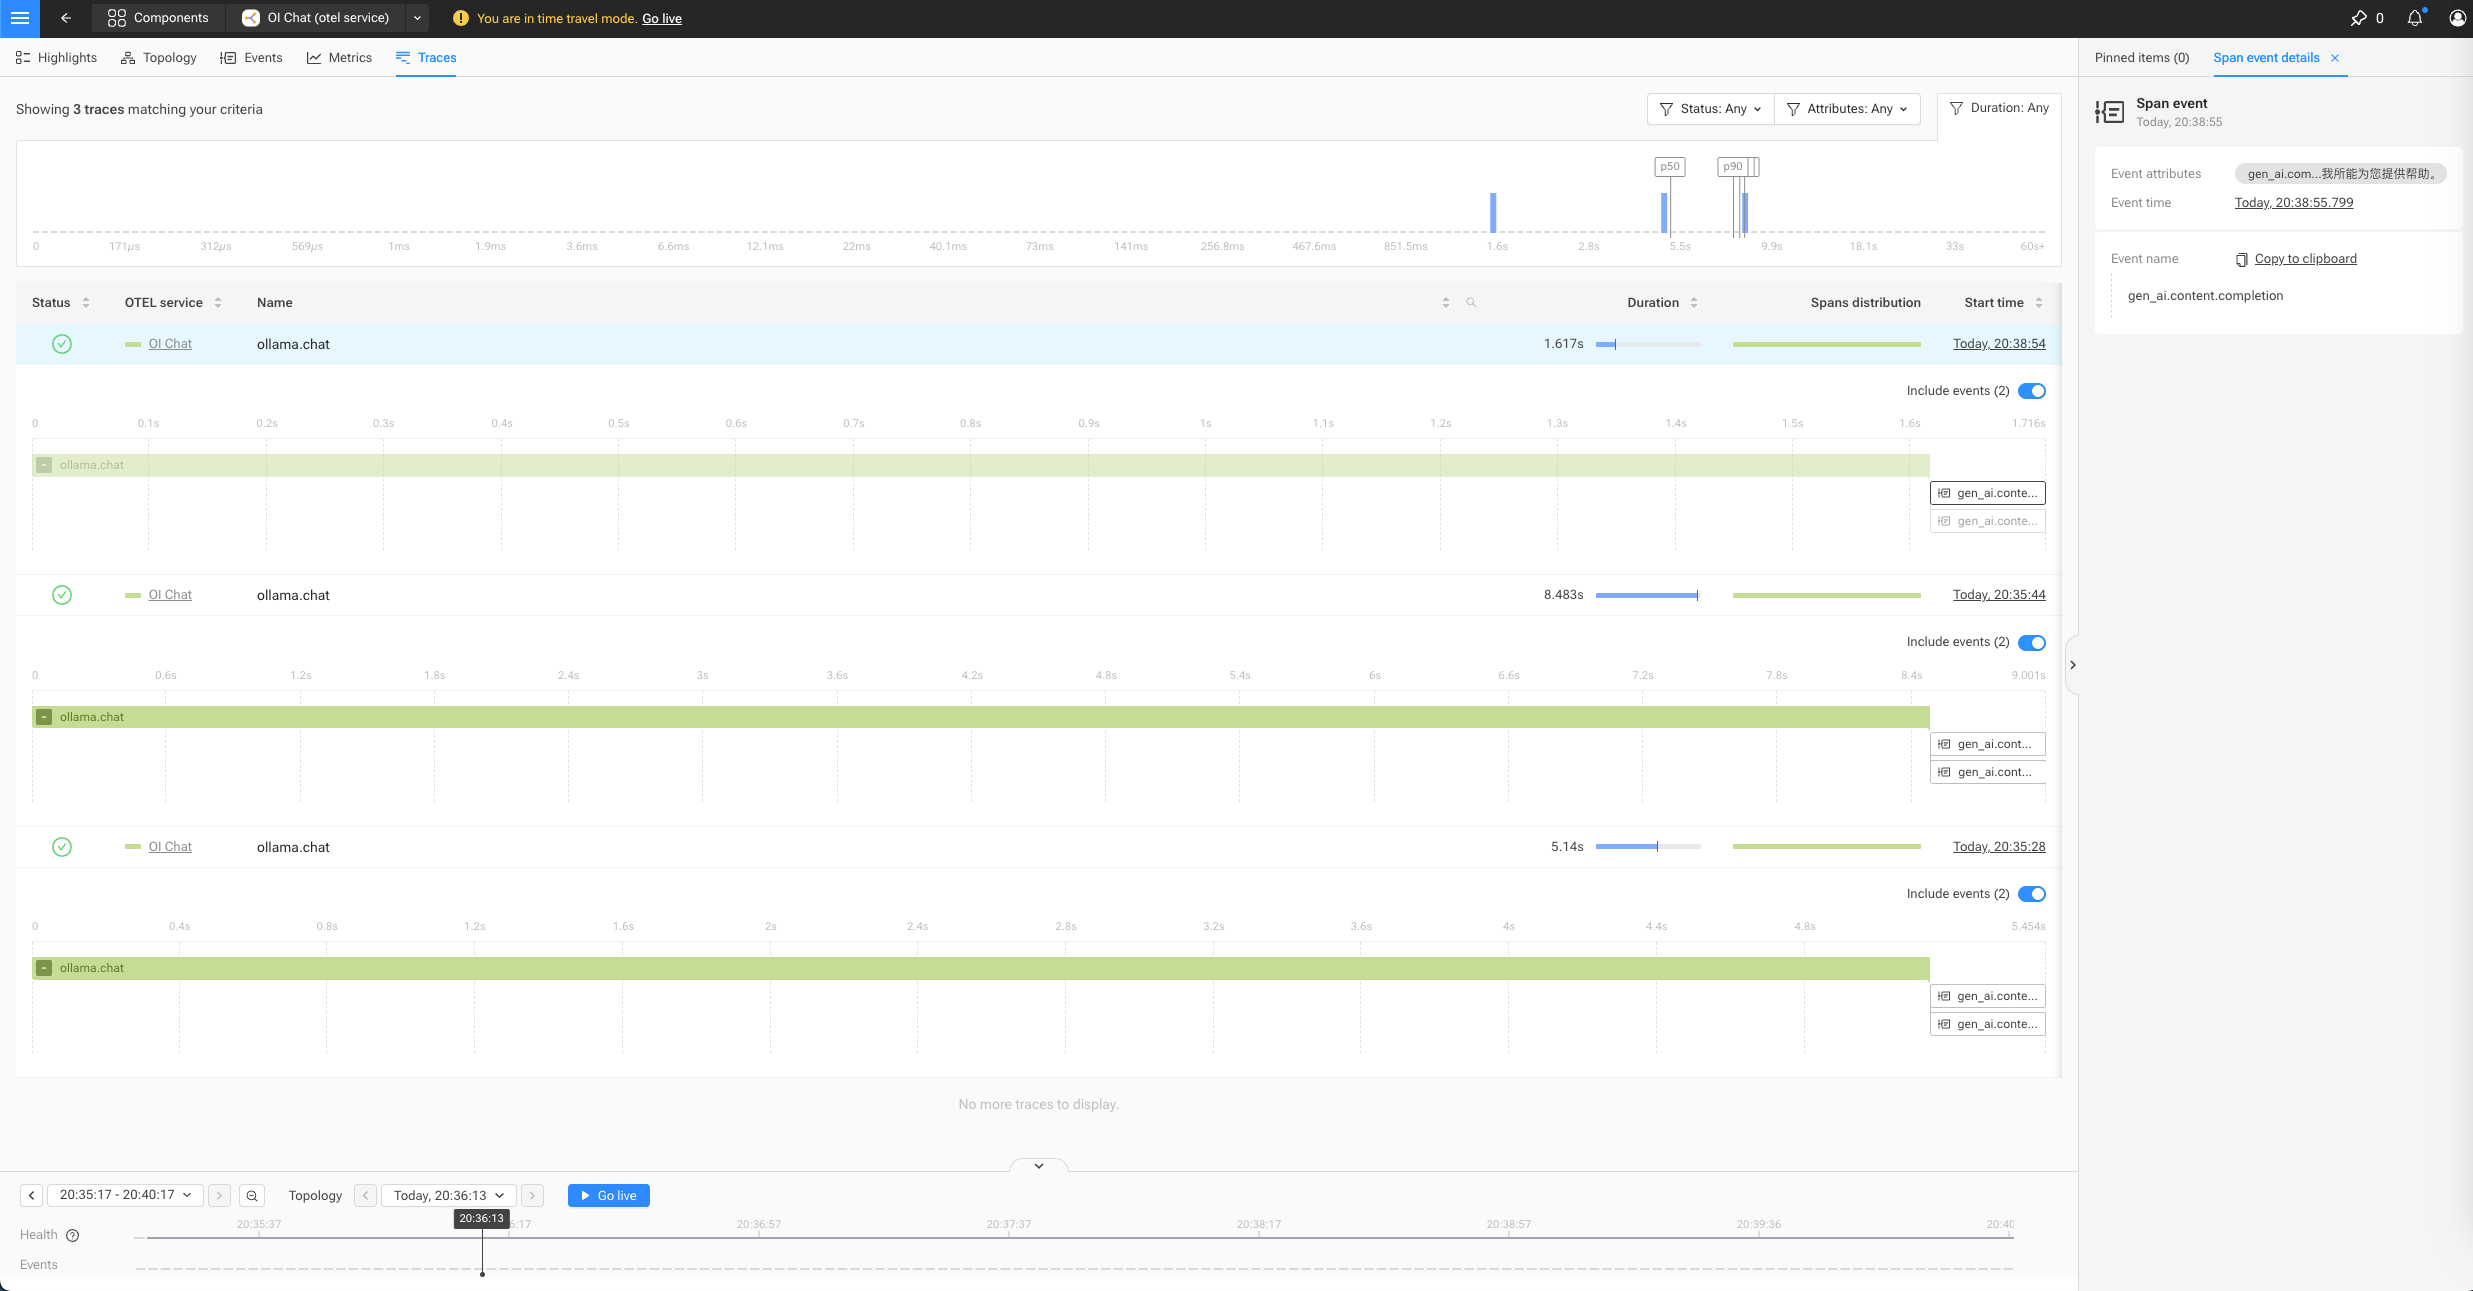
在 SUSE O11y 界面中,即可看到 Python OpenLIT SDK 生成的数据:
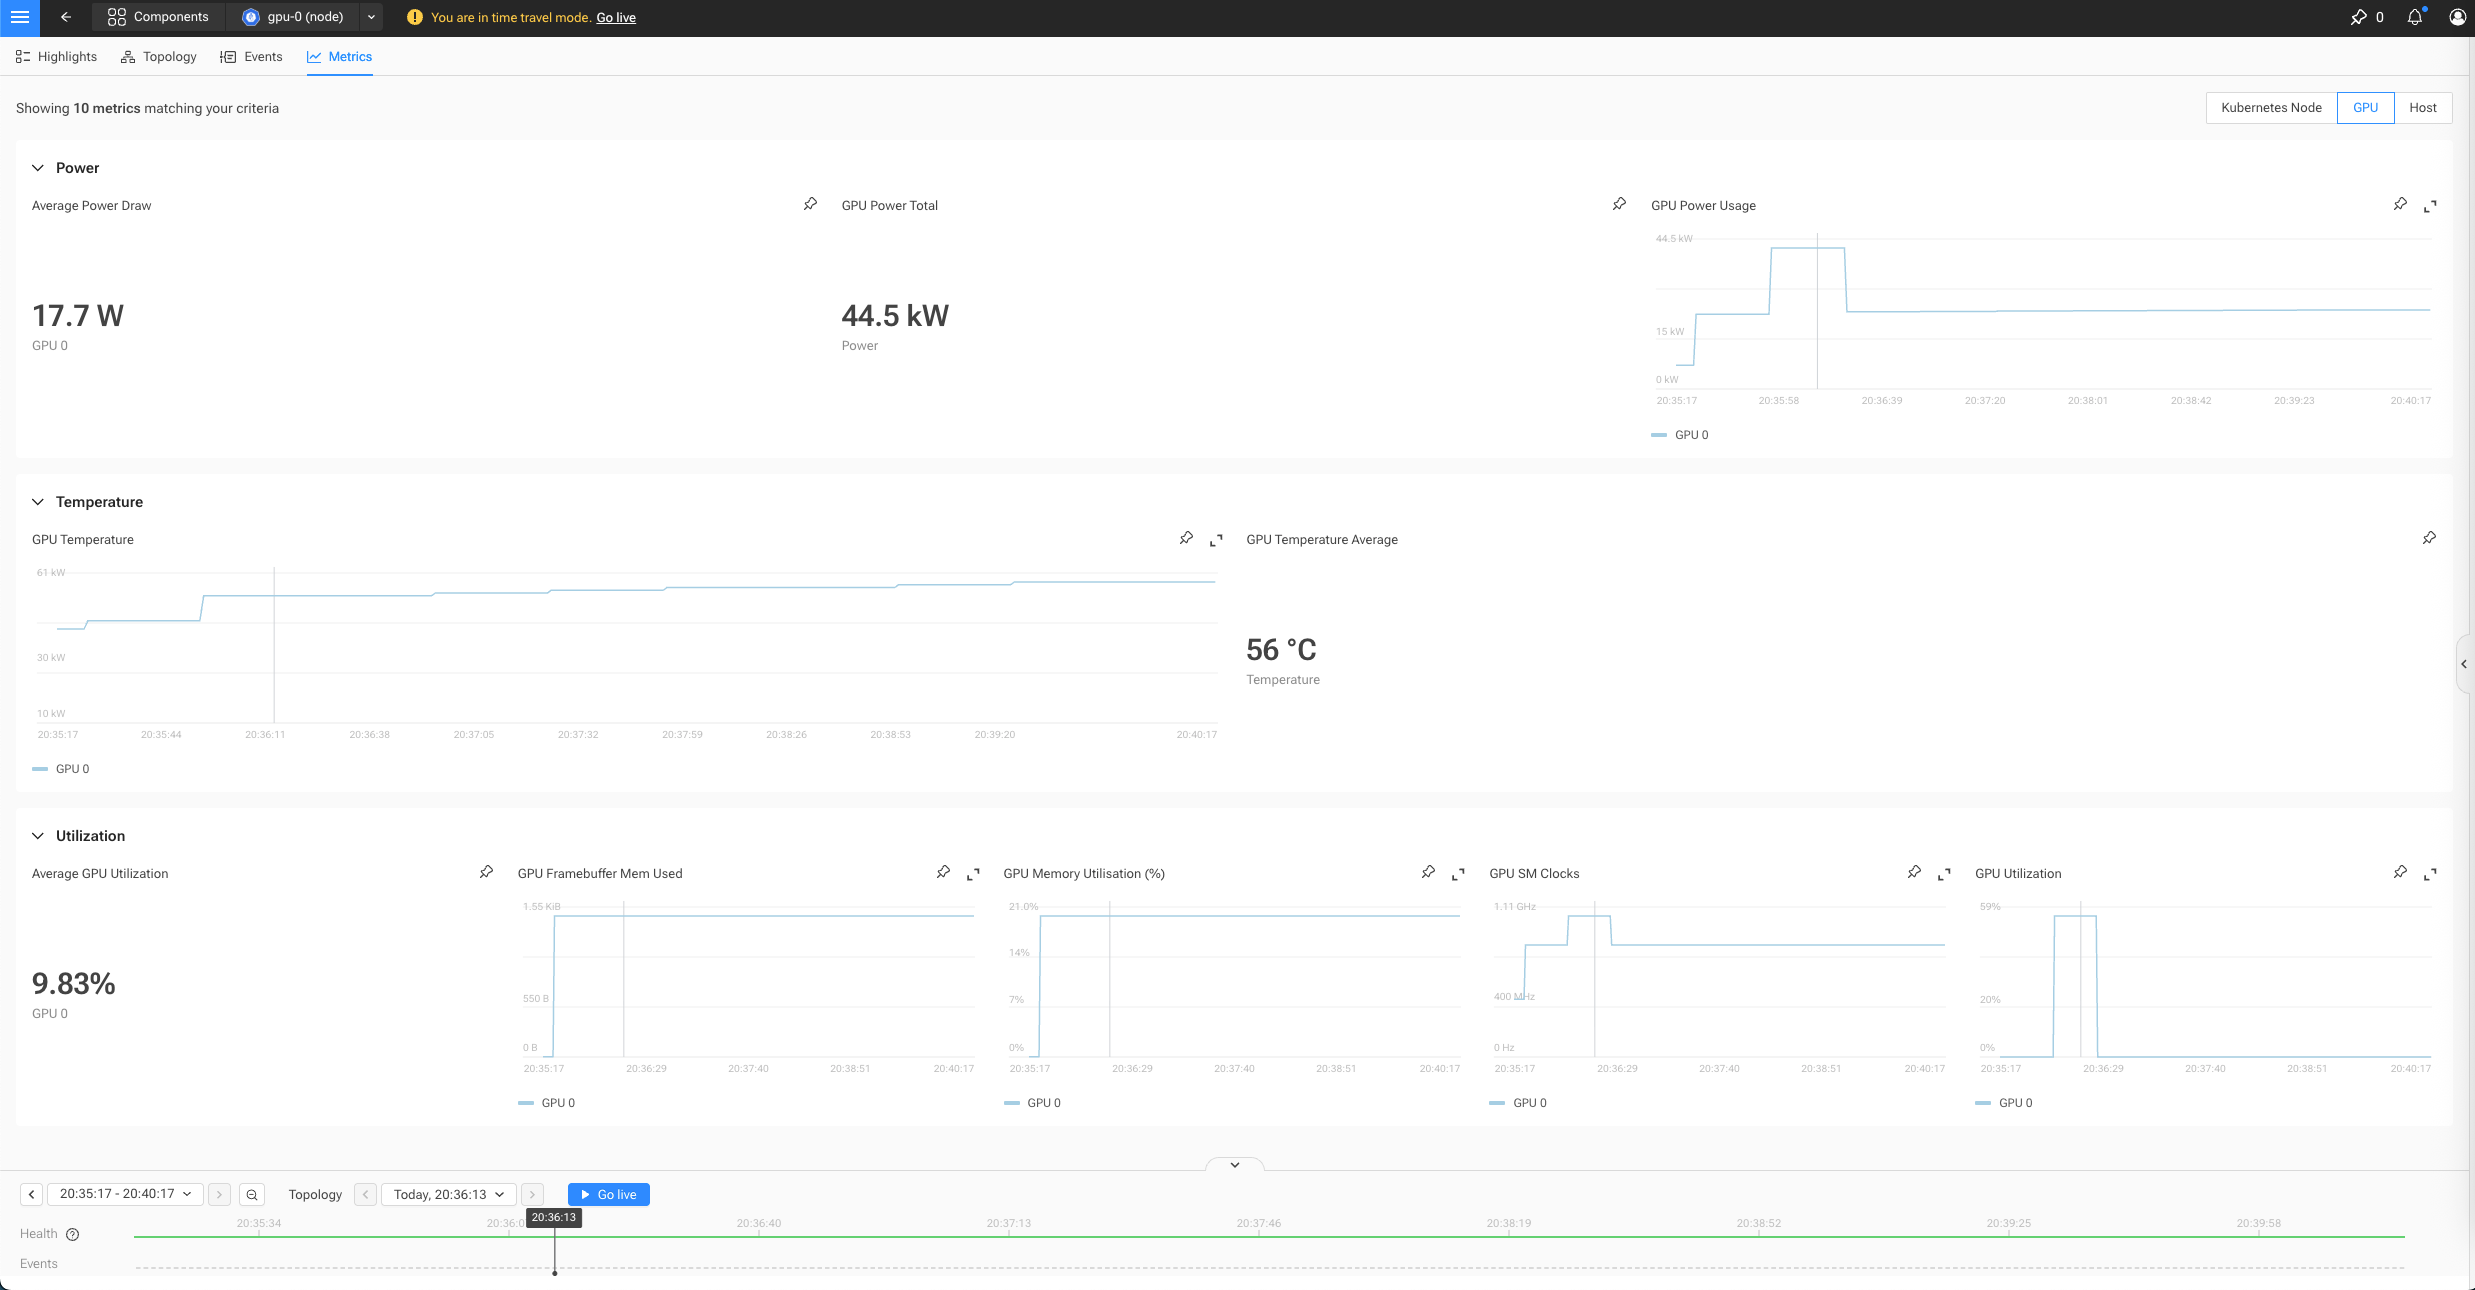
查看 GPU 节点监控,可以看到 GPU 使用信息:
部署测试 GenAI Observability Demo 参考 Helm Chart:https://github.com/SUSE/suse-ai-observability-extension/tree/main/setup/genai-observability-demo
准备配置文件:
1
2
3
4
5
6
7
8
9
10
11
12
cat <<EOF > genai_observability_demo_values.yaml ollamaEndpoint: 'http://ollama.suse-private-ai.svc.cluster.local:11434' otlpEndpoint: 'http://opentelemetry-collector.observability.svc.cluster.local:4318' model: "llama3.2:3b" resources: requests: memory: '200Mi' cpu: '300m' limits: memory: '2000Mi' cpu: '4000m' EOF
执行安装:
1 helm -n suse-private-ai upgrade --install genai-observability-demo genai-observability-demo -f genai_observability_demo_values.yaml
1
2
3
4
5
6
7
8
9
10
11
12
root@suse-o11y-01:~# helm -n suse-private-ai ls NAME NAMESPACE REVISION UPDATED STATUS CHART APP VERSION genai-observability-demo suse-private-ai 1 2025-08-15 14:02:52.04422985 +0800 CST deployed genai-observability-demo-0.1.20.0.6 milvus suse-private-ai 1 2025-08-12 10:15:32.150413955 +0800 CST deployed milvus-4.2.2 2.4.6 ollama suse-private-ai 1 2025-08-12 11:34:18.24052066 +0800 CST deployed ollama-1.16.0 0.6.8 open-webui suse-private-ai 11 2025-08-14 19:47:10.425548195 +0800 CST deployed open-webui-6.13.0 0.6.9 root@suse-o11y-01:~# kubectl get pod -n suse-private-ai -l app.kubernetes.io/name=genai-observability-demo NAME READY STATUS RESTARTS AGE genai-observability-demo-rag101-55f7b8db5f-8djqr 1/1 Running 0 6m53s genai-observability-demo-rag102-5845f6bfc9-8d876 1/1 Running 0 6m53s genai-observability-demo-simple-bb97d9bfb-5xp98 1/1 Running 0 6m53s
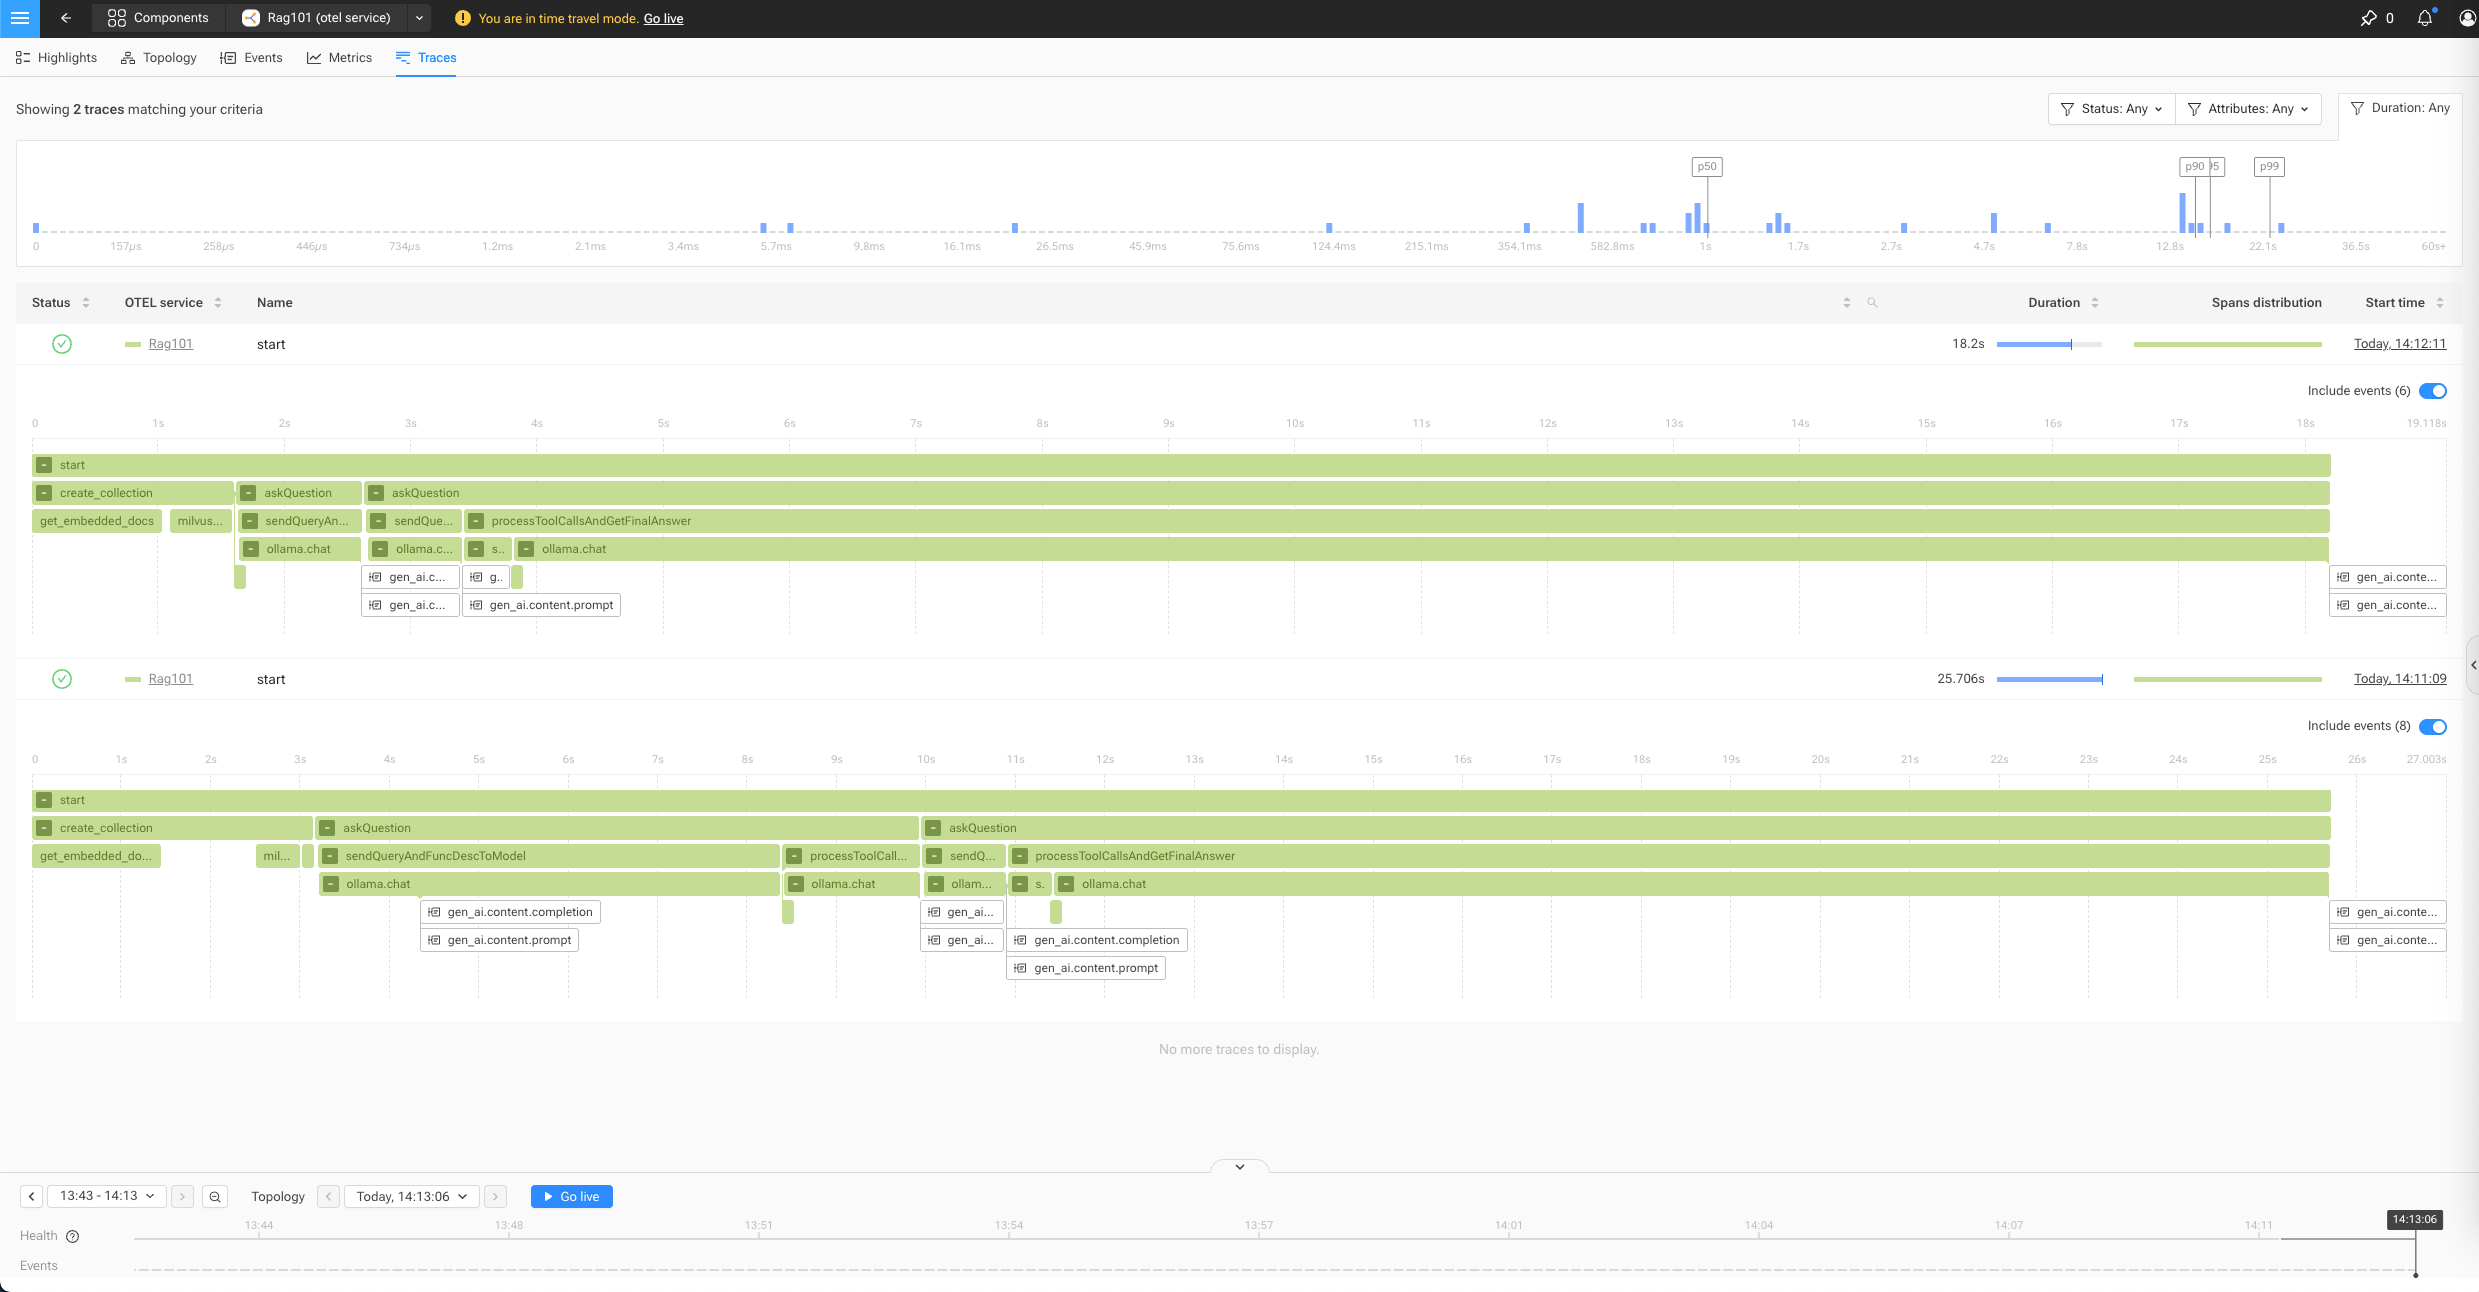
在 SUSE O11y 查看数据: