本文记录在 RTX 3060 12 GiB 上部署和调优 vLLM 的过程,包括 Python 与 Docker 启动方式、请求级采样参数、服务级显存与并发配置,以及通过 HAMi 在 Kubernetes 中共享单张 GPU。本文参数以功能验证和调优起点为主,不代表所有模型和负载下的最佳配置。
前提条件
- GPU 节点已安装与 vLLM 兼容的 NVIDIA 驱动,可通过
nvidia-smi 确认 GPU 能被正常识别。
- 本文使用 uv 创建 Python 虚拟环境和安装依赖,因此 Python 安装方式需要预先安装 uv:https://docs.astral.sh/uv/#installation
- 通过官方预编译 Python wheel 安装 vLLM 时,通常不需要单独安装完整的 CUDA Toolkit;如果需要从源码编译 vLLM、编译自定义 CUDA 扩展,或者运行过程中明确出现需要
nvcc 的 JIT 编译错误,再安装与当前环境兼容的 CUDA Toolkit。
- 使用容器方式运行 vLLM 时,GPU 节点需要安装 Docker 和 NVIDIA Container Toolkit,并确保容器能够访问 NVIDIA GPU。
- 在 Kubernetes 环境部署时,需要运用到 GPU Operator 和 HAMi。
运行 vLLM
通过 Python 运行
安装 vLLM:
1
2
3
4
5
6
7
8
9
| uv venv --python 3.12 --seed --managed-python
source .venv/bin/activate
uv pip install "vllm==0.24.0" --torch-backend=auto
uv pip install "modelscope==1.37.1"
|
环境验证:
1
2
3
4
5
6
7
| python -c '
import torch, vllm
print("vLLM:", vllm.__version__)
print("GPU:", torch.cuda.get_device_name())
print("Capability:", torch.cuda.get_device_capability())
print("VRAM GiB:", torch.cuda.get_device_properties(0).total_memory / 1024**3)
'
|
示例输出:
1
2
3
4
| vLLM: 0.24.0
GPU: NVIDIA GeForce RTX 3060
Capability: (8, 6)
VRAM GiB: 11.63262939453125
|
以 FP16 加载 Qwen2.5-1.5B-Instruct,将单请求最大上下文限制为 8192 token,每次调度最多处理 16 个序列,允许 vLLM 使用约 90% 的 GPU 显存,启用公共前缀 KV Cache 复用,并忽略模型自带的生成配置,统一使用 vLLM 默认采样参数:
1
2
3
4
5
6
7
8
9
10
|
export VLLM_USE_MODELSCOPE=True
vllm serve Qwen/Qwen2.5-1.5B-Instruct \
--dtype half \
--max-model-len 8192 \
--max-num-seqs 16 \
--gpu-memory-utilization 0.90 \
--enable-prefix-caching \
--generation-config vllm
|
通过预编译 wheel 安装 vLLM 时,通常不需要因为使用 FlashInfer 采样器而单独安装 CUDA Toolkit。如果运行时明确出现 FlashInfer 采样器的编译或兼容性错误,可以检查 PyTorch、CUDA 和 FlashInfer 的版本是否匹配,也可以临时回退到其他 Top-K / Top-P 采样实现:
1
2
3
4
5
6
7
8
| VLLM_USE_FLASHINFER_SAMPLER=0 \
vllm serve Qwen/Qwen2.5-1.5B-Instruct \
--dtype half \
--max-model-len 8192 \
--max-num-seqs 16 \
--gpu-memory-utilization 0.90 \
--enable-prefix-caching \
--generation-config vllm
|
VLLM_USE_FLASHINFER_SAMPLER=0 只控制 Top-K / Top-P 采样器后端,并不会禁用 vLLM 中所有可能使用 FlashInfer 的功能,因此应将其作为针对具体错误的排查手段,而不是默认配置。
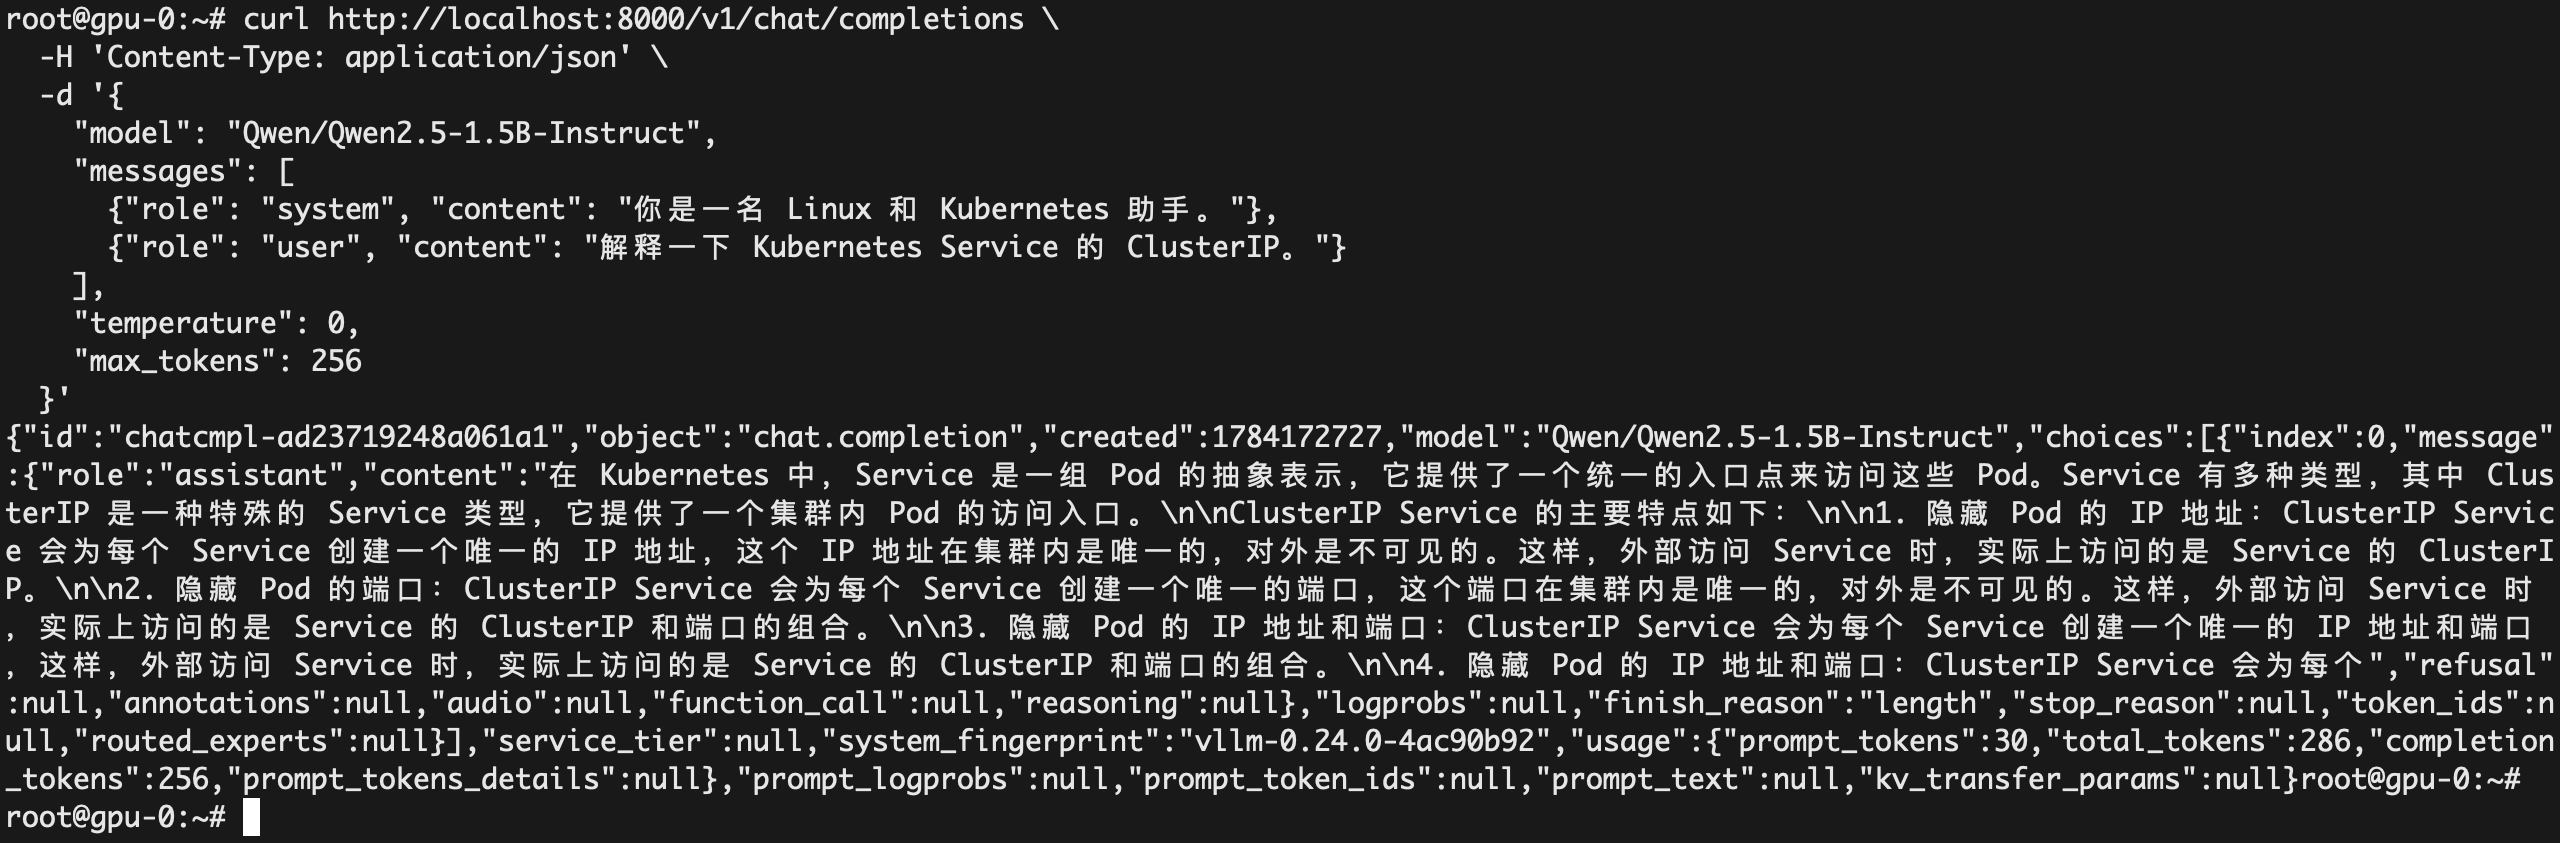
运行成功后,会监听 8000 端口,此时可以调用 OpenAI 兼容接口:
1
2
3
4
5
6
7
8
9
10
11
| curl http://localhost:8000/v1/chat/completions \
-H 'Content-Type: application/json' \
-d '{
"model": "Qwen/Qwen2.5-1.5B-Instruct",
"messages": [
{"role": "system", "content": "你是一名 Linux 和 Kubernetes 助手。"},
{"role": "user", "content": "解释一下 Kubernetes Service 的 ClusterIP。"}
],
"temperature": 0,
"max_tokens": 256
}'
|
通过 Docker 运行
vLLM 官方提供了镜像,可以直接通过 Docker 运行:
1
2
3
4
5
6
7
8
9
10
11
12
13
14
15
| docker run --rm \
--name vllm \
--runtime nvidia \
--gpus all \
-v ~/.cache/huggingface:/root/.cache/huggingface \
-p 8000:8000 \
--ipc=host \
vllm/vllm-openai:v0.24.0 \
--model Qwen/Qwen2.5-1.5B-Instruct \
--dtype half \
--max-model-len 8192 \
--max-num-seqs 16 \
--gpu-memory-utilization 0.90 \
--enable-prefix-caching \
--generation-config vllm
|
也可以通过魔搭社区获取大模型:
1
2
3
4
5
6
7
8
9
10
11
12
13
14
15
16
17
| docker run --rm \
--name vllm \
--runtime nvidia \
--gpus all \
-e VLLM_USE_MODELSCOPE=True \
-e MODELSCOPE_CACHE=/modelscope_cache \
-v /data/modelscope:/modelscope_cache \
-p 8000:8000 \
--ipc=host \
vllm/vllm-openai:v0.24.0 \
--model Qwen/Qwen2.5-1.5B-Instruct \
--dtype half \
--max-model-len 8192 \
--max-num-seqs 16 \
--gpu-memory-utilization 0.90 \
--enable-prefix-caching \
--generation-config vllm
|
运行成功后,同样可以通过 8000 端口调用大模型。
请求级参数
通过在请求中调整 Temperature、Top-K、Top-P 参数,应用于不同场景。
- 回答太随机、幻觉多:降低 Temperature
- 回答太单调:提高 Temperature
- 偶尔出现非常离谱的词:降低 Top-P 或 Top-K
- 候选范围太窄、表达重复:提高 Top-P 或 Top-K
场景一:事实问答:使用贪心解码
要求答案稳定、可重复:
1
2
3
4
5
| {
"temperature": 0,
"top_p": 1,
"top_k": 0
}
|
当 temperature=0 时,vLLM 使用贪心解码,top_p 和 top_k 实际上不再发挥筛选作用,并在内部设置 top_p=1、top_k=0、min_p=0。这里显式写出 top_p=1 和 top_k=0,主要是为了让配置含义更加直观。
例如:
1
2
3
4
5
6
7
8
9
10
11
12
| curl http://localhost:8000/v1/chat/completions \
-H 'Content-Type: application/json' \
-d '{
"model": "Qwen/Qwen2.5-1.5B-Instruct",
"messages": [
{"role": "user", "content": "Kubernetes Service 有哪些类型?"}
],
"temperature": 0,
"top_p": 1,
"top_k": 0,
"max_tokens": 256
}'
|
场景二:代码生成:低随机性采样
希望稳定,但不要完全僵化:
1
2
3
4
5
| {
"temperature": 0.2,
"top_p": 0.9,
"top_k": 20
}
|
例如:
1
2
3
4
5
6
7
8
9
10
11
12
13
14
15
| curl http://localhost:8000/v1/chat/completions \
-H 'Content-Type: application/json' \
-d '{
"model": "Qwen/Qwen2.5-1.5B-Instruct",
"messages": [
{
"role": "user",
"content": "编写一个 Bash 脚本,检查 8000 端口是否正在监听。"
}
],
"temperature": 0.2,
"top_p": 0.9,
"top_k": 20,
"max_tokens": 256
}'
|
场景三:通用聊天:平衡稳定性与多样性
在稳定性和多样性之间取得平衡:
1
2
3
4
5
| {
"temperature": 0.7,
"top_p": 0.9,
"top_k": 40
}
|
例如:
1
2
3
4
5
6
7
8
9
10
11
12
13
14
15
| curl http://localhost:8000/v1/chat/completions \
-H 'Content-Type: application/json' \
-d '{
"model": "Qwen/Qwen2.5-1.5B-Instruct",
"messages": [
{
"role": "user",
"content": "用通俗的例子解释 vLLM 的 Continuous Batching。"
}
],
"temperature": 0.7,
"top_p": 0.9,
"top_k": 40,
"max_tokens": 512
}'
|
场景四:创意生成:提高候选多样性
提高随机性和候选范围:
1
2
3
4
5
| {
"temperature": 1.0,
"top_p": 0.95,
"top_k": 50
}
|
例如:
1
2
3
4
5
6
7
8
9
10
11
12
13
14
15
| curl http://localhost:8000/v1/chat/completions \
-H 'Content-Type: application/json' \
-d '{
"model": "Qwen/Qwen2.5-1.5B-Instruct",
"messages": [
{
"role": "user",
"content": "给一个云原生技术博客起十个有创意的名字。"
}
],
"temperature": 1.0,
"top_p": 0.95,
"top_k": 50,
"max_tokens": 512
}'
|
服务级参数
常见参数:
| 参数 |
作用 |
--dtype |
权重和计算精度 |
--gpu-memory-utilization |
当前 vLLM 实例可使用的显存比例 |
--max-model-len |
输入 Token 与输出 Token 的总长度上限 |
--max-num-seqs |
单轮最多处理的序列数 |
--max-num-batched-tokens |
单轮最多调度的 Token 数 |
--enable-prefix-caching |
复用完全相同的公共 Token 前缀对应的 KV Cache |
--generation-config vllm |
使用 vLLM 默认采样参数 |
--served-model-name |
API 中暴露的模型名 |
--api-key |
API 鉴权 |
--enforce-eager |
禁用 CUDA Graph |
--cpu-offload-gb |
将部分权重放入 CPU |
--trust-remote-code |
执行模型仓库中的自定义代码 |
表中的数值是 Qwen2.5-1.5B-Instruct 与 RTX 3060 12 GiB 环境下的测试起点,不是所有模型和负载下的固定最佳配置。
场景一:低并发、本地交互
适合本地聊天和代码助手,可以从以下配置开始测试:
1
2
3
4
5
| --dtype half \
--gpu-memory-utilization 0.85 \
--max-model-len 4096 \
--max-num-seqs 4 \
--generation-config vllm
|
特点:
- 不追求大量并发。
- 较小的
max-model-len 可以降低 KV Cache 容量压力。
- 较小的
max-num-seqs 可能减少 CUDA Graph 捕获规模和相关显存占用。
- 是否能够降低首 Token 延迟,需要通过实际基准测试确认。
gpu-memory-utilization=0.85 主要用于保留显存余量,不应直接理解为低延迟优化。设置过低会减少 KV Cache 容量,在高负载下可能增加抢占。
场景二:多用户并发
适合多个客户端同时调用短文本请求:
1
2
3
4
5
| --dtype half \
--gpu-memory-utilization 0.90 \
--max-model-len 4096 \
--max-num-seqs 16 \
--generation-config vllm
|
如果不同请求包含相同的长 System Prompt、few-shot 示例或其他公共 Token 前缀,可以额外开启:
多用户并发本身不意味着 Prefix Caching 一定有效,是否有效取决于不同请求之间是否具有完全相同的 Token 前缀。
场景三:长上下文
适合长文档总结、日志分析和代码问答:
1
2
3
4
5
| --dtype half \
--gpu-memory-utilization 0.90 \
--max-model-len 8192 \
--max-num-seqs 4 \
--generation-config vllm
|
上下文长度增加会提高单个请求的 KV Cache 占用,因此通常需要降低并发数量。在实际请求没有公共长前缀时,不需要为了长上下文单独开启 Prefix Caching。
场景四:相同长文档的多次问答
重点开启 Prefix Caching:
1
2
3
4
| --max-model-len 8192 \
--max-num-seqs 8 \
--enable-prefix-caching \
--generation-config vllm
|
适合以下请求模式:
1
2
3
| 长文档 + 问题 A
长文档 + 问题 B
长文档 + 问题 C
|
公共长文档必须位于请求的相同 Token 前缀位置。命中缓存后,可以复用已经计算好的 KV Cache,减少后续请求的 Prefill 计算和首 Token 延迟。
Prefix Caching 不会缓存模型最终生成的回答,也不会直接加速输出阶段的 Decode。如果每次 RAG 检索出来的文档块或文档顺序不同,缓存命中率可能很低。
使用 HAMi 在单卡上运行多个 vLLM 服务
vLLM 本身可以通过 --gpu-memory-utilization 限制单实例的显存使用量,但标准 Kubernetes GPU Device Plugin 通常按整卡分配 nvidia.com/gpu,无法对多个 Pod 进行细粒度的显存与算力调度。HAMi 可以将同一张物理 GPU 划分给多个工作负载,并分别限制其显存和计算资源。
当 GPU 节点已接入 Kubernetes 集群,且安装配置内核驱动 / NVIDIA Container Toolkit / GPU Operator / HAMi 后,即可通过 HAMi 部署多个 vLLM 实例。
如果使用 GPU Operator 管理驱动和容器工具链,应关闭 GPU Operator 自带的 NVIDIA Device Plugin,由 HAMi Device Plugin 负责上报和分配 GPU 资源。
本示例环境只有一个 GPU 节点,并且节点只有一张 RTX 3060,因此两个 Pod 会共享同一张物理 GPU。多节点或单节点多卡环境中,需要配置 HAMi GPU 调度策略,或通过 nvidia.com/use-gpuuuid 将两个 Pod 固定到同一张 GPU。
Helm Chart Values 配置
GPU Operator:
1
2
3
4
5
6
7
8
9
10
11
12
13
14
15
| toolkit:
enabled: true
env:
- name: CONTAINERD_CONFIG
value: /var/lib/rancher/rke2/agent/etc/containerd/config.toml
- name: CONTAINERD_SOCKET
value: /run/k3s/containerd/containerd.sock
driver:
enabled: false
devicePlugin:
enabled: false
|
HAMi:
1
2
3
4
5
6
7
8
9
| devicePlugin:
deviceListStrategy: cdi-annotations
nvidiaDriverRoot: /
nvidiaHookPath: /usr/local/nvidia/toolkit/nvidia-ctk
scheduler:
kubeScheduler:
imageTag: v1.35.6
|
部署 vLLM
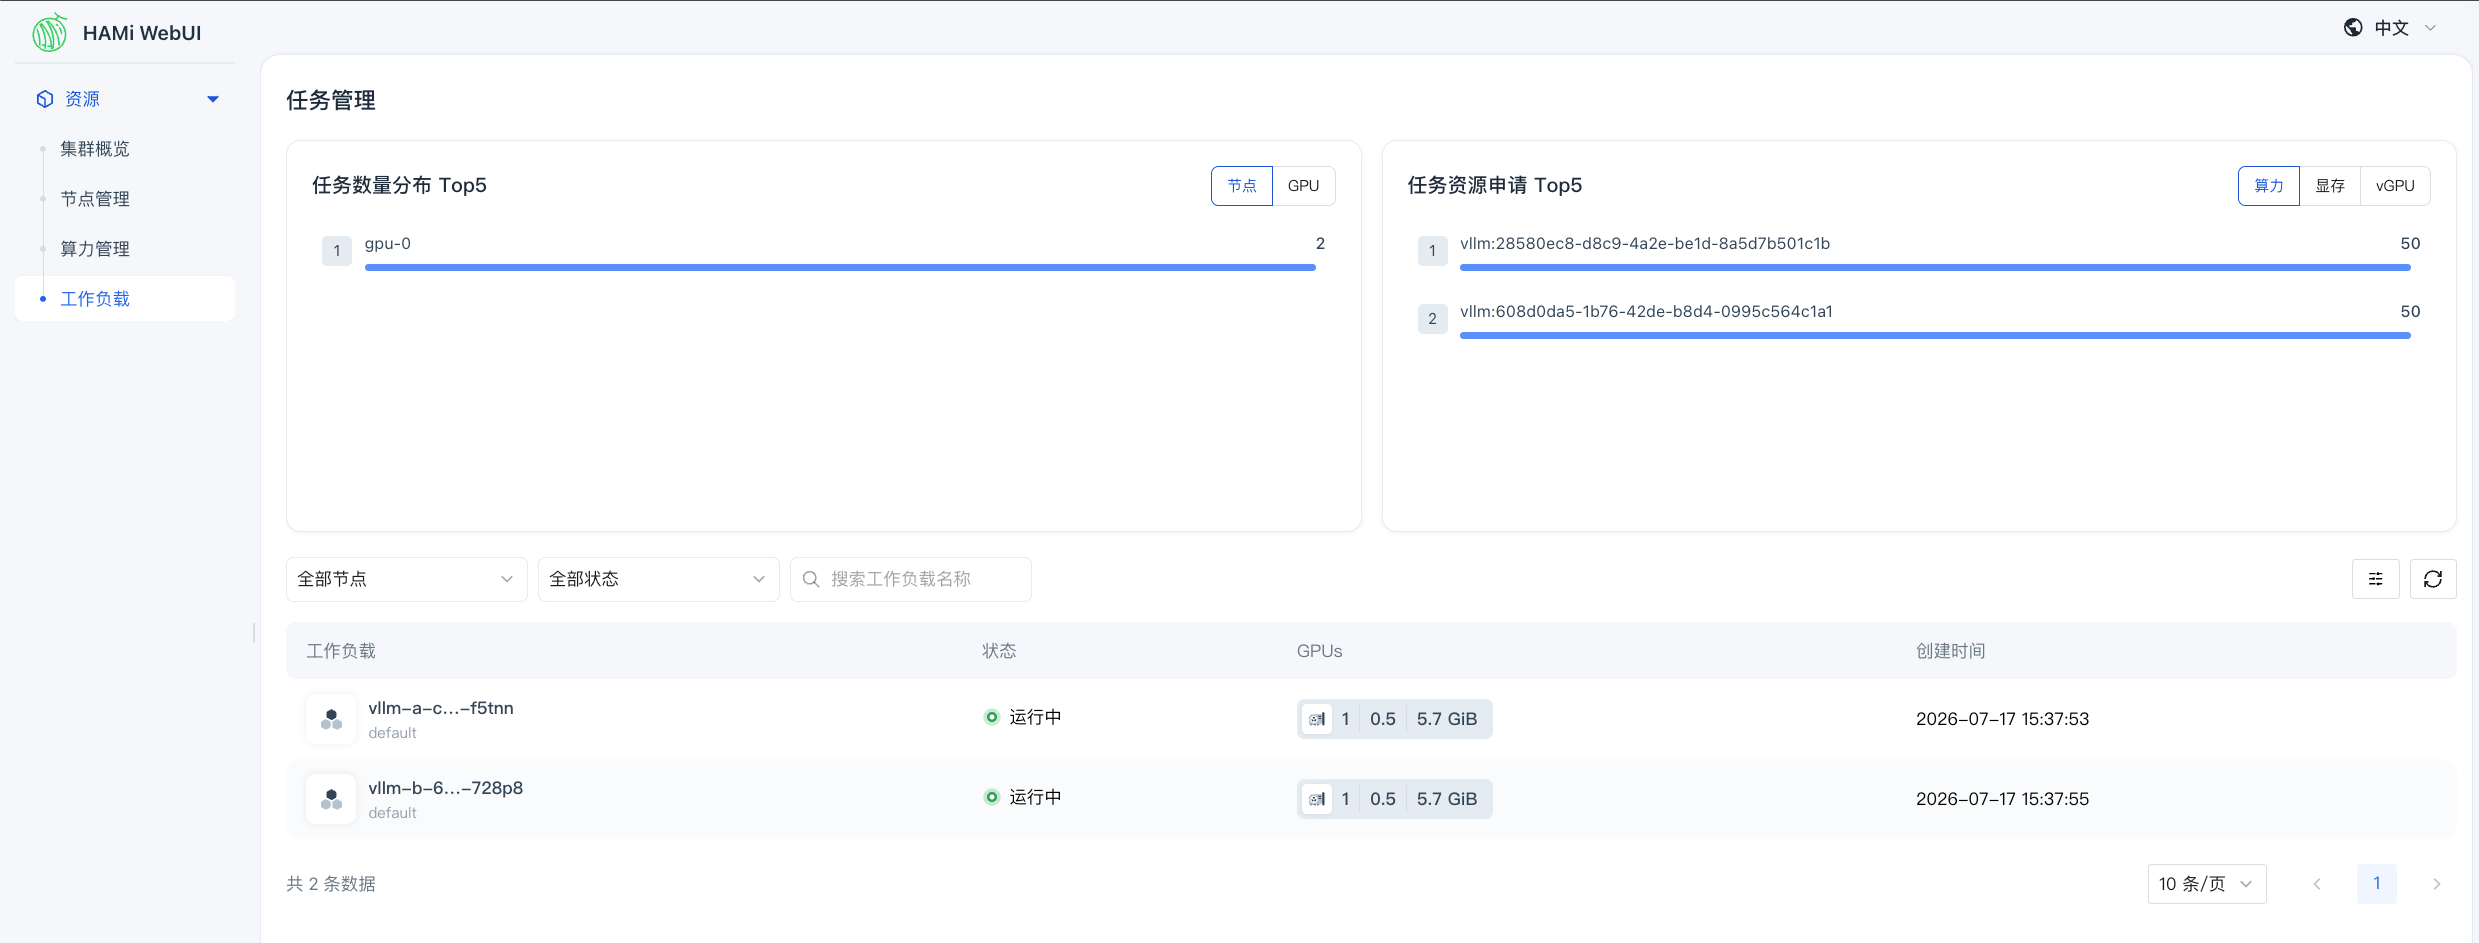
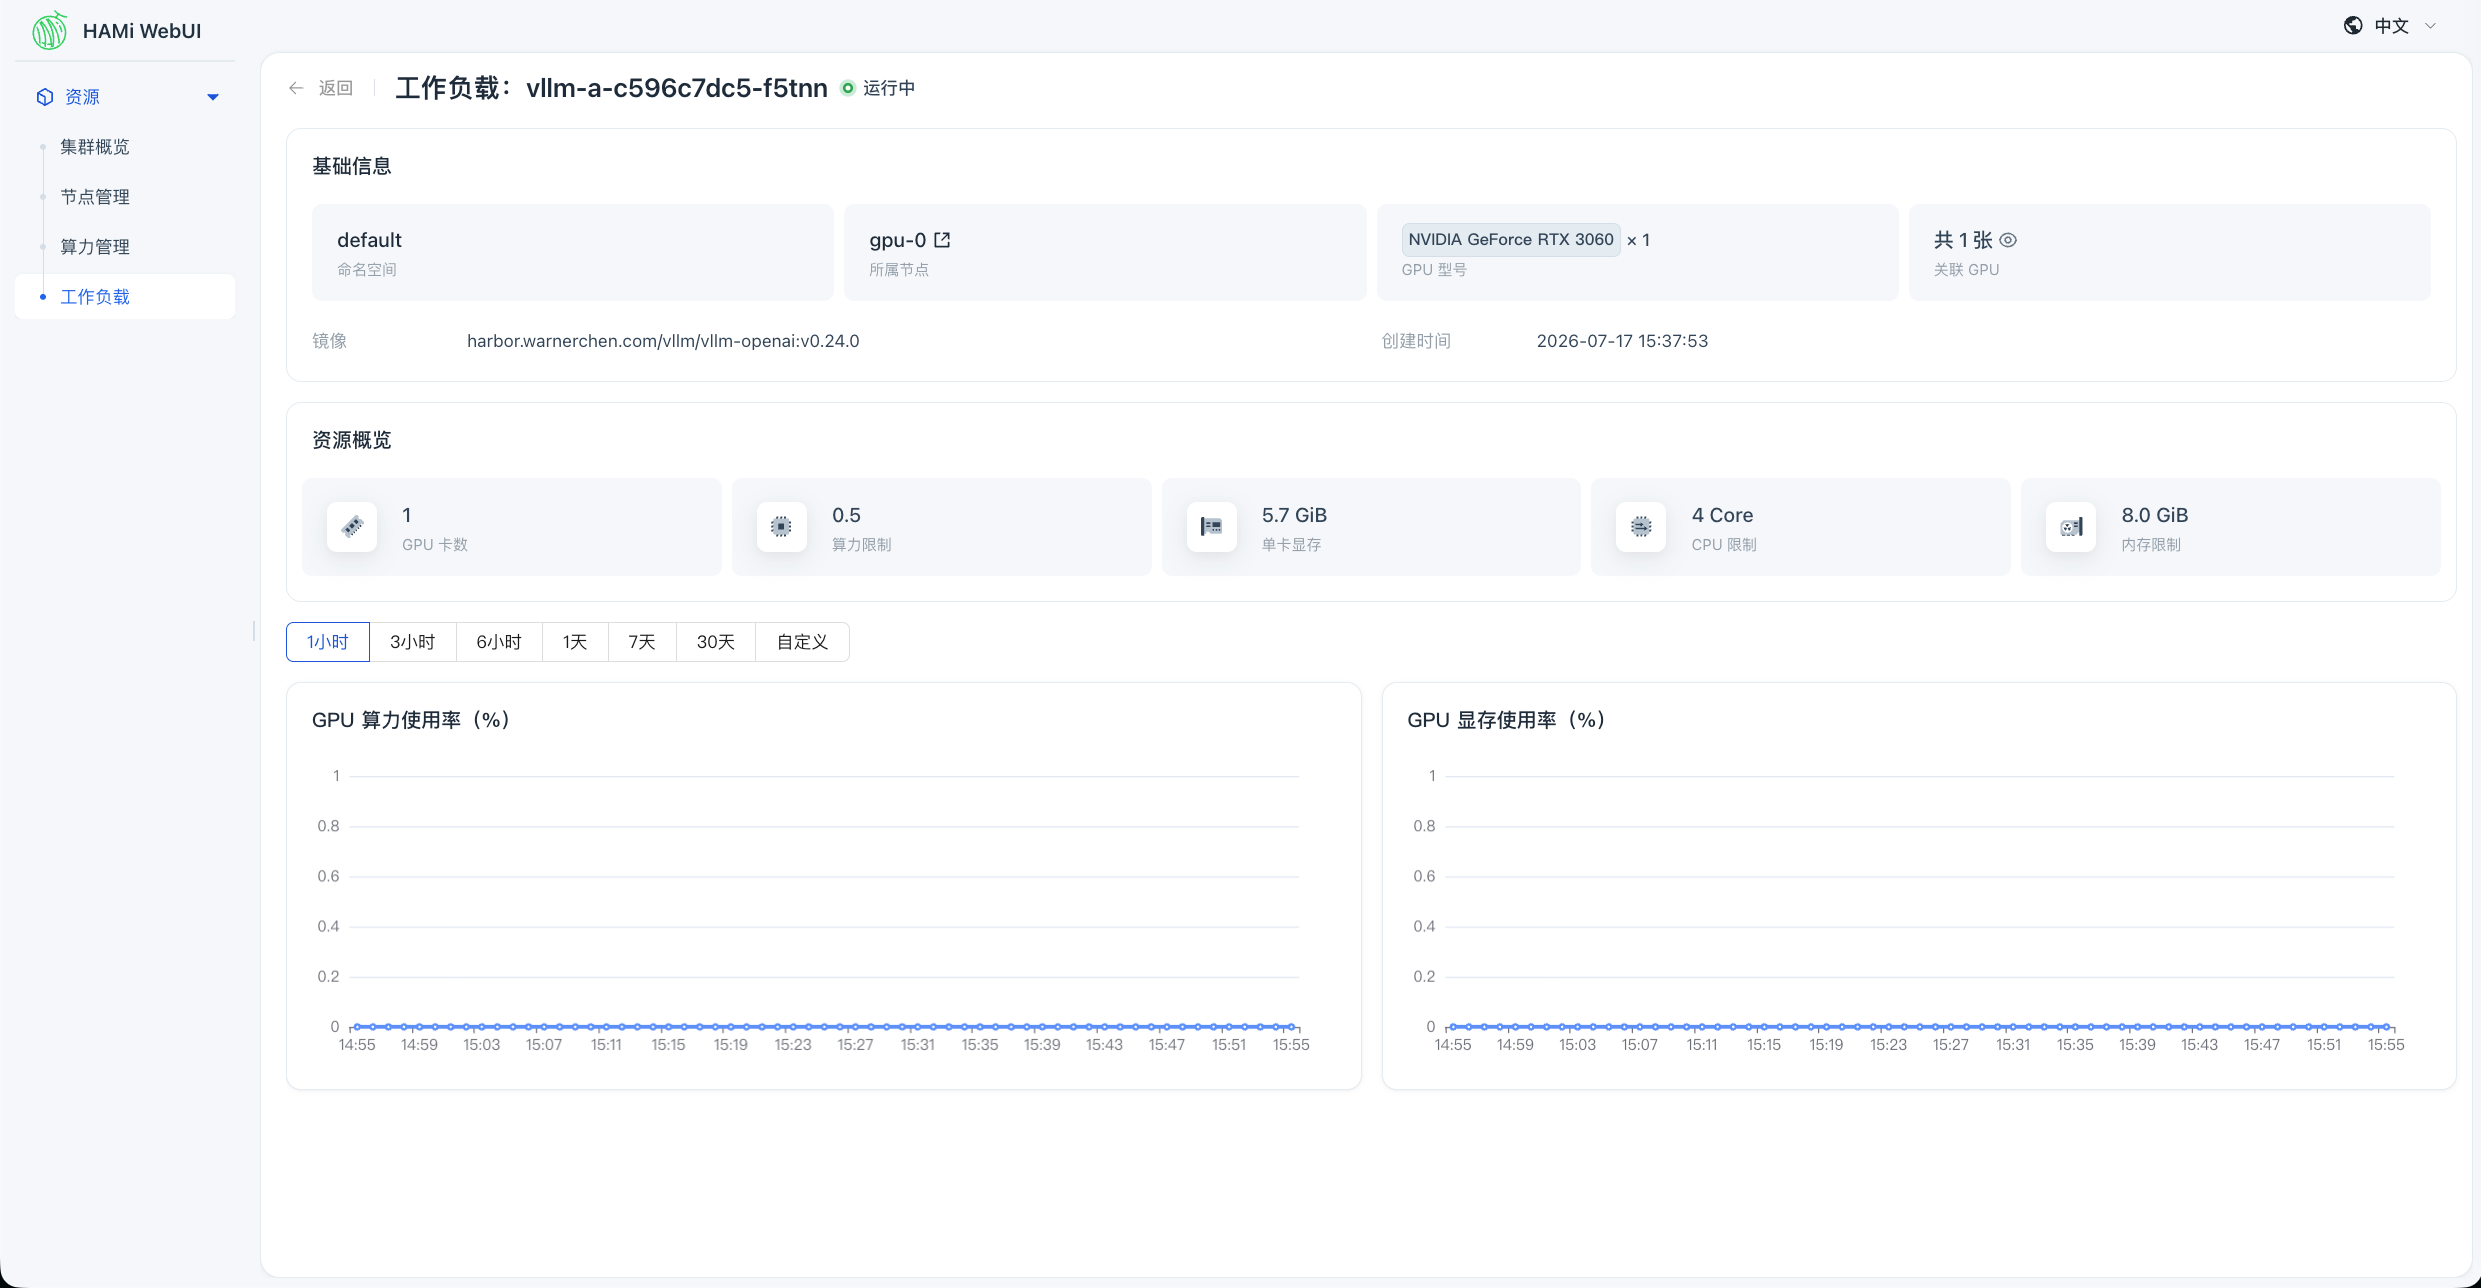
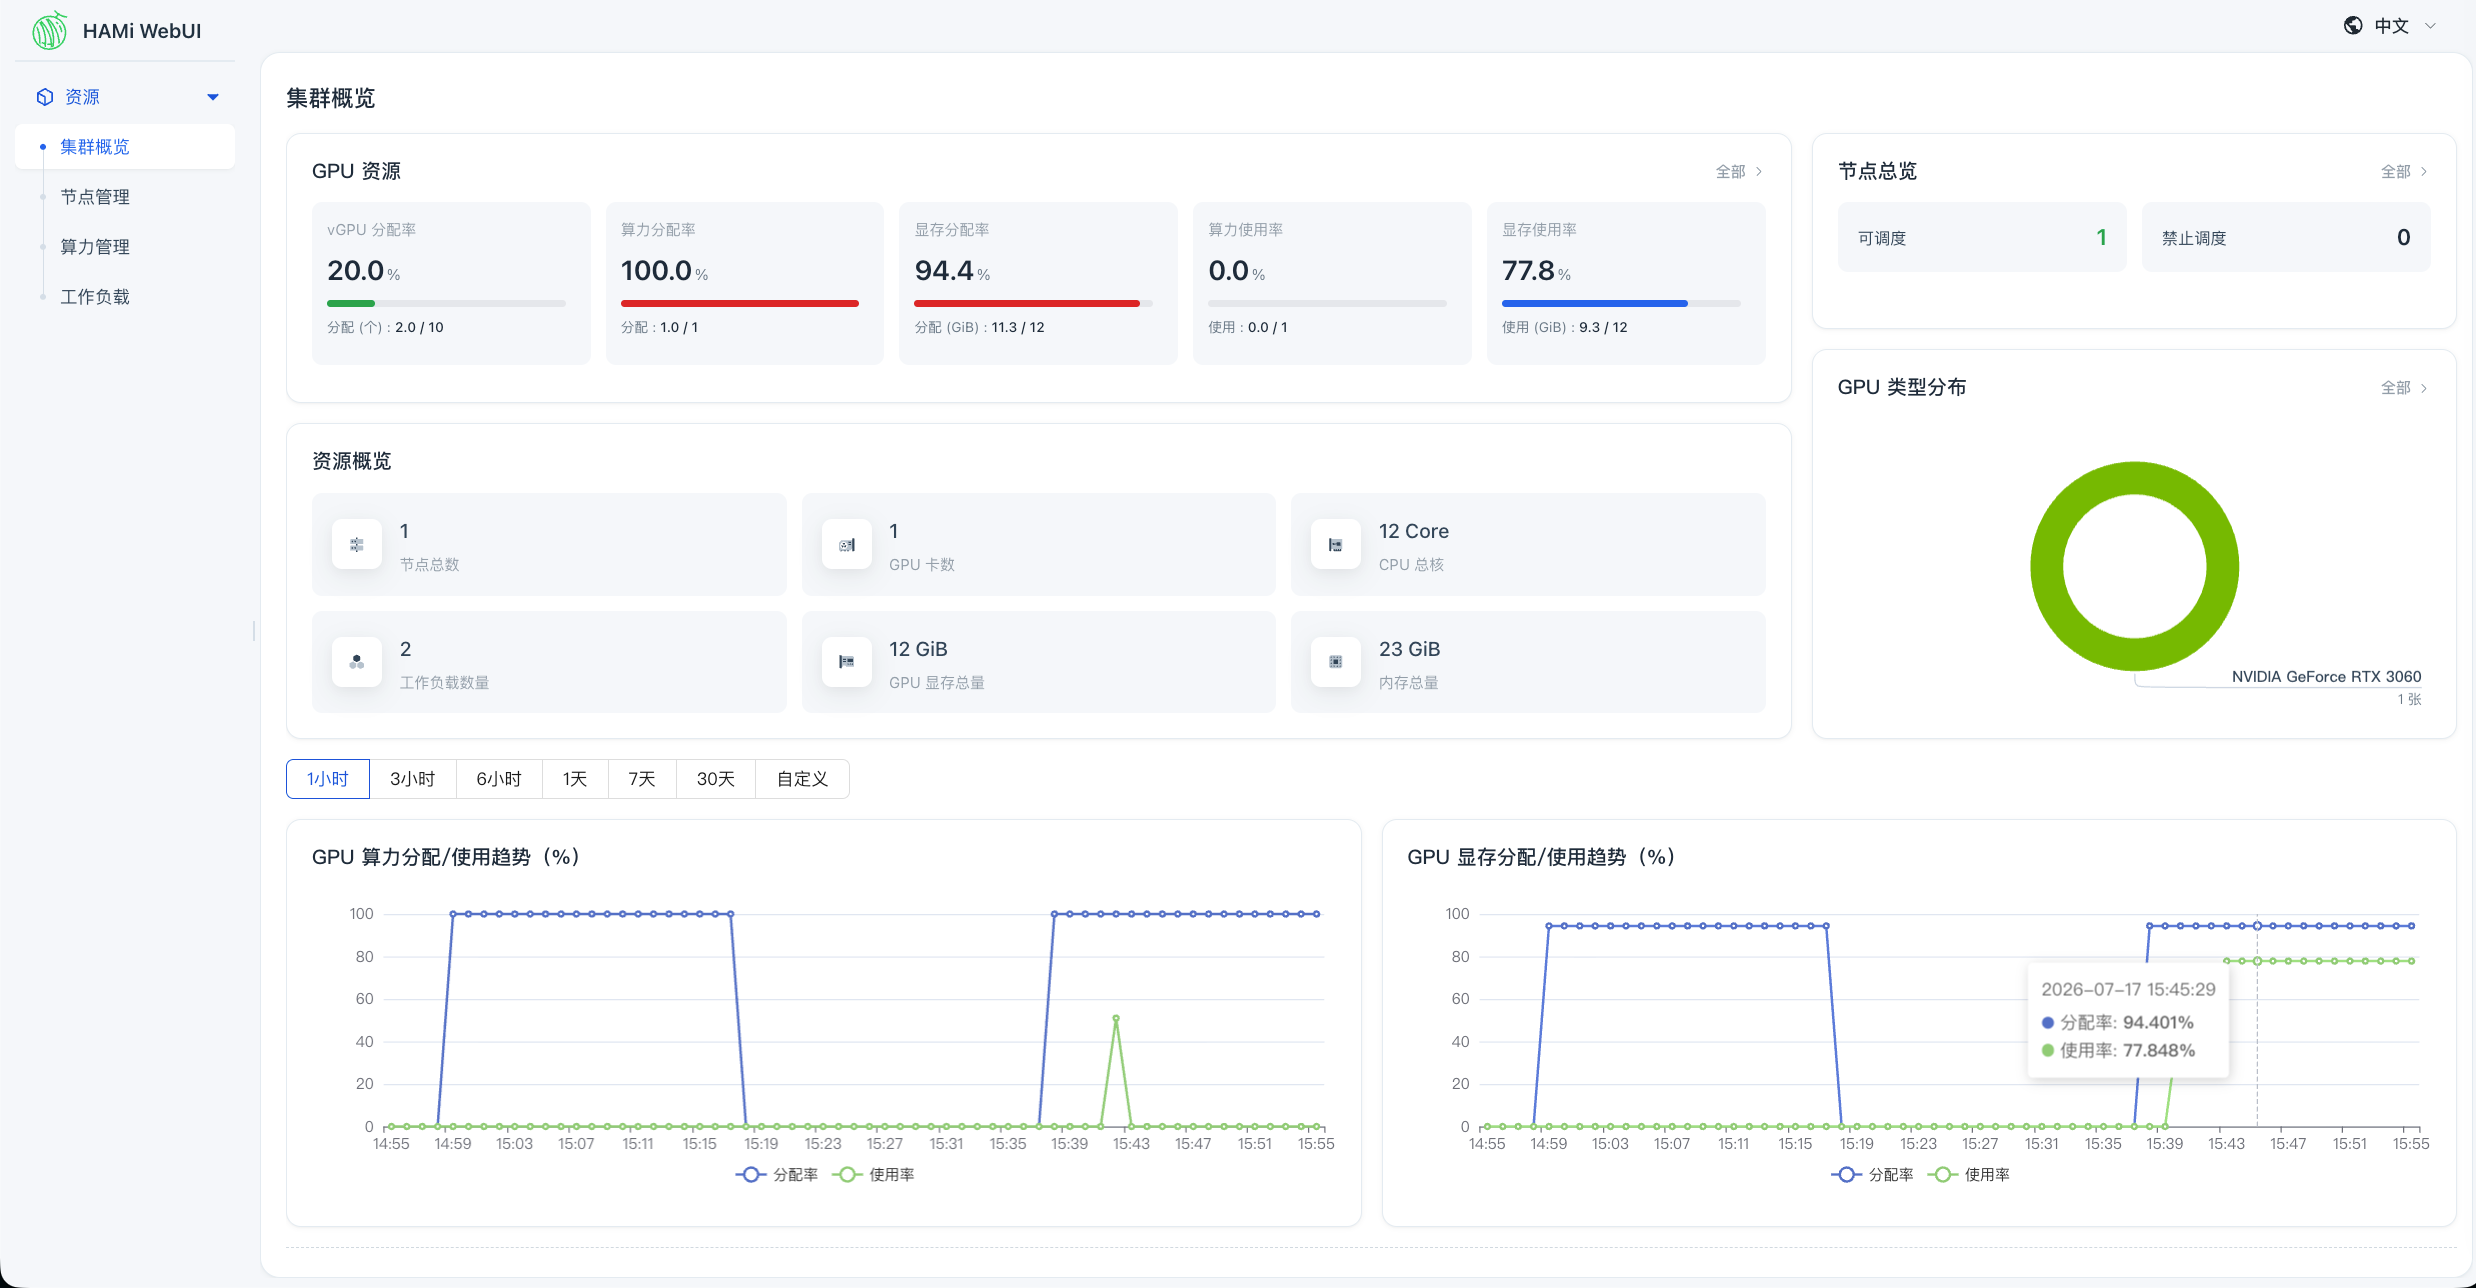
运行两个 vLLM Deployment,每个实例使用 1 个 vGPU、5800 MiB 显存、50% 算力:
1
2
3
4
5
6
7
8
9
10
11
12
13
14
15
16
17
18
19
20
21
22
23
24
25
26
27
28
29
30
31
32
33
34
35
36
37
38
39
40
41
42
43
44
45
46
47
48
49
50
51
52
53
54
55
56
57
58
59
60
61
62
63
64
65
66
67
68
69
70
71
72
73
74
75
76
77
78
79
80
81
82
83
84
85
86
87
88
89
90
91
92
93
94
95
96
97
98
99
100
101
102
103
104
105
106
107
108
109
110
111
112
113
114
115
116
117
118
119
120
121
122
123
124
125
126
127
128
129
130
131
132
133
134
135
136
137
138
139
140
141
142
143
144
145
146
147
148
149
150
151
152
153
154
155
156
157
158
159
160
161
162
163
164
165
166
167
168
169
170
171
172
173
174
175
176
177
178
179
180
181
182
183
184
185
186
187
188
189
190
191
192
193
194
195
196
197
198
199
200
201
202
203
204
205
206
207
208
209
210
211
212
213
214
215
| cat <<EOF | kubectl apply -f -
apiVersion: apps/v1
kind: Deployment
metadata:
name: vllm-a
spec:
replicas: 1
strategy:
type: Recreate
selector:
matchLabels:
app: vllm-a
template:
metadata:
labels:
app: vllm-a
spec:
terminationGracePeriodSeconds: 30
containers:
- name: vllm
image: harbor.warnerchen.com/vllm/vllm-openai:v0.24.0
imagePullPolicy: IfNotPresent
args:
- --model
- Qwen/Qwen2.5-1.5B-Instruct
- --dtype
- half
- --max-model-len
- "4096"
- --max-num-seqs
- "4"
- --gpu-memory-utilization
- "0.85"
- --enable-prefix-caching
- --generation-config
- vllm
env:
- name: VLLM_USE_MODELSCOPE
value: "True"
- name: MODELSCOPE_CACHE
value: /modelscope_cache
ports:
- name: http
containerPort: 8000
protocol: TCP
resources:
requests:
cpu: "2"
memory: 4Gi
nvidia.com/gpu: "1"
nvidia.com/gpumem: "5800"
nvidia.com/gpucores: "50"
limits:
cpu: "4"
memory: 8Gi
nvidia.com/gpu: "1"
nvidia.com/gpumem: "5800"
nvidia.com/gpucores: "50"
startupProbe:
httpGet:
path: /health
port: http
periodSeconds: 10
timeoutSeconds: 3
failureThreshold: 60
readinessProbe:
httpGet:
path: /health
port: http
periodSeconds: 5
timeoutSeconds: 3
failureThreshold: 3
livenessProbe:
httpGet:
path: /health
port: http
periodSeconds: 15
timeoutSeconds: 3
failureThreshold: 5
volumeMounts:
- name: modelscope-cache
mountPath: /modelscope_cache
- name: shm
mountPath: /dev/shm
volumes:
- name: modelscope-cache
hostPath:
path: /data/modelscope
type: DirectoryOrCreate
- name: shm
emptyDir:
medium: Memory
sizeLimit: 1Gi
---
apiVersion: v1
kind: Service
metadata:
name: vllm-a
spec:
type: ClusterIP
selector:
app: vllm-a
ports:
- name: http
port: 8000
targetPort: http
protocol: TCP
---
apiVersion: apps/v1
kind: Deployment
metadata:
name: vllm-b
spec:
replicas: 1
strategy:
type: Recreate
selector:
matchLabels:
app: vllm-b
template:
metadata:
labels:
app: vllm-b
spec:
terminationGracePeriodSeconds: 30
containers:
- name: vllm
image: harbor.warnerchen.com/vllm/vllm-openai:v0.24.0
imagePullPolicy: IfNotPresent
args:
- --model
- Qwen/Qwen2.5-1.5B-Instruct
- --dtype
- half
- --max-model-len
- "4096"
- --max-num-seqs
- "4"
- --gpu-memory-utilization
- "0.85"
- --enable-prefix-caching
- --generation-config
- vllm
env:
- name: VLLM_USE_MODELSCOPE
value: "True"
- name: MODELSCOPE_CACHE
value: /modelscope_cache
ports:
- name: http
containerPort: 8000
protocol: TCP
resources:
requests:
cpu: "2"
memory: 4Gi
nvidia.com/gpu: "1"
nvidia.com/gpumem: "5800"
nvidia.com/gpucores: "50"
limits:
cpu: "4"
memory: 8Gi
nvidia.com/gpu: "1"
nvidia.com/gpumem: "5800"
nvidia.com/gpucores: "50"
startupProbe:
httpGet:
path: /health
port: http
periodSeconds: 10
timeoutSeconds: 3
failureThreshold: 60
readinessProbe:
httpGet:
path: /health
port: http
periodSeconds: 5
timeoutSeconds: 3
failureThreshold: 3
livenessProbe:
httpGet:
path: /health
port: http
periodSeconds: 15
timeoutSeconds: 3
failureThreshold: 5
volumeMounts:
- name: modelscope-cache
mountPath: /modelscope_cache
- name: shm
mountPath: /dev/shm
volumes:
- name: modelscope-cache
hostPath:
path: /data/modelscope
type: DirectoryOrCreate
- name: shm
emptyDir:
medium: Memory
sizeLimit: 1Gi
---
apiVersion: v1
kind: Service
metadata:
name: vllm-b
spec:
type: ClusterIP
selector:
app: vllm-b
ports:
- name: http
port: 8000
targetPort: http
protocol: TCP
EOF
|
检查运行情况:
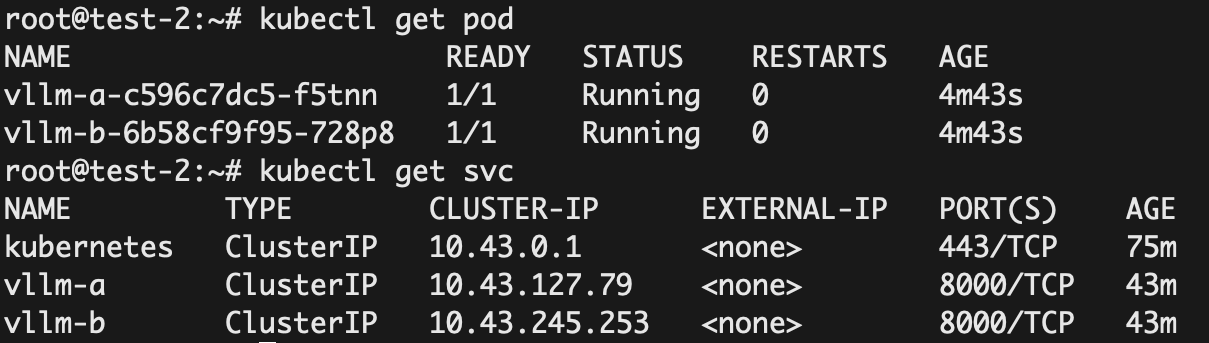
分别对两个 vLLM 实例发起请求:
1
2
3
4
5
6
7
8
9
10
11
12
13
14
15
16
17
18
19
20
21
22
23
24
25
26
27
| curl http://<vllm-a-cluster-ip>:8000/v1/chat/completions \
-H 'Content-Type: application/json' \
-d '{
"model": "Qwen/Qwen2.5-1.5B-Instruct",
"messages": [
{
"role": "user",
"content": "你是什么大模型"
}
],
"temperature": 0,
"max_tokens": 256
}'
curl http://<vllm-b-cluster-ip>:8000/v1/chat/completions \
-H 'Content-Type: application/json' \
-d '{
"model": "Qwen/Qwen2.5-1.5B-Instruct",
"messages": [
{
"role": "user",
"content": "你是什么大模型"
}
],
"temperature": 0,
"max_tokens": 256
}'
|
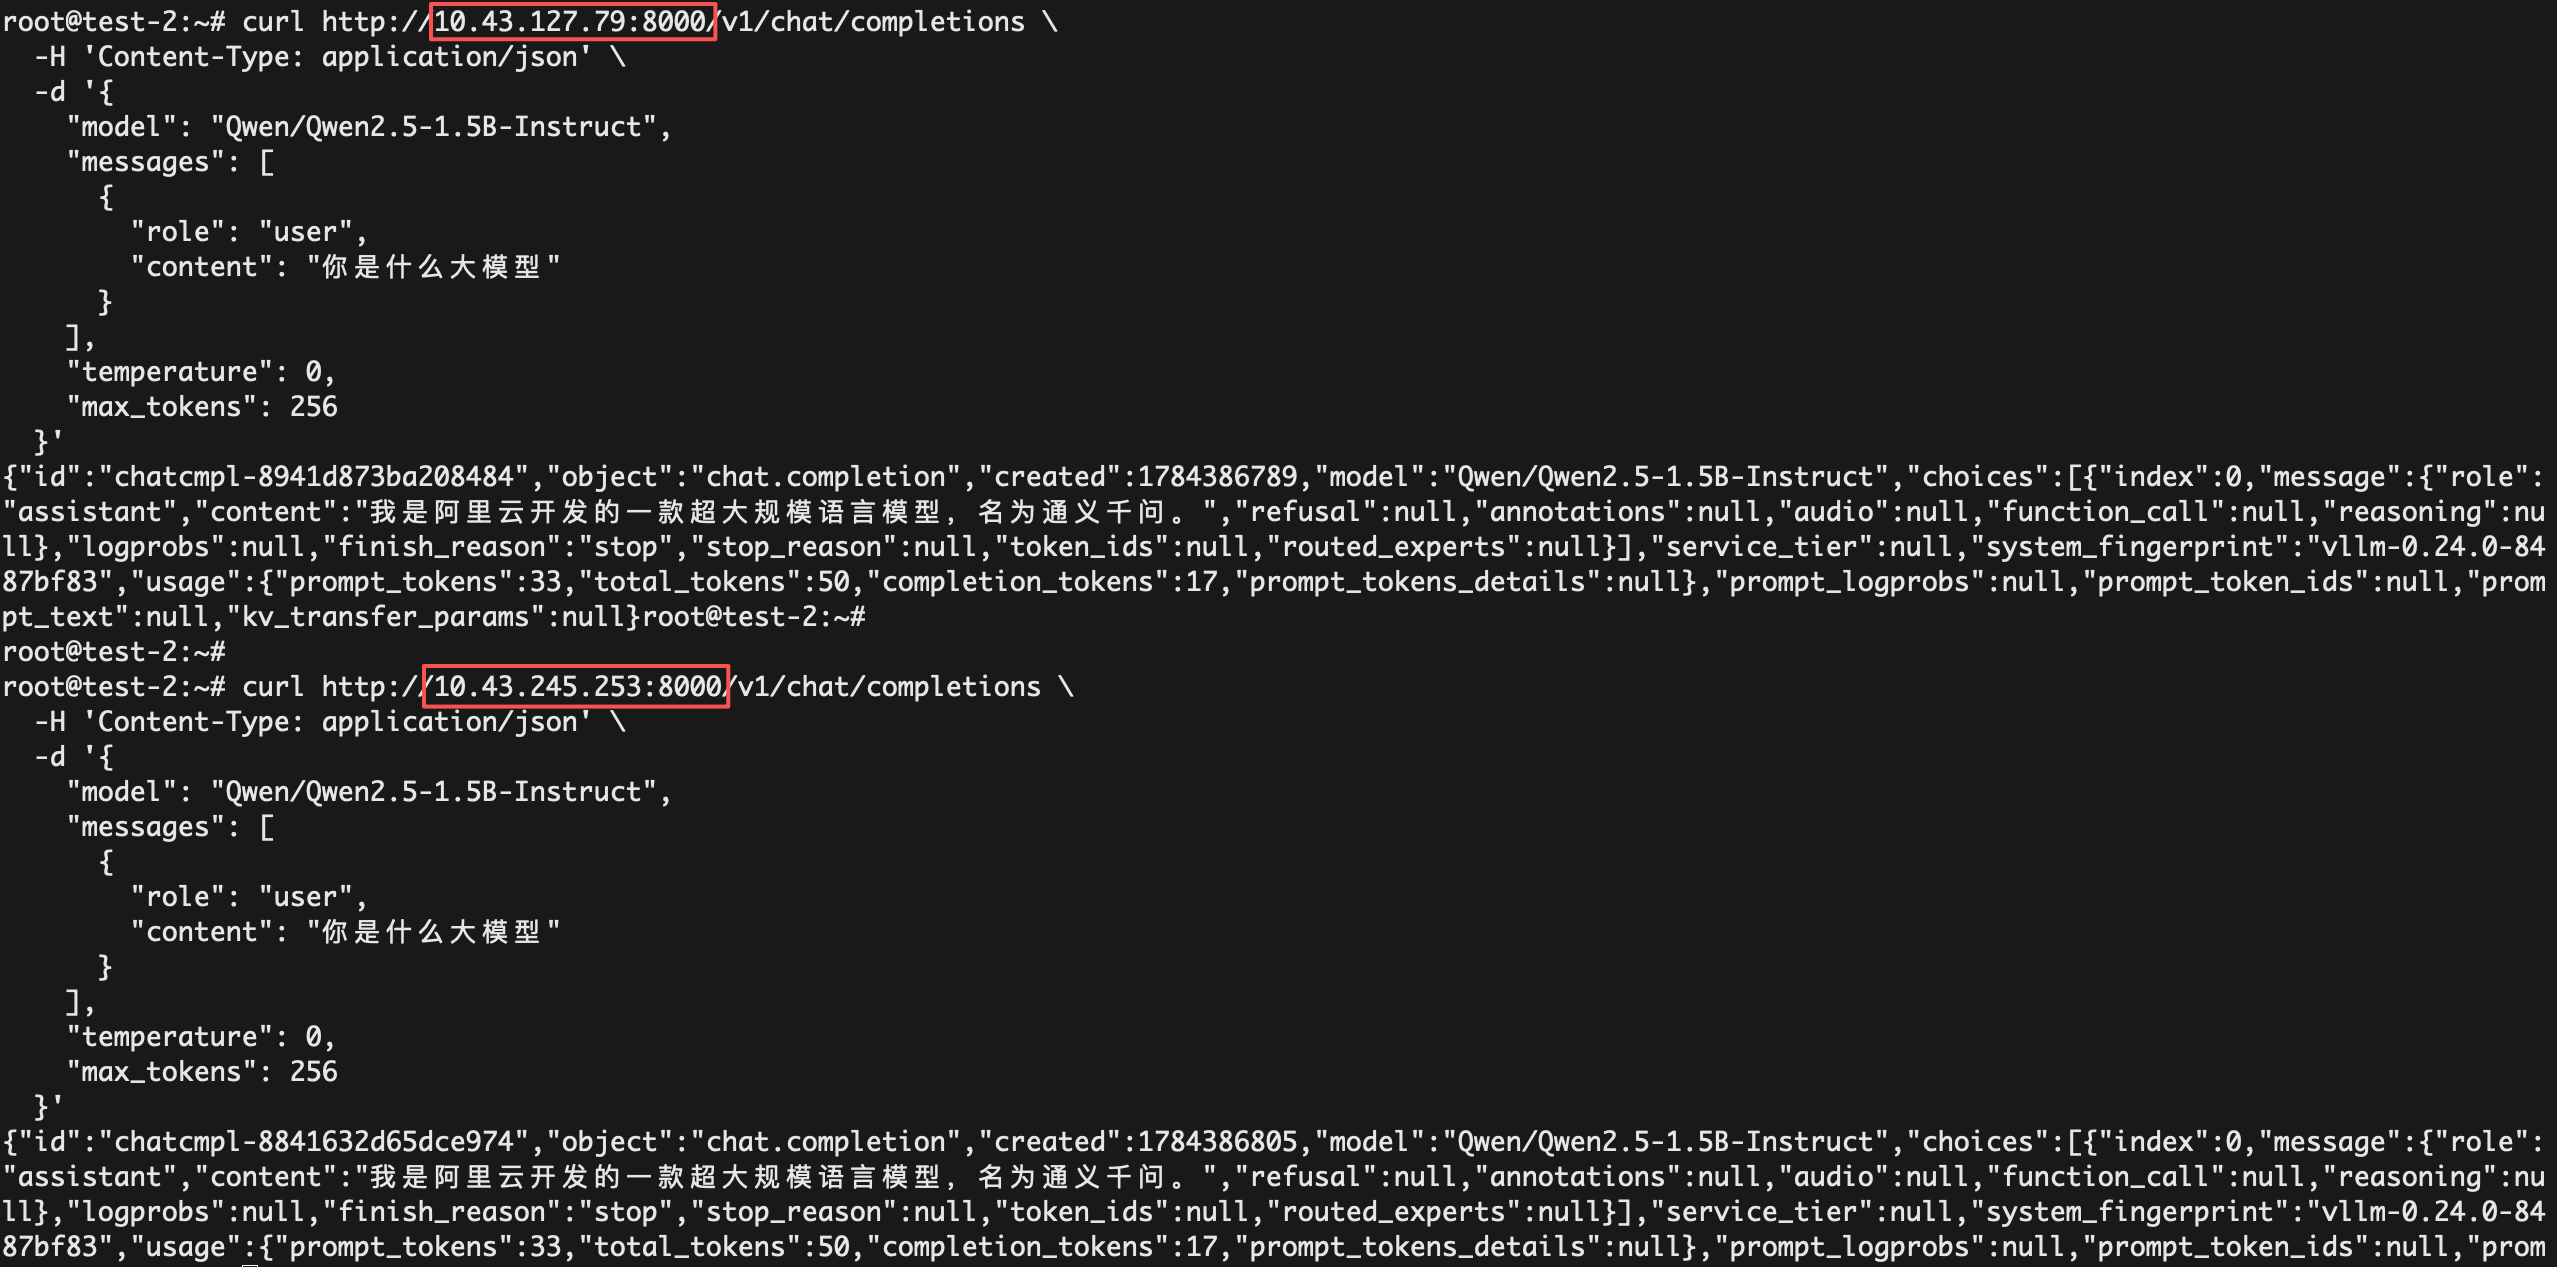
通过 nvidia-smi 可以看到承载了两个 vLLM 实例:
通过 HAMi UI 查看监控信息:
PD 分离
PD 分离的验证至少需要两块 GPU,通过 HAMi 可以在软件层面上将一块 GPU 分成两块 vGPU,从而进行功能性验证。
使用 HAMi 本质上还是共享同一张物理 GPU,所以只能验证功能,不能证明性能收益。
请求链路:
1
2
3
4
5
6
7
8
9
| 客户端
│
PD Proxy
│
├─ 1. 请求 Prefill,max_tokens=1
│ └─ 计算 Prompt,返回 kv_transfer_params
│
└─ 2. 将 kv_transfer_params 附加到 Decode 请求
└─ Decode 通过 NIXL 拉取 KV Cache,然后生成答案
|
部署 Prefill 实例
VLLM_NIXL_SIDE_CHANNEL_HOST 需要使用 Pod IP,不能使用默认的 localhost,否则 Decode Pod 会尝试连接自己:
1
2
3
4
5
6
7
8
9
10
11
12
13
14
15
16
17
18
19
20
21
22
23
24
25
26
27
28
29
30
31
32
33
34
35
36
37
38
39
40
41
42
43
44
45
46
47
48
49
50
51
52
53
54
55
56
57
58
59
60
61
62
63
64
65
66
67
68
69
70
71
72
73
74
75
76
77
78
79
| cat <<EOF | kubectl apply -f -
apiVersion: apps/v1
kind: Deployment
metadata:
name: vllm-prefill
spec:
replicas: 1
selector:
matchLabels:
app: vllm-prefill
template:
metadata:
labels:
app: vllm-prefill
spec:
containers:
- name: vllm
image: harbor.warnerchen.com/vllm/vllm-openai:v0.24.0
command:
- vllm
- serve
- Qwen/Qwen2.5-1.5B-Instruct
args:
- --host
- "0.0.0.0"
- --port
- "8000"
- --served-model-name
- qwen-pd
- --dtype
- half
- --max-model-len
- "1024"
- --max-num-seqs
- "1"
- --gpu-memory-utilization
- "0.75"
- --enforce-eager
- --kv-transfer-config
- >-
{"kv_connector":"NixlConnector",
"kv_role":"kv_producer",
"kv_load_failure_policy":"fail"}
env:
- name: VLLM_USE_MODELSCOPE
value: "true"
- name: UCX_TLS
value: "all"
- name: UCX_NET_DEVICES
value: "all"
- name: VLLM_NIXL_SIDE_CHANNEL_HOST
valueFrom:
fieldRef:
fieldPath: status.podIP
- name: VLLM_NIXL_SIDE_CHANNEL_PORT
value: "5600"
ports:
- name: http
containerPort: 8000
- name: nixl
containerPort: 5600
resources:
limits:
nvidia.com/gpu: "1"
nvidia.com/gpumem: "5800"
nvidia.com/gpucores: "50"
---
apiVersion: v1
kind: Service
metadata:
name: vllm-prefill
spec:
selector:
app: vllm-prefill
ports:
- name: http
port: 8000
targetPort: 8000
EOF
|
部署 Decode 实例
此处 Prefill 和 Decode 的 vLLM 启动参数配置保持一致:
1
2
3
4
5
6
7
8
9
10
11
12
13
14
15
16
17
18
19
20
21
22
23
24
25
26
27
28
29
30
31
32
33
34
35
36
37
38
39
40
41
42
43
44
45
46
47
48
49
50
51
52
53
54
55
56
57
58
59
60
61
62
63
64
65
66
67
68
69
70
71
72
73
74
75
76
77
78
79
| cat <<EOF | kubectl apply -f -
apiVersion: apps/v1
kind: Deployment
metadata:
name: vllm-decode
spec:
replicas: 1
selector:
matchLabels:
app: vllm-decode
template:
metadata:
labels:
app: vllm-decode
spec:
containers:
- name: vllm
image: harbor.warnerchen.com/vllm/vllm-openai:v0.24.0
command:
- vllm
- serve
- Qwen/Qwen2.5-1.5B-Instruct
args:
- --host
- "0.0.0.0"
- --port
- "8000"
- --served-model-name
- qwen-pd
- --dtype
- half
- --max-model-len
- "1024"
- --max-num-seqs
- "1"
- --gpu-memory-utilization
- "0.75"
- --enforce-eager
- --kv-transfer-config
- >-
{"kv_connector":"NixlConnector",
"kv_role":"kv_consumer",
"kv_load_failure_policy":"fail"}
env:
- name: VLLM_USE_MODELSCOPE
value: "true"
- name: UCX_TLS
value: "all"
- name: UCX_NET_DEVICES
value: "all"
- name: VLLM_NIXL_SIDE_CHANNEL_HOST
valueFrom:
fieldRef:
fieldPath: status.podIP
- name: VLLM_NIXL_SIDE_CHANNEL_PORT
value: "5601"
ports:
- name: http
containerPort: 8000
- name: nixl
containerPort: 5601
resources:
limits:
nvidia.com/gpu: "1"
nvidia.com/gpumem: "5800"
nvidia.com/gpucores: "50"
---
apiVersion: v1
kind: Service
metadata:
name: vllm-decode
spec:
selector:
app: vllm-decode
ports:
- name: http
port: 8000
targetPort: 8000
EOF
|
确认两个 vLLM 运行的模型一致:
1
2
| curl -s http://<vllm-prefill-cluster-ip>:8000/v1/models
curl -s http://<vllm-decode-cluster-ip>:8000/v1/models
|

部署 PD Proxy
下载 vLLM 官方提供的 toy_proxy_server.py,并使用其创建 ConfigMap:
1
2
3
4
| curl -LO \
https://raw.githubusercontent.com/vllm-project/vllm/v0.24.0/tests/v1/kv_connector/nixl_integration/toy_proxy_server.py
kubectl create cm vllm-pd-proxy-config --from-file toy_proxy_server.py
|
部署 PD Proxy:
1
2
3
4
5
6
7
8
9
10
11
12
13
14
15
16
17
18
19
20
21
22
23
24
25
26
27
28
29
30
31
32
33
34
35
36
37
38
39
40
41
42
43
44
45
46
47
48
49
50
51
52
53
54
55
56
57
58
59
60
| cat <<EOF | kubectl apply -f -
apiVersion: apps/v1
kind: Deployment
metadata:
name: vllm-pd-proxy
spec:
replicas: 1
selector:
matchLabels:
app: vllm-pd-proxy
template:
metadata:
labels:
app: vllm-pd-proxy
spec:
containers:
- name: proxy
image: harbor.warnerchen.com/vllm/vllm-openai:v0.24.0
command:
- python3
- /opt/pd/toy_proxy_server.py
args:
- --host
- 0.0.0.0
- --port
- "8000"
- --prefiller-hosts
- vllm-prefill
- --prefiller-ports
- "8000"
- --decoder-hosts
- vllm-decode
- --decoder-ports
- "8000"
ports:
- containerPort: 8000
name: http
protocol: TCP
volumeMounts:
- mountPath: /opt/pd/toy_proxy_server.py
name: proxy-config
subPath: toy_proxy_server.py
volumes:
- configMap:
defaultMode: 420
name: vllm-pd-proxy-config
name: proxy-config
---
apiVersion: v1
kind: Service
metadata:
name: vllm-pd-proxy
spec:
selector:
app: vllm-pd-proxy
ports:
- name: http
port: 8000
targetPort: 8000
EOF
|
检查是否能获取 vLLM 实例:
1
| curl http://<vllm-pd-proxy-cluster-ip>:8000/healthcheck
|

验证
对 PD Proxy 发起请求:
1
2
3
4
5
6
7
8
9
10
11
12
13
| curl http://<vllm-pd-proxy-cluster-ip>:8000/v1/chat/completions \
-H 'Content-Type: application/json' \
-d '{
"model": "qwen-pd",
"messages": [
{
"role": "user",
"content": "简单说明一下 Kubernetes 是什么。"
}
],
"temperature": 0,
"max_tokens": 128
}'
|
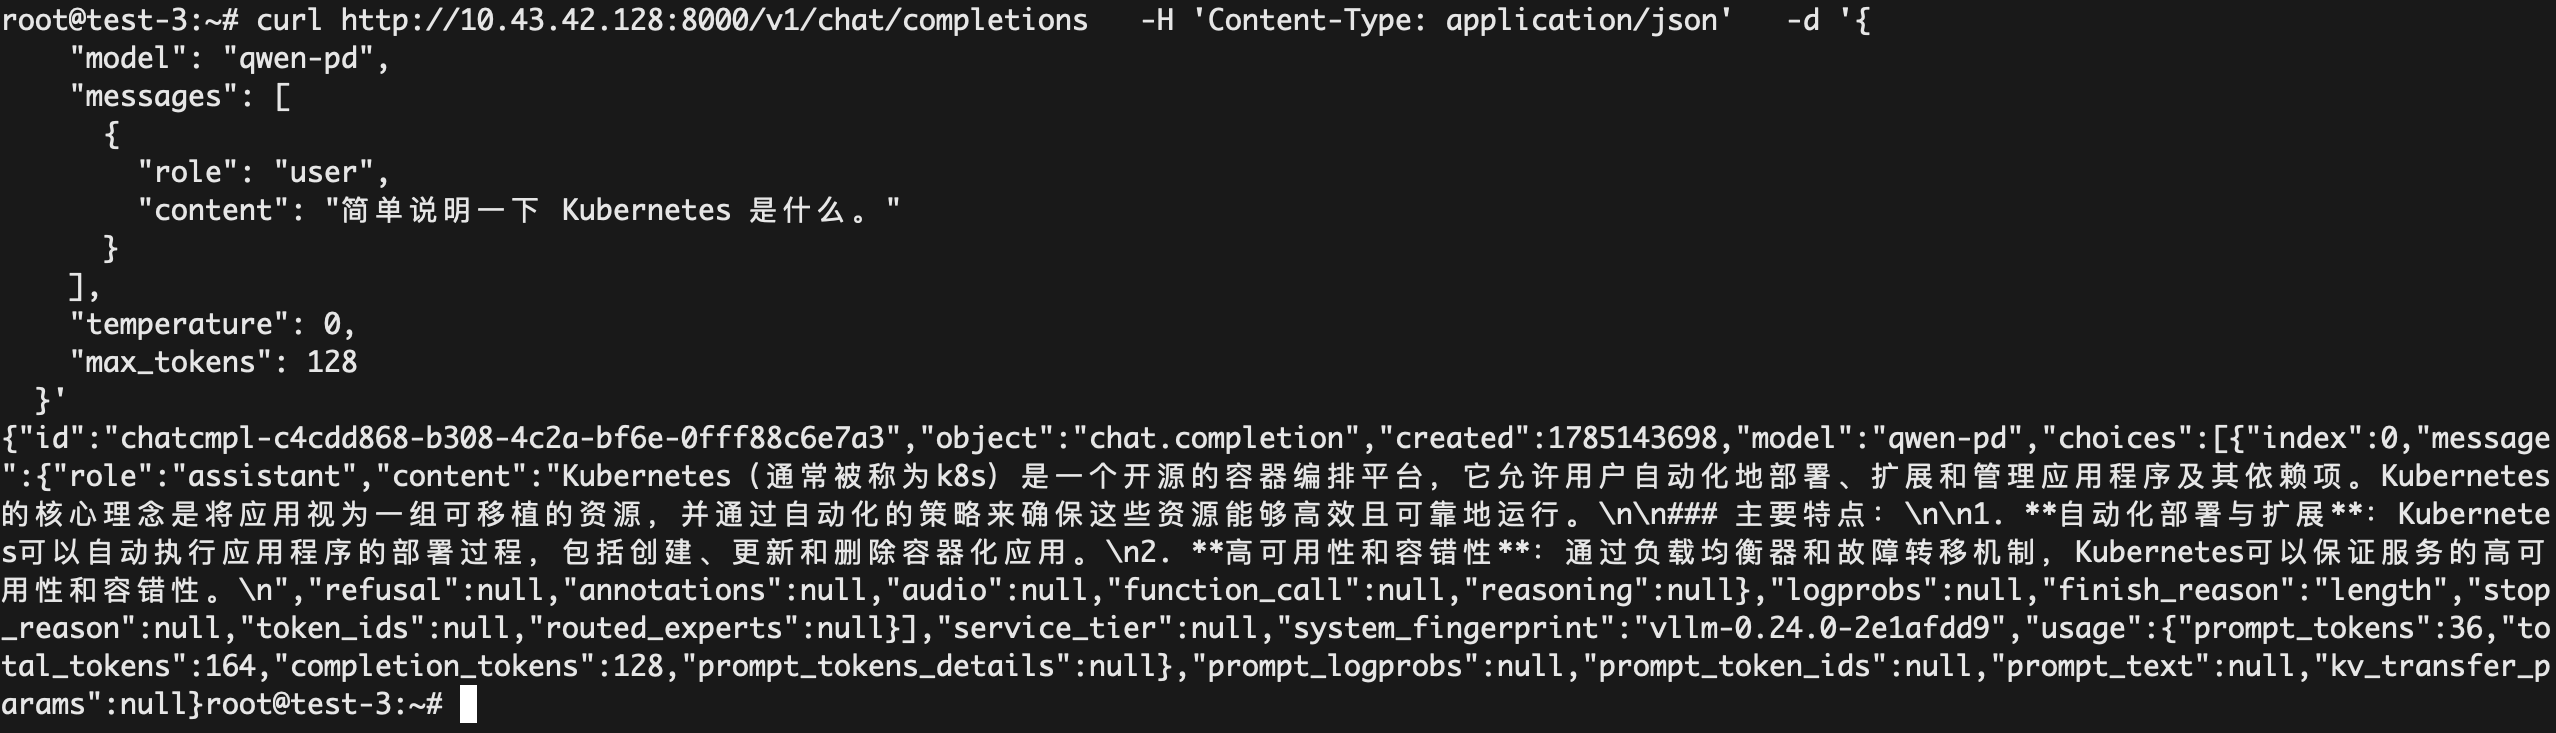
验证成功:
从日志中也可以看到 PD 分离的效果。
Prefill 日志:
1
2
| (APIServer pid=1) INFO: 10.42.206.161:57892 - "POST /v1/chat/completions HTTP/1.1" 200 OK
(APIServer pid=1) INFO 07-27 08:45:46 [loggers.py:273] Engine 000: Avg prompt throughput: 4.1 tokens/s, Avg generation throughput: 0.1 tokens/s, Running: 0 reqs, Waiting: 0 reqs, GPU KV cache usage: 0.0%, Prefix cache hit rate: 0.0%, External prefix cache hit rate: 0.0%
|
- Prefill 处理了 Prompt
- Proxy 将 max_tokens 改成了 1,所以只有很少的 generation throughput
- Prefill 是 KV Cache 生产者,不需要从外部读取,因此 External hit 为 0%
Decode 日志:
1
2
| (APIServer pid=1) INFO: 10.42.206.161:55632 - "POST /v1/chat/completions HTTP/1.1" 200 OK
(APIServer pid=1) INFO 07-27 08:45:53 [loggers.py:273] Engine 000: Avg prompt throughput: 0.0 tokens/s, Avg generation throughput: 12.8 tokens/s, Running: 0 reqs, Waiting: 0 reqs, GPU KV cache usage: 0.0%, Prefix cache hit rate: 0.0%,
|
- Decode 没有重新计算 Prompt,所以 prompt throughput 为 0
- Decode 主要负责逐 Token 生成,generation throughput 为 12.8 tokens/s
- Prompt 对应的 KV Cache 全部从 Prefill 获取,因此 External hit 为 100%