本文记录 SUSE 相关产品在第一周测试过程中的部署与使用情况,包括 RKE2、Rancher、Monitoring、Logging、NeuVector、Longhorn、Istio 和 K3s 等组件。
安装单节点 RKE2 该 RKE2 集群作为 Rancher 的 local 集群使用。
准备配置文件 1 2 3 4 5 6 7 8 9 10 11 12 13 14 15 16 17 18 19 mkdir -pv /etc/rancher/rke2cat <<EOF > /etc/rancher/rke2/config.yaml token: my-shared-secret tls-san: - 172.16.170.200 system-default-registry: registry.cn-hangzhou.aliyuncs.com EOF cat <<EOF > /etc/rancher/rke2/registries.yaml configs: "harbor.warnerchen.com": auth: username: xxx password: xxx tls: insecure_skip_verify: true EOF
安装并启动 RKE2 1 2 3 4 5 curl -sfL https://get.rke2.io | sh - systemctl enable rke2-server --now
配置常用运维环境 Server 节点:
1 2 3 4 5 6 7 8 mkdir -pv ~/.kubeln -s /etc/rancher/rke2/rke2.yaml ~/.kube/configecho 'export CONTAINER_RUNTIME_ENDPOINT="unix:///run/k3s/containerd/containerd.sock"' >> ~/.bashrcecho 'export CONTAINERD_NAMESPACE="k8s.io"' >> ~/.bashrcecho 'export PATH=$PATH:/var/lib/rancher/rke2/bin' >> ~/.bashrcecho 'source <(kubectl completion bash)' >> ~/.bashrc
Agent 节点:
1 2 3 echo 'export CONTAINER_RUNTIME_ENDPOINT="unix:///run/k3s/containerd/containerd.sock"' >> ~/.bashrcecho 'export CONTAINERD_NAMESPACE="k8s.io"' >> ~/.bashrcecho 'export PATH=$PATH:/var/lib/rancher/rke2/bin' >> ~/.bashrc
安装 Helm 1 2 3 curl https://rancher-mirror.rancher.cn/helm/get-helm-3.sh | INSTALL_HELM_MIRROR=cn bash -s -- --version v4.1.3 echo 'source <(helm completion bash)' >> ~/.bashrc
安装 nerdctl 1 2 3 4 5 6 7 8 9 export NERDCTL_VERSION=2.2.2wget "https://files.m.daocloud.io/github.com/containerd/nerdctl/releases/download/v$NERDCTL_VERSION /nerdctl-$NERDCTL_VERSION -linux-amd64.tar.gz" tar Czvxf /usr/local/bin nerdctl-$NERDCTL_VERSION -linux-amd64.tar.gz rm -f nerdctl-$NERDCTL_VERSION -linux-amd64.tar.gzecho 'export CONTAINERD_ADDRESS="/run/k3s/containerd/containerd.sock"' >> ~/.bashrc
安装 Rancher 添加 Helm 仓库 1 2 3 4 helm repo add rancher-stable https://releases.rancher.com/server-charts/stable helm repo add jetstack https://charts.jetstack.io helm repo update
安装 Cert Manager 1 2 3 4 5 6 helm upgrade --install \ cert-manager jetstack/cert-manager \ --namespace cert-manager \ --create-namespace \ --version v1.19.2 \ --set crds.enabled=true
安装 Rancher 1 2 3 4 5 6 7 8 helm upgrade --install rancher rancher-stable/rancher \ --namespace cattle-system \ --create-namespace \ --set hostname=xxx.com \ --set replicas=1 \ --set bootstrapPassword=xxx \ --set rancherImage=registry.cn-hangzhou.aliyuncs.com/rancher/rancher \ --set systemDefaultRegistry=registry.cn-hangzhou.aliyuncs.com
RKE2 默认会安装 NGINX Ingress Controller,并监听节点的 80/443 端口。安装 Rancher 时配置 hostname 后,会自动创建对应的 Ingress,因此可以通过该 Ingress 访问 Rancher UI。
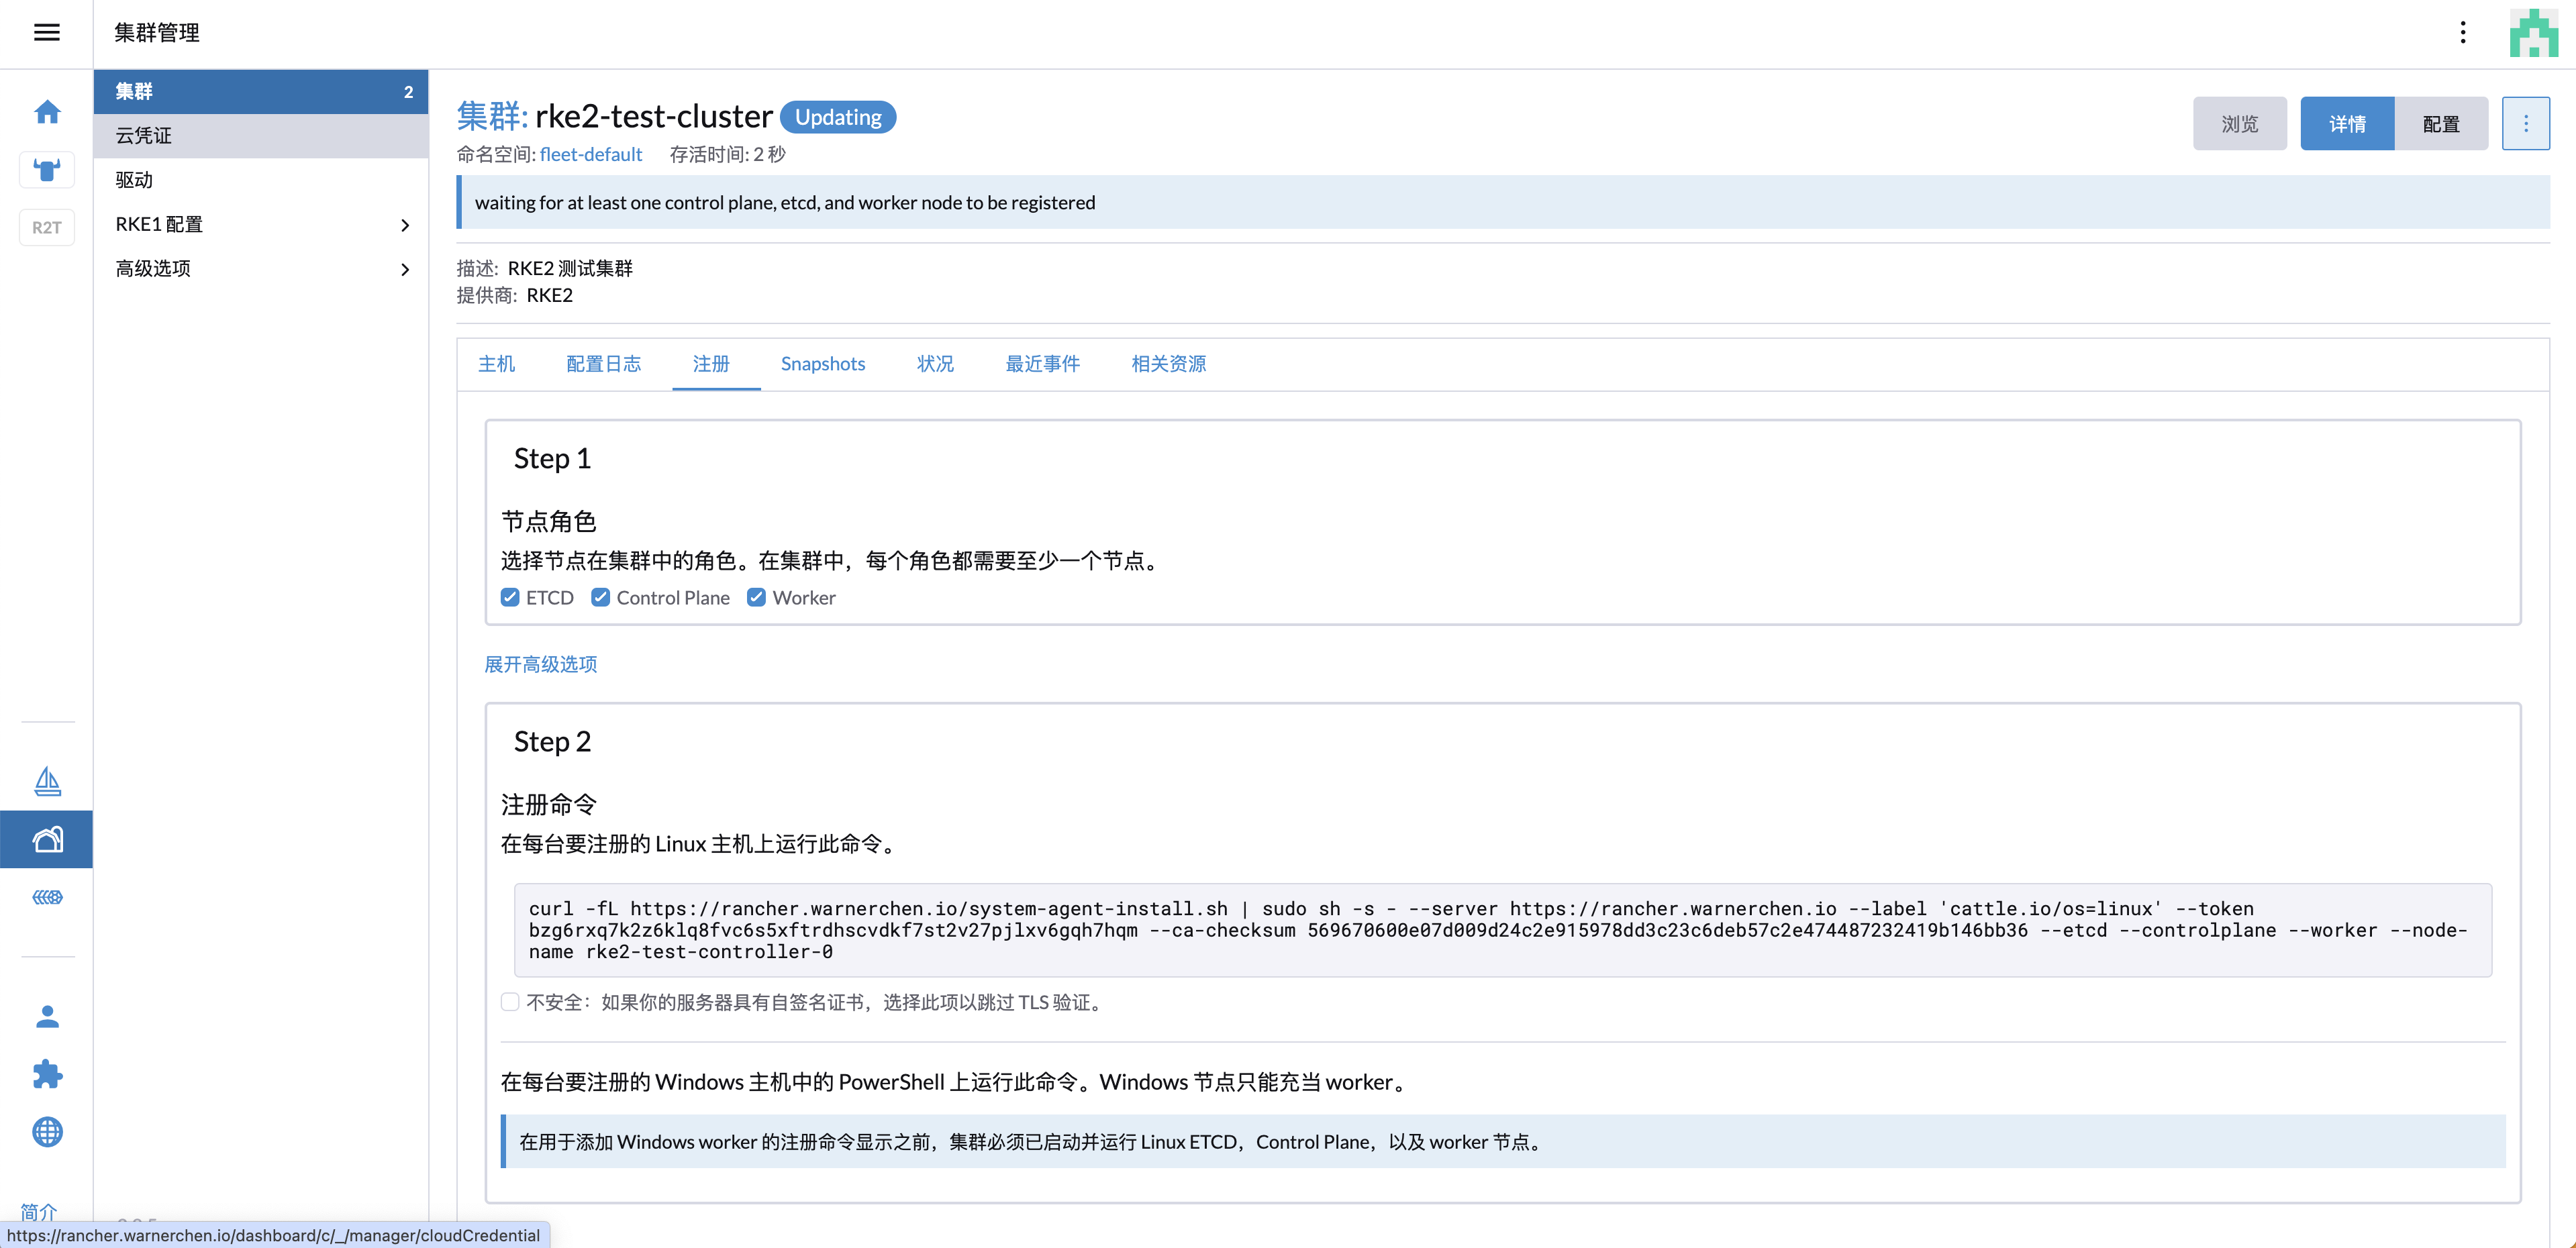
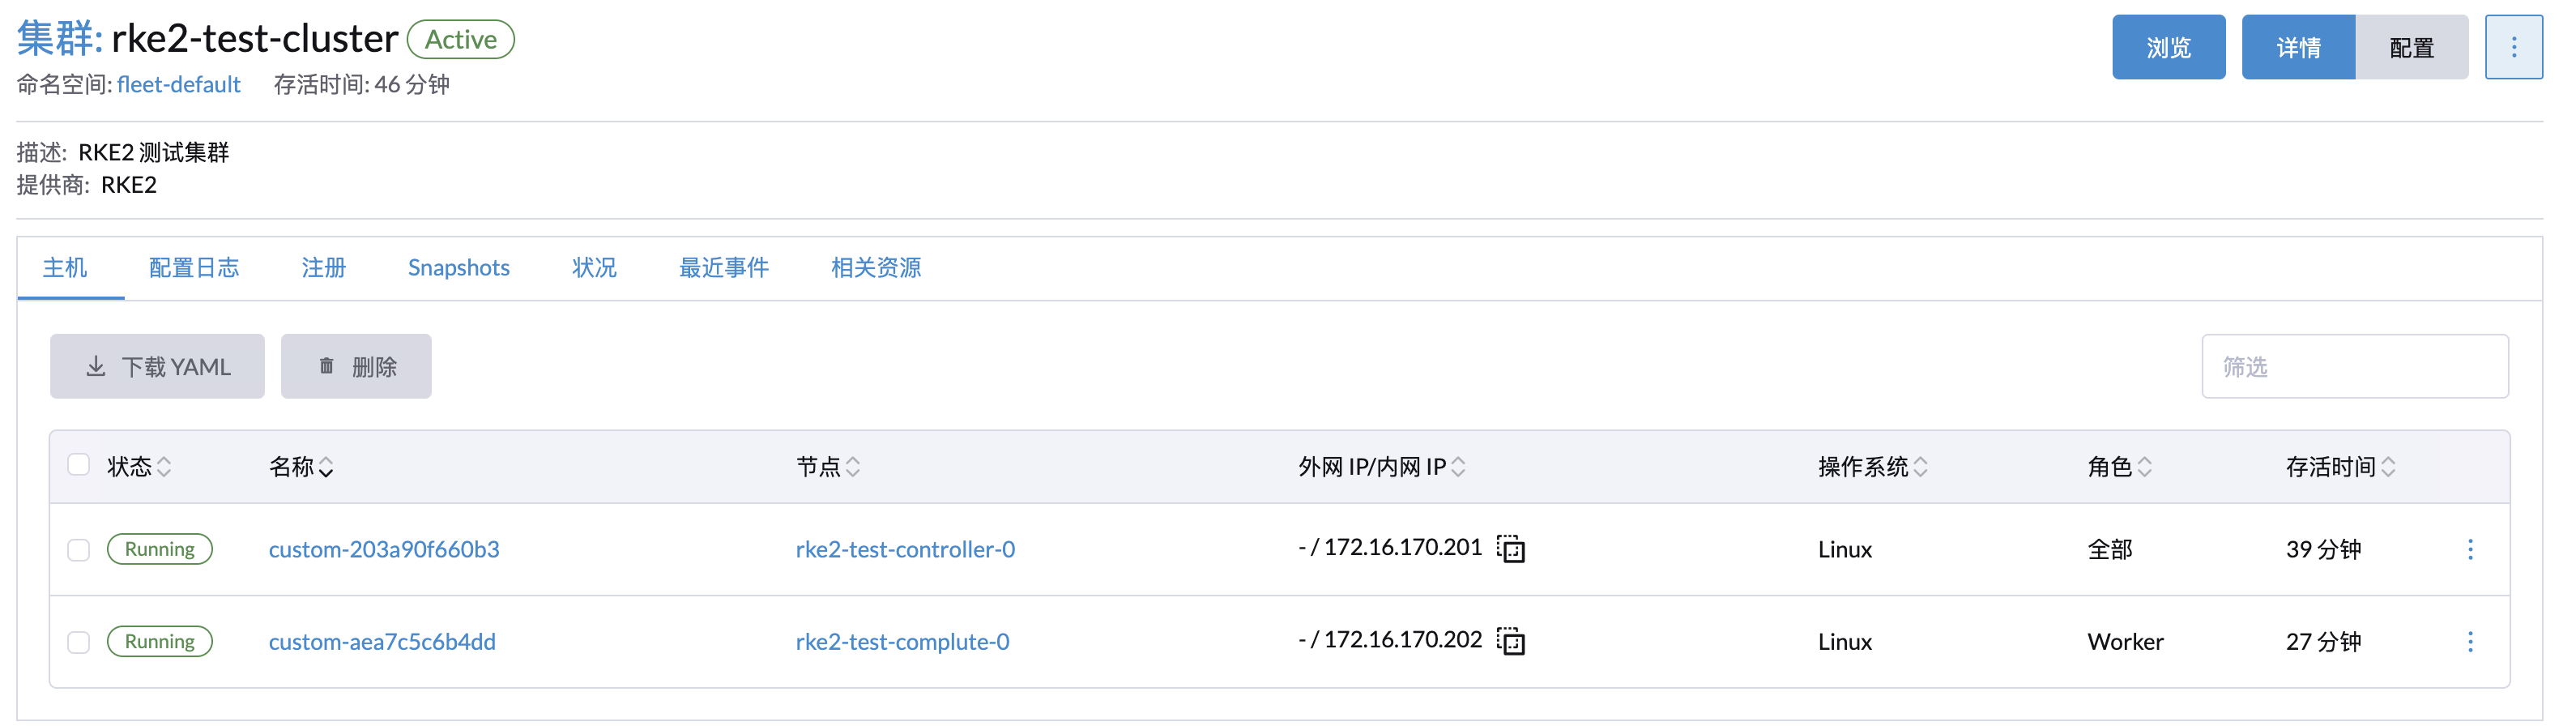
创建下游集群 在 Rancher UI 中创建集群后,页面会生成节点注册命令。登录目标节点后执行该命令即可完成节点注册。
示例命令如下:
1 2 3 4 5 6 7 8 9 curl --insecure -fL https://xxx.com/system-agent-install.sh | sudo sh -s - \ --server https://xxx.com \ --label 'cattle.io/os=linux' \ --token xxx \ --ca-checksum xxx \ --etcd \ --controlplane \ --worker \ --node-name rke2-test-controller-0
示例输出:
1 2 3 4 5 6 7 8 9 10 11 12 13 14 15 16 17 18 19 20 [INFO] Label: cattle.io/os=linux [INFO] Role requested: etcd [INFO] Role requested: controlplane [INFO] Role requested: worker [INFO] Using default agent configuration directory /etc/rancher/agent [INFO] Using default agent var directory /var/lib/rancher/agent [INFO] Determined CA is necessary to connect to Rancher [INFO] Successfully downloaded CA certificate [INFO] Value from https://xxx.com/cacerts is an x509 certificate [INFO] Successfully tested Rancher connection [INFO] Downloading rancher-system-agent binary from https://xxx.com/assets/rancher-system-agent-amd64 [INFO] Successfully downloaded the rancher-system-agent binary. [INFO] Downloading rancher-system-agent-uninstall.sh script from https://xxx.com/assets/system-agent-uninstall.sh [INFO] Successfully downloaded the rancher-system-agent-uninstall.sh script. [INFO] Generating Cattle ID [INFO] Successfully downloaded Rancher connection information [INFO] systemd: Creating service file [INFO] Creating environment file /etc/systemd/system/rancher-system-agent.env [INFO] Enabling rancher-system-agent.service [INFO] Starting/restarting rancher-system-agent.service
处理 cattle-cluster-agent DNS 解析问题 节点注册后,发现 cattle-cluster-agent 持续崩溃重启:
1 kubectl -n cattle-system get pod
示例输出:
1 2 NAME READY STATUS RESTARTS AGE cattle-cluster-agent-767b67b66f-bcl2s 0/1 CrashLoopBackOff 5 (79s ago) 10m
查看上一次容器日志:
1 kubectl -n cattle-system logs cattle-cluster-agent-767b67b66f-bcl2s -p
日志显示 Rancher 域名无法解析:
1 ERROR: https://xxx.com/ping is not accessible (Could not resolve host: xxx.com)
该问题是由于集群内 DNS 无法解析 Rancher 域名导致。可以临时通过 CoreDNS 的 hosts 配置添加域名映射:
1 2 3 4 5 6 7 8 9 10 11 12 13 14 15 16 17 18 19 20 21 22 .:53 { errors health { lameduck 5s } ready kubernetes cluster.local cluster.local in-addr.arpa ip6.arpa { pods insecure fallthrough in-addr.arpa ip6.arpa ttl 30 } prometheus 0.0.0.0:9153 forward . /etc/resolv.conf cache 30 loop reload loadbalance hosts { 172.16.170.200 xxx.com fallthrough } }
配置完成后重启相关 Pod,集群即可正常 Ready。
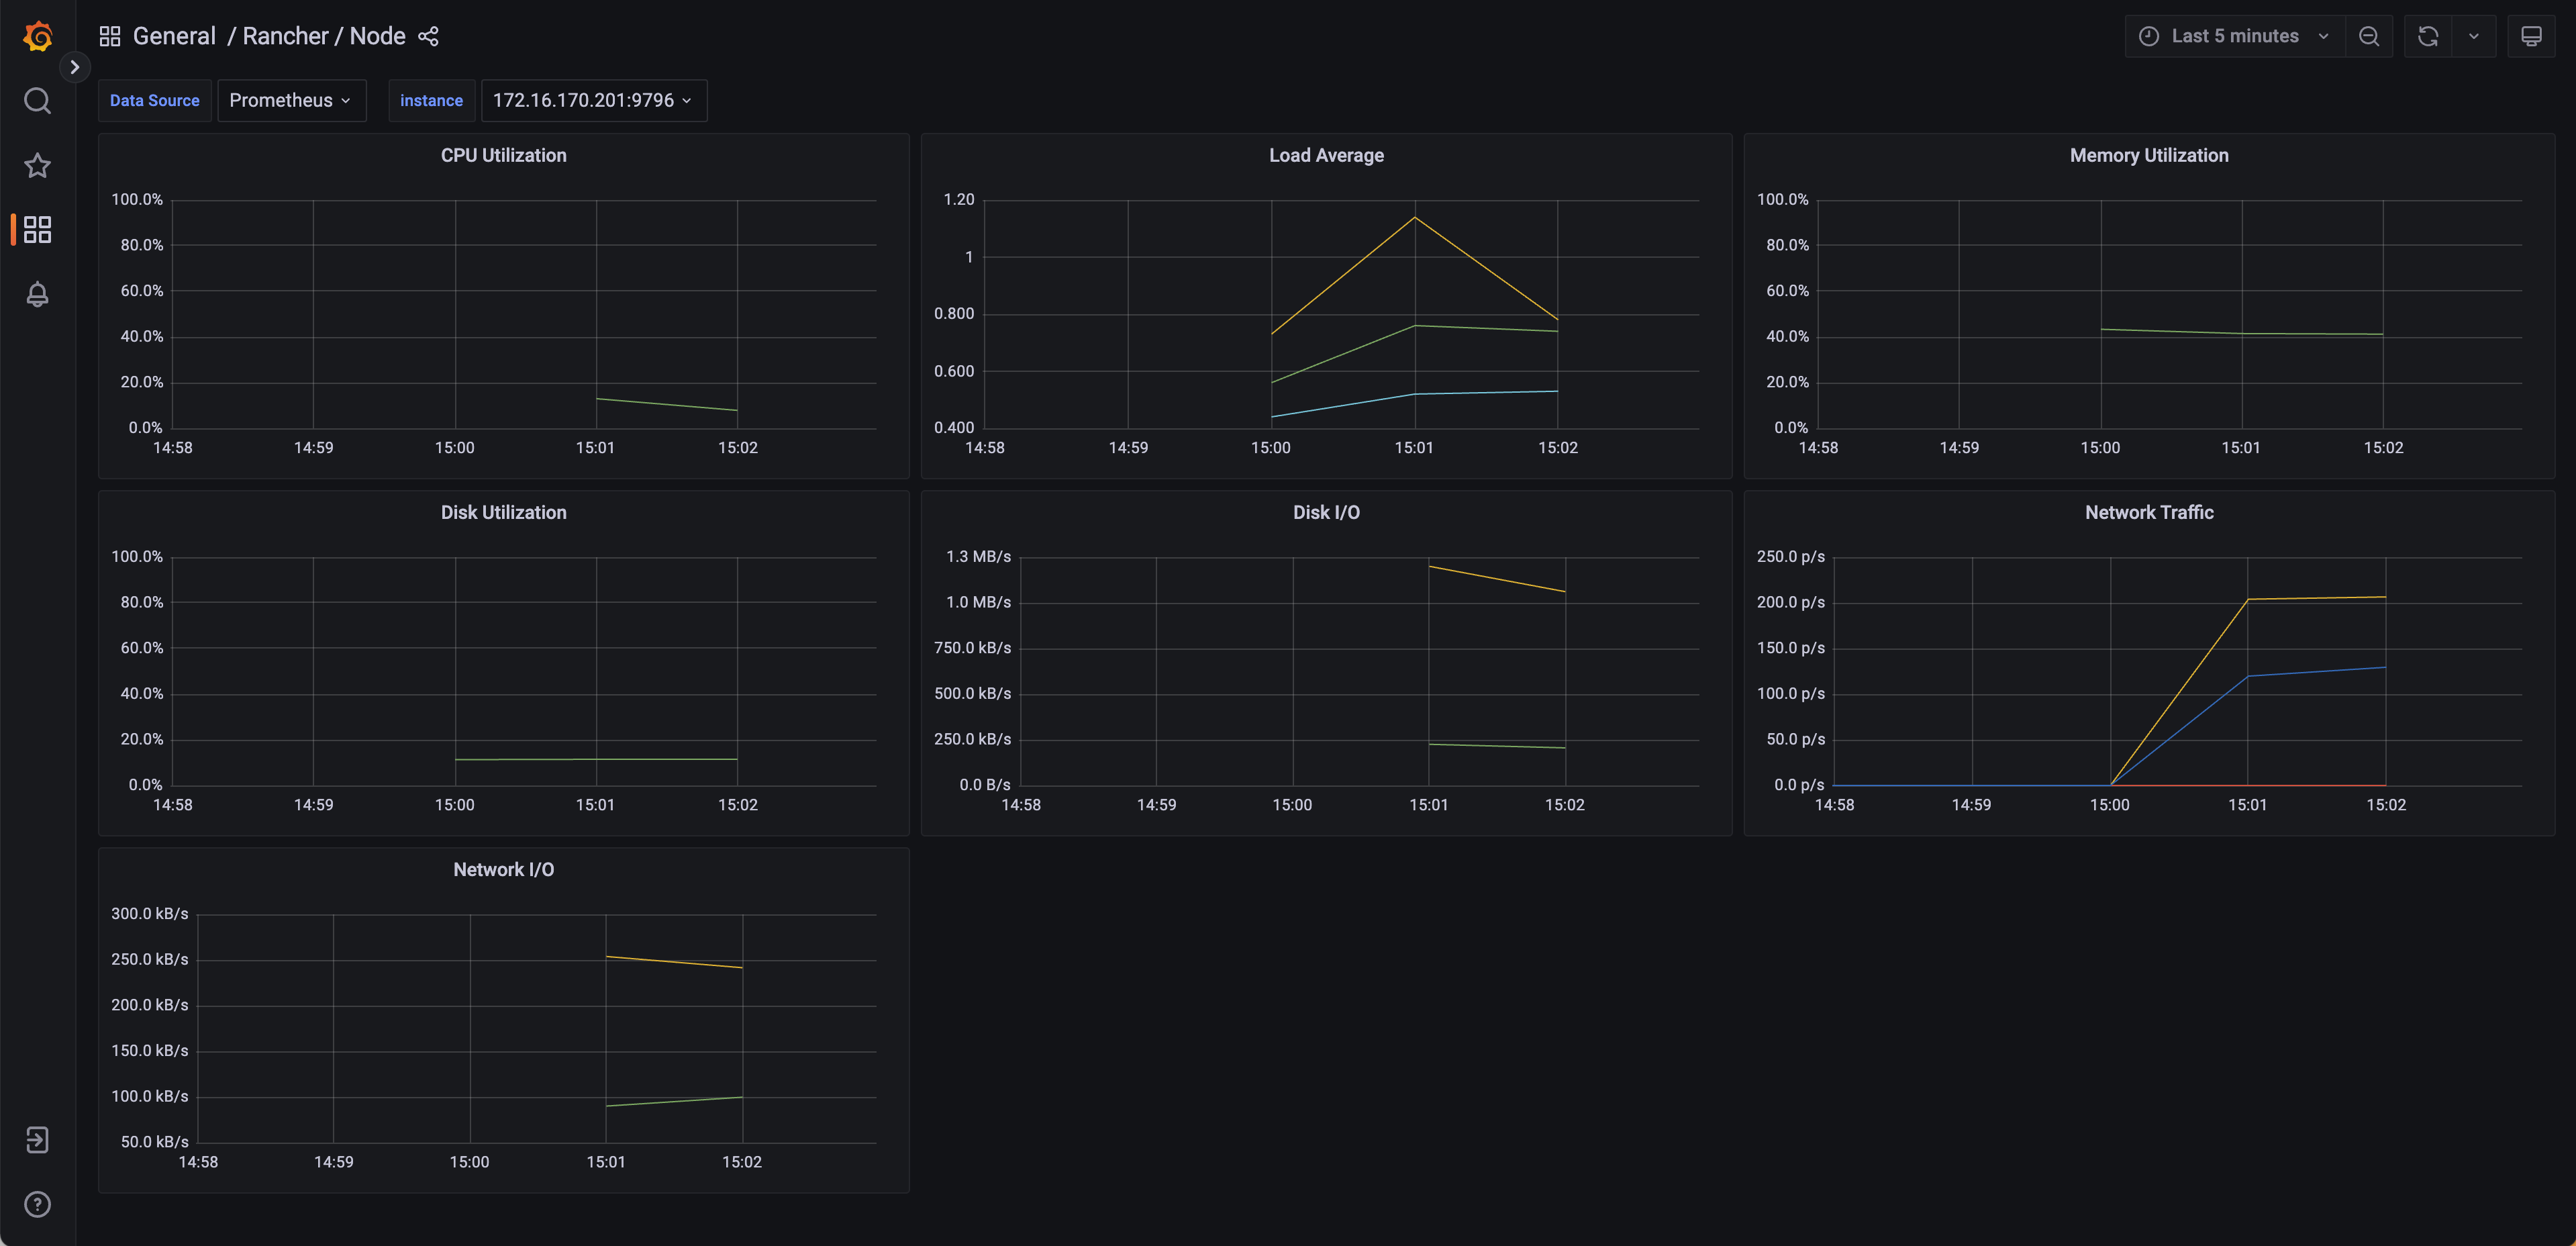
Monitoring 通过 Rancher UI 选择并安装 Monitoring Helm Chart,即可部署基础监控组件,例如 Prometheus、Alertmanager 和 Grafana 等。
Webhook 配置 告警可以对接多种通知方式,其中 Webhook 可通过 AlertmanagerConfig CR 进行配置:
1 2 3 4 5 6 7 8 9 10 11 12 13 14 15 16 17 18 19 20 21 cat <<EOF | kubectl apply -f - apiVersion: monitoring.coreos.com/v1alpha1 kind: AlertmanagerConfig metadata: name: test-webhook namespace: default spec: receivers: - name: test-webhook webhookConfigs: - httpConfig: tlsConfig: {} sendResolved: false url: https://webhook.site/xxx route: groupBy: [] groupInterval: 5m groupWait: 30s matchers: [] repeatInterval: 4h EOF
Logging 通过 Rancher UI 选择并安装 Logging Helm Chart,即可部署基于 Logging Operator 的日志采集与转发能力。
Logging Operator 会部署 Fluent Bit DaemonSet 用于收集日志,然后将日志传输到 Fluentd,再由 Fluentd 转发到不同的 Output。
常用 CR 说明:
Flow:命名空间级别的日志路由规则,用于将日志转发到 Output 或 ClusterOutput。ClusterFlow:集群级别的日志路由规则。Output:命名空间级别的日志输出目标。ClusterOutput:集群级别的日志输出目标,可被 Flow 或 ClusterFlow 引用。
部署 Elasticsearch 和 Kibana 基于 ECK Operator 部署 Elasticsearch 和 Kibana,后续可通过 Logging Operator 的 Output 将日志写入 Elasticsearch。
安装 ECK Operator 1 2 kubectl create -f https://download.elastic.co/downloads/eck/2.14.0/crds.yaml kubectl apply -f https://download.elastic.co/downloads/eck/2.14.0/operator.yaml
创建 Elasticsearch 1 2 3 4 5 6 7 8 9 10 11 12 13 14 cat <<EOF | kubectl apply -f - apiVersion: elasticsearch.k8s.elastic.co/v1 kind: Elasticsearch metadata: name: logging namespace: cattle-logging-system spec: version: 7.15.2 nodeSets: - name: logging count: 1 config: node.store.allow_mmap: false EOF
创建 Kibana 1 2 3 4 5 6 7 8 9 10 11 12 cat <<EOF | kubectl apply -f - apiVersion: kibana.k8s.elastic.co/v1 kind: Kibana metadata: name: logging namespace: cattle-logging-system spec: version: 7.15.2 count: 1 elasticsearchRef: name: logging EOF
创建 Kibana Ingress 1 2 3 4 5 6 7 8 9 10 11 12 13 14 15 16 17 18 19 20 21 22 cat <<EOF | kubectl apply -f - apiVersion: networking.k8s.io/v1 kind: Ingress metadata: name: logging-kb namespace: cattle-logging-system annotations: nginx.ingress.kubernetes.io/backend-protocol: HTTPS spec: ingressClassName: nginx rules: - host: kibana.warnerchen.io http: paths: - path: / pathType: Prefix backend: service: name: logging-kb-http port: number: 5601 EOF
创建 Flow 和 Output 创建 Output 1 2 3 4 5 6 7 8 9 10 11 12 13 14 15 16 17 18 19 20 21 22 23 24 25 26 27 28 29 30 31 32 cat <<EOF | kubectl apply -f - apiVersion: v1 kind: Secret metadata: name: logging-es-elastic-user namespace: default type: Opaque data: elastic: xxx --- apiVersion: logging.banzaicloud.io/v1beta1 kind: Output metadata: name: output-to-es namespace: default spec: elasticsearch: host: logging-es-http.cattle-logging-system.svc.cluster.local index_name: ns-default password: valueFrom: secretKeyRef: key: elastic name: logging-es-elastic-user port: 9200 scheme: https ssl_verify: false ssl_version: TLSv1_2 suppress_type_name: false user: elastic EOF
创建 Flow 以下配置用于收集标签为 app=nginx 的 Pod 日志:
1 2 3 4 5 6 7 8 9 10 11 12 13 14 cat <<EOF | kubectl apply -f - apiVersion: logging.banzaicloud.io/v1beta1 kind: Flow metadata: name: flow-for-default namespace: default spec: localOutputRefs: - output-to-es match: - select: labels: app: nginx EOF
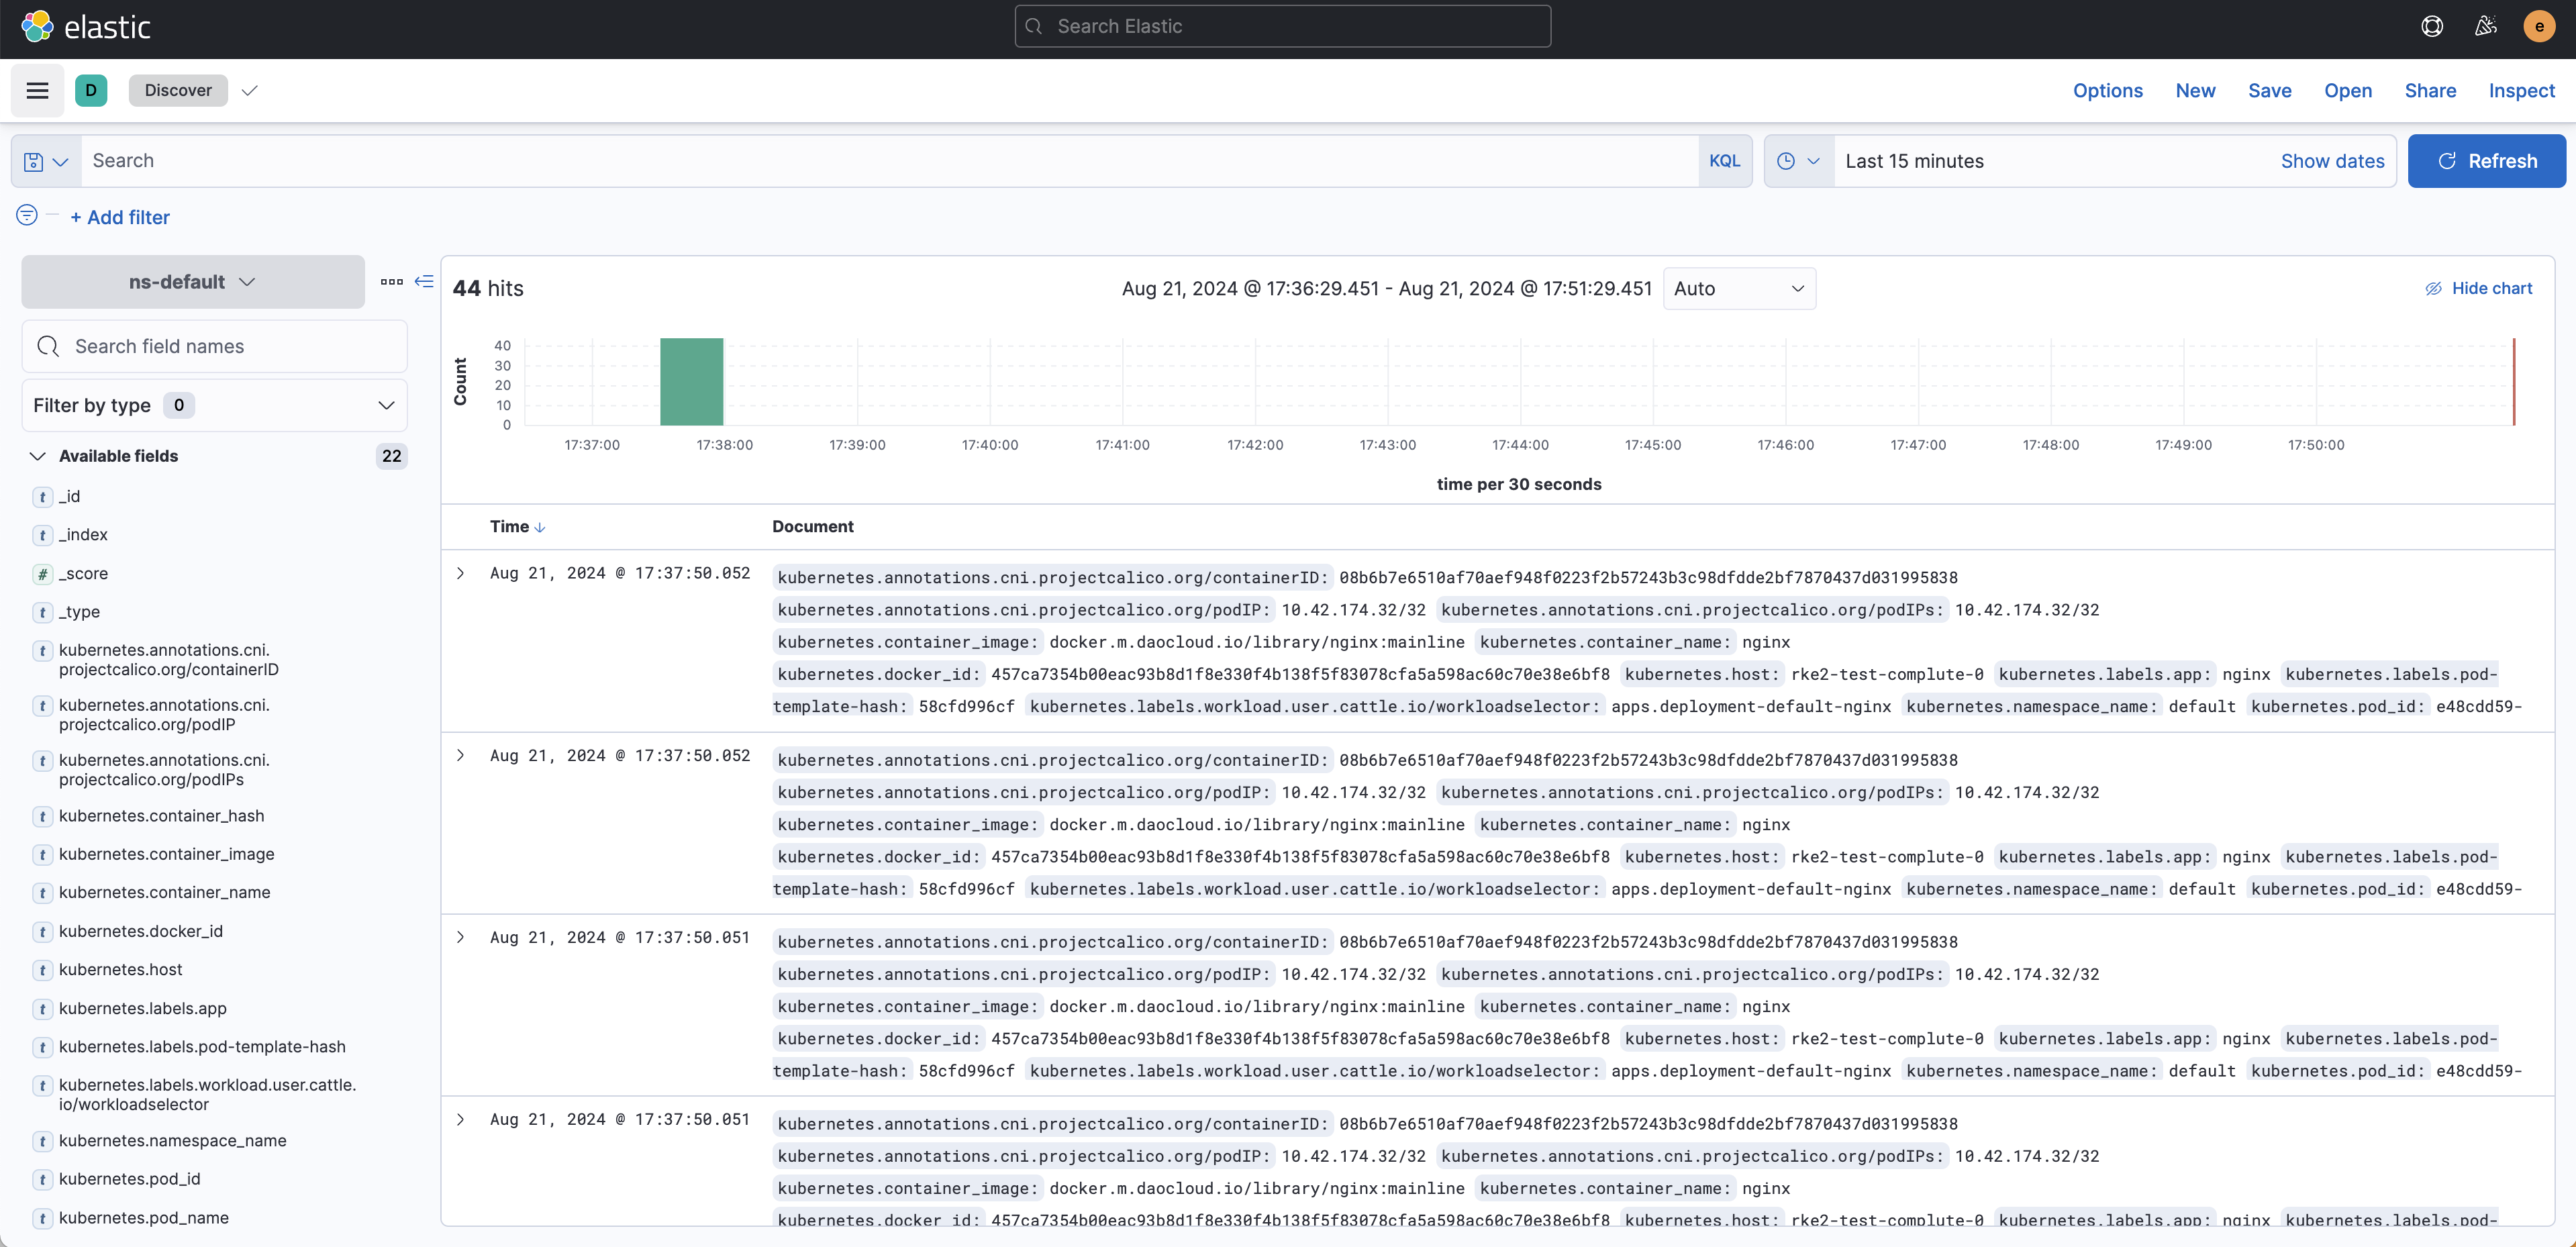
查看是否生成对应索引:
创建 Kibana Data View / Index Pattern 查看日志:
NeuVector 通过 Rancher UI 选择 NeuVector Helm Chart 即可完成安装。
Longhorn 安装 Longhorn 前,需要在所有节点上安装依赖:
1 2 3 apt update apt -y install open-iscsi nfs-common systemctl enable iscsid --now
依赖安装完成后,可通过 Rancher UI 安装 Longhorn。
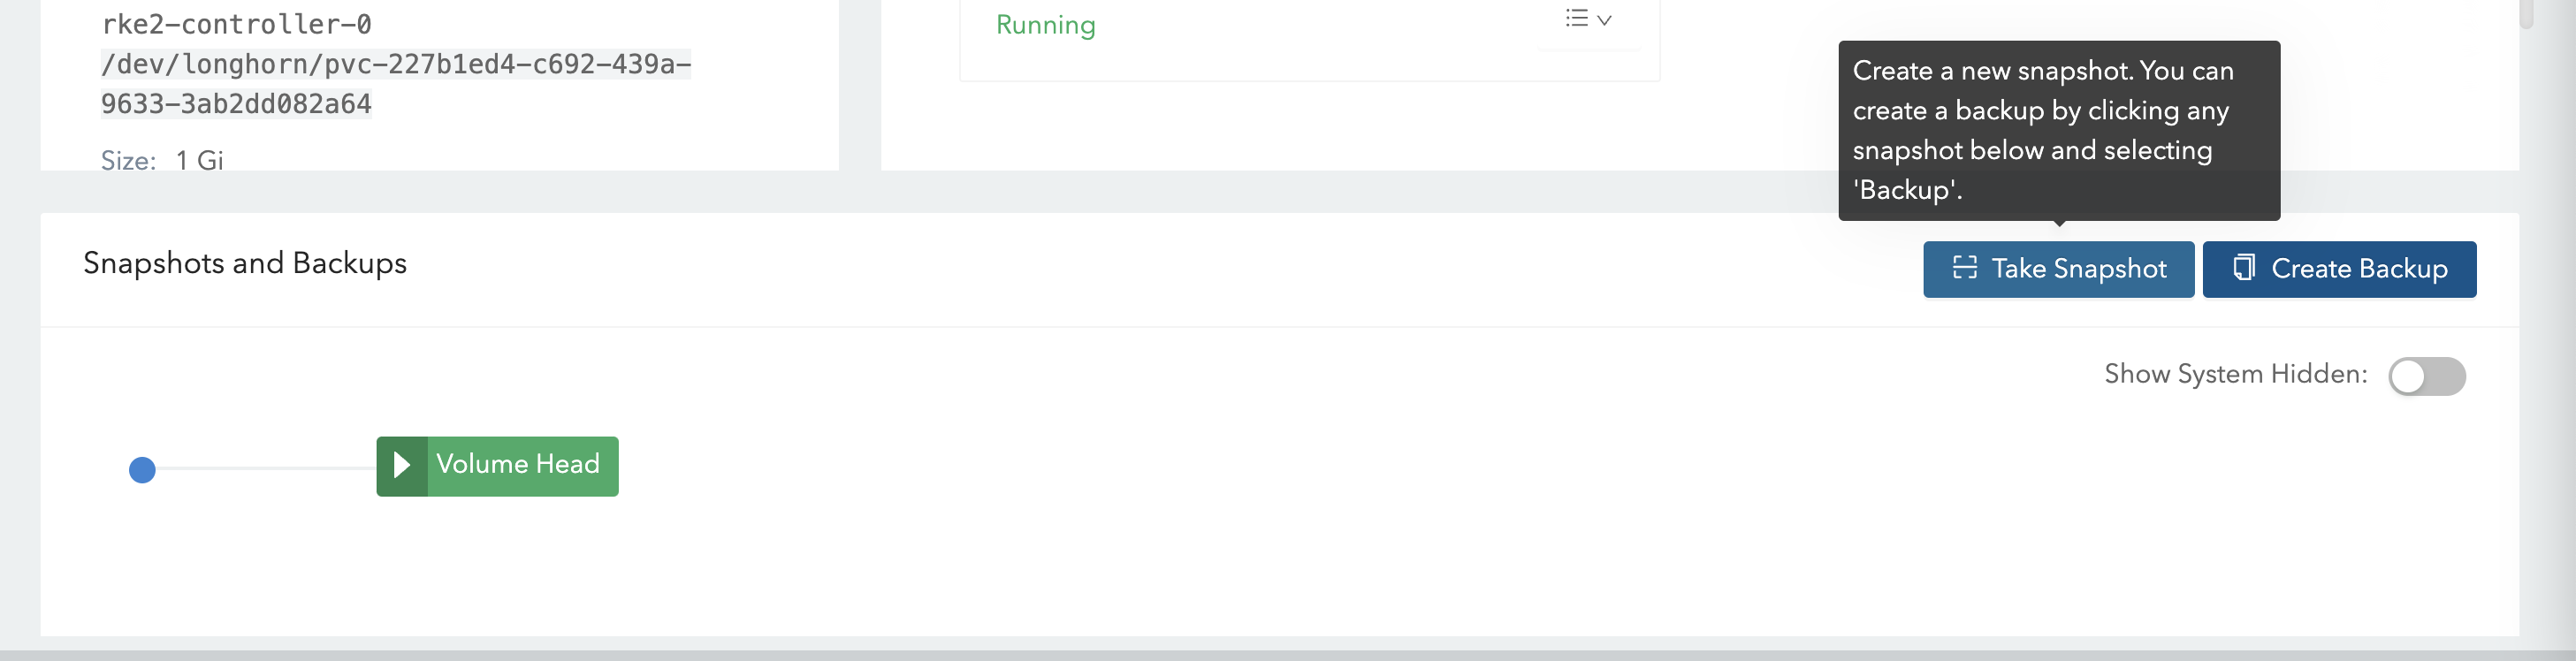
数据卷快照与恢复 Longhorn 支持对 Volume 创建快照,并基于快照进行恢复。
在 UI 中创建快照:
删除测试数据:
1 kubectl exec -it nginx-7f6d5dcf8c-tvxcw -- rm -f /data/test.txt
停止业务 Pod:
1 kubectl scale deployment nginx --replicas=0
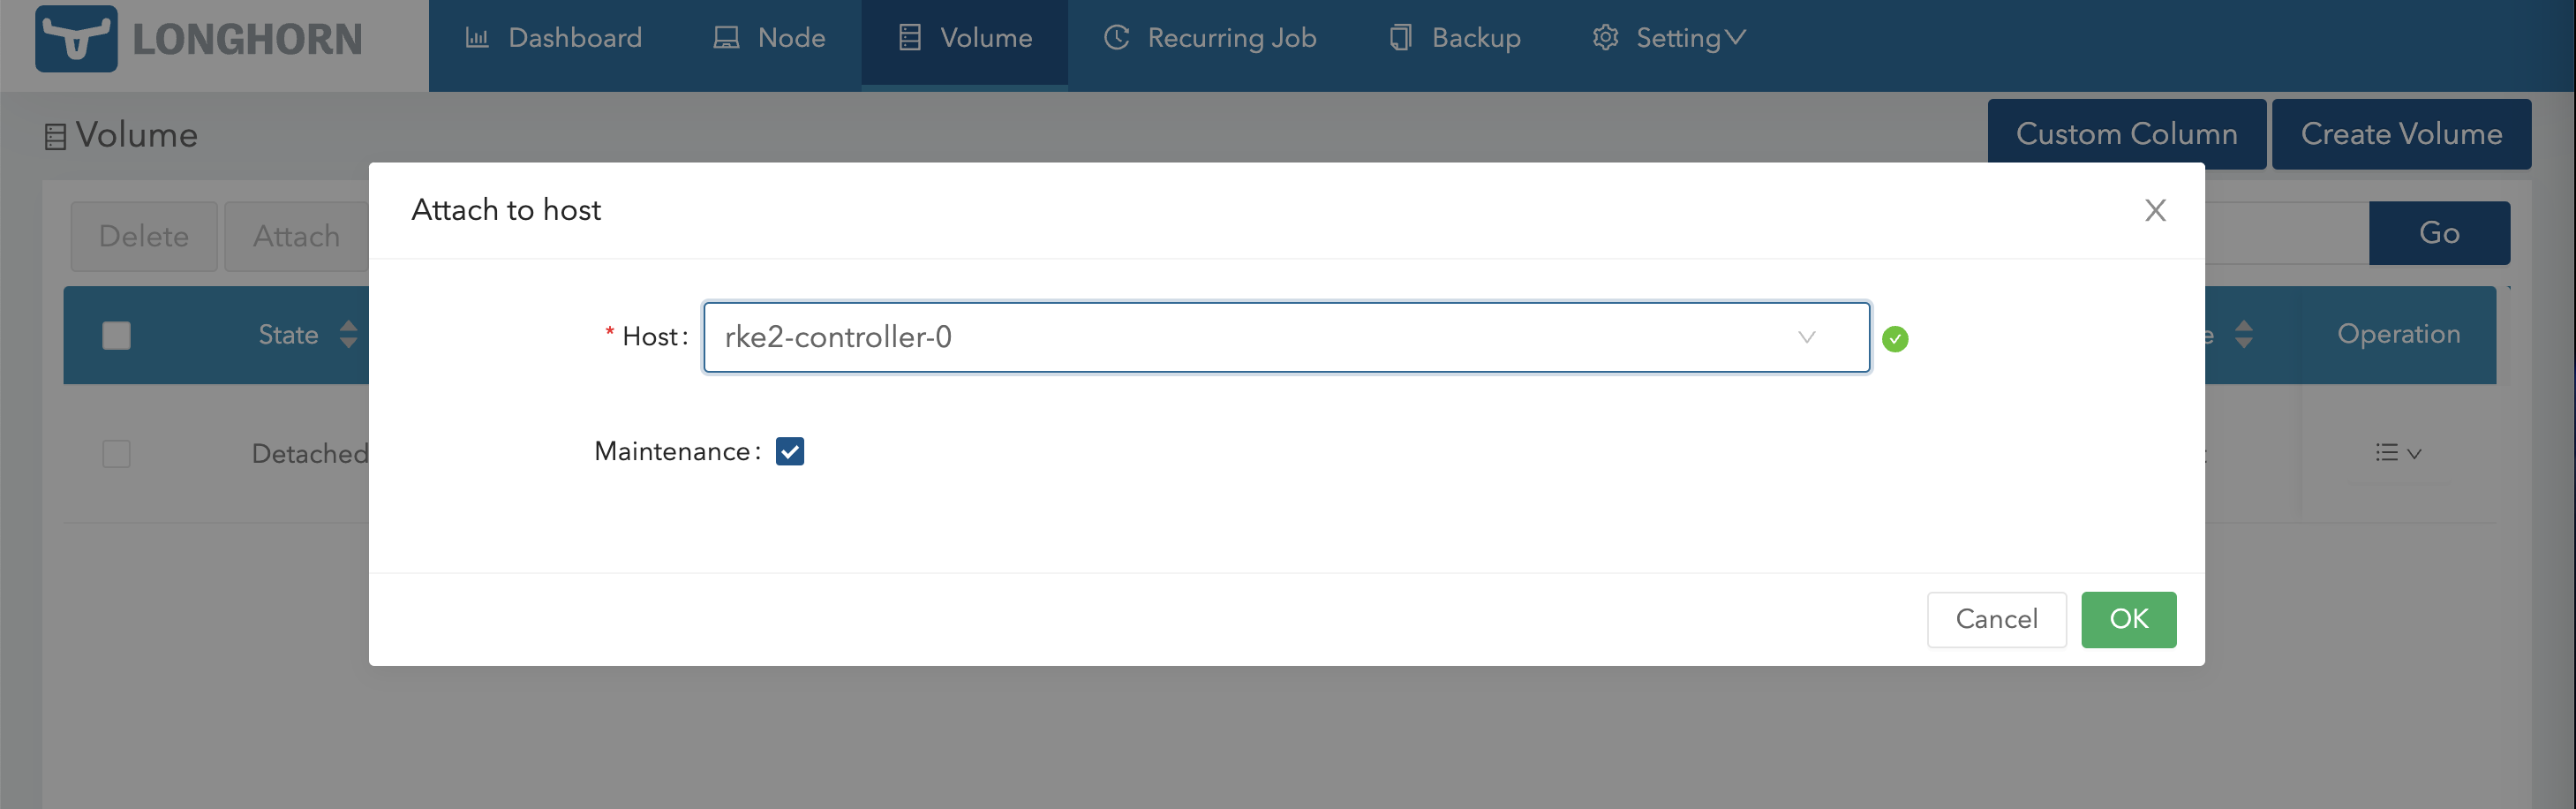
通过维护模式重新 Attach Volume:
进入 Volume 页面,选择对应快照进行恢复:
恢复完成后,Detach 该 Volume,并重新启动业务服务,即可看到数据已恢复:
数据卷备份与灾难恢复 Longhorn 支持将 Volume 备份到集群外部的 S3 或 NFS,用于跨集群备份和灾难恢复。
以下示例使用 MinIO 作为 S3 Backup Target。
部署 MinIO 示例使用 MinIO Operator 创建 MinIO Tenant:
1 2 3 4 5 6 7 8 9 10 11 12 13 14 15 16 17 18 19 20 21 22 23 24 25 26 27 28 29 30 31 32 33 34 35 36 37 38 39 40 41 42 43 44 45 46 47 48 49 50 51 52 53 54 55 56 57 58 59 60 61 62 63 64 65 66 67 68 69 70 71 72 73 74 75 76 77 78 79 80 81 82 83 84 85 86 87 88 89 90 91 92 93 94 95 96 97 98 99 100 101 102 103 104 105 106 107 108 109 110 111 112 113 114 cat <<EOF | kubectl apply -f - apiVersion: v1 kind: Secret metadata: name: backup-minio-secret namespace: default type: Opaque data: accesskey: bWluaW8= secretkey: VGpCcFkwVTNZVGcyU3c9PQ== --- apiVersion: v1 kind: Secret metadata: name: backup-minio-env-configuration namespace: default type: Opaque data: config.env: ZXhwb3J0IE1JTklPX0JST1dTRVI9Im9uIgpleHBvcnQgTUlOSU9fUk9PVF9VU0VSPSJtaW5pbyIKZXhwb3J0IE1JTklPX1JPT1RfUEFTU1dPUkQ9IlRqQnBZMFUzWVRnMlN3PT0iCg== --- apiVersion: minio.min.io/v2 kind: Tenant metadata: name: backup-minio namespace: default spec: buckets: - name: longhorn configuration: name: backup-minio-env-configuration env: - name: MINIO_PROMETHEUS_AUTH_TYPE value: public - name: MINIO_SERVER_URL value: http://minio-hl.warnerchen.io image: quay.m.daocloud.io/minio/minio:RELEASE.2023-10-07T15-07-38Z initContainers: - name: change-permission image: quay.m.daocloud.io/minio/minio:RELEASE.2023-10-07T15-07-38Z command: - sh - -c - chown -R 1000:1000 /export/* || true securityContext: capabilities: add: - CHOWN volumeMounts: - name: "0" mountPath: /export pools: - name: pool-0 servers: 1 volumesPerServer: 1 resources: limits: cpu: 500m memory: 500Mi requests: cpu: 50m memory: 100Mi volumeClaimTemplate: metadata: {} spec: accessModes: - ReadWriteOnce resources: requests: storage: 10Gi requestAutoCert: false serviceMetadata: minioServiceLabels: mcamel/exporter-type: minio --- apiVersion: networking.k8s.io/v1 kind: Ingress metadata: name: minio namespace: default spec: rules: - host: minio.warnerchen.io http: paths: - path: / pathType: Prefix backend: service: name: minio port: number: 443 --- apiVersion: networking.k8s.io/v1 kind: Ingress metadata: name: minio-hl namespace: default spec: rules: - host: minio-hl.warnerchen.io http: paths: - path: / pathType: Prefix backend: service: name: backup-minio-hl port: number: 9000 EOF
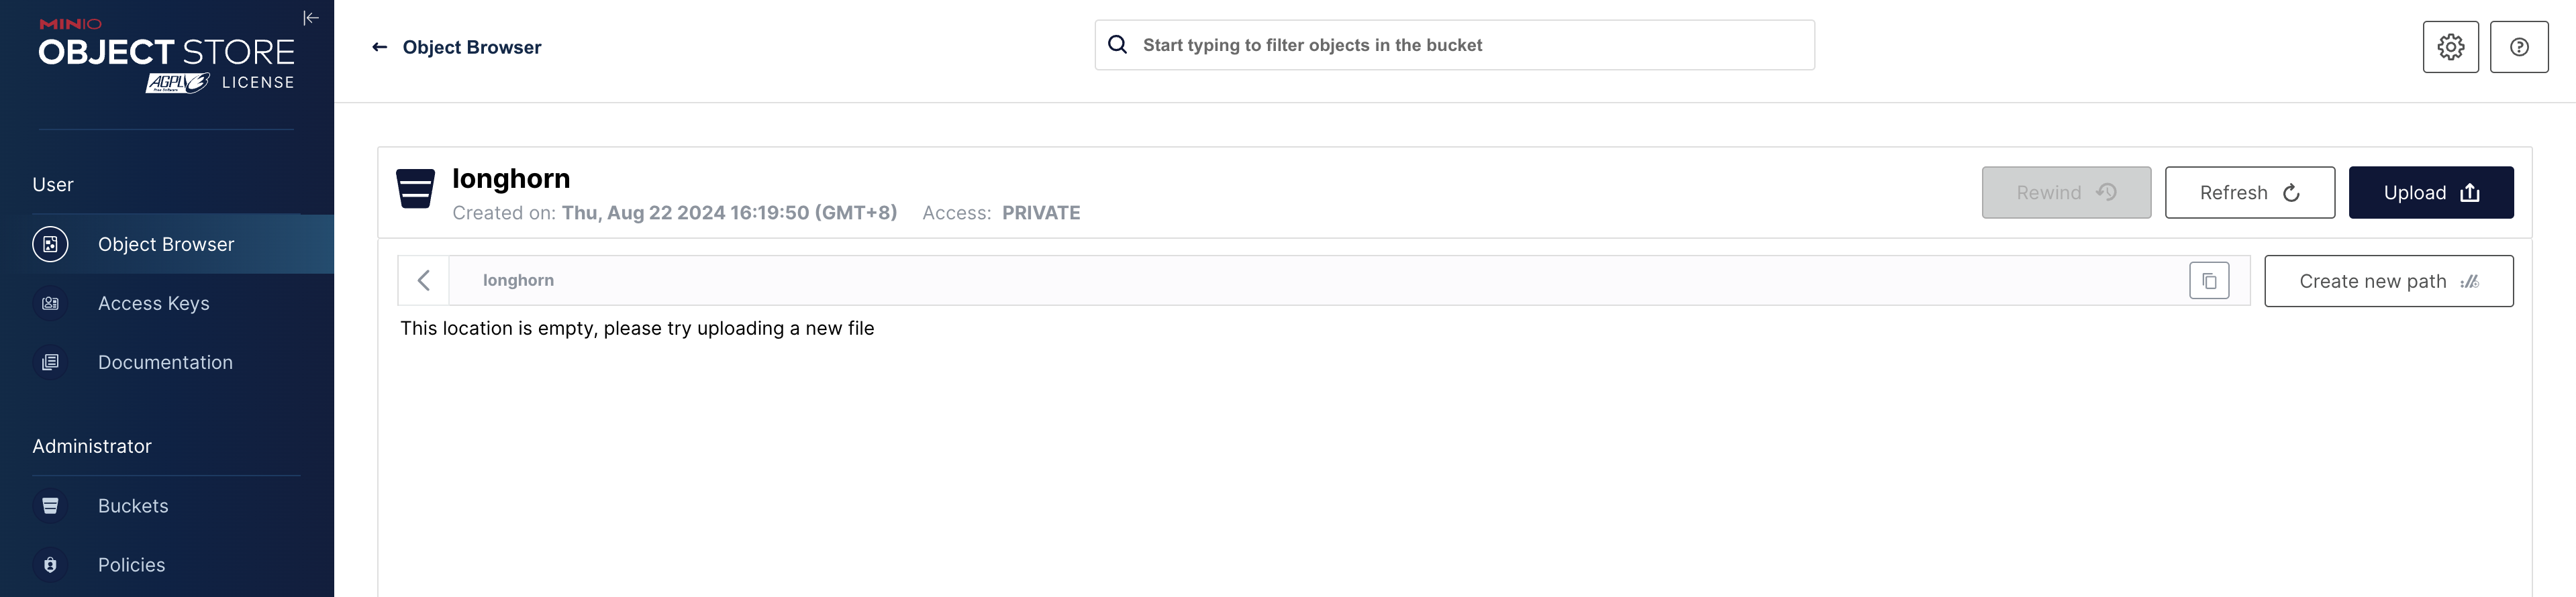
准备 Bucket:
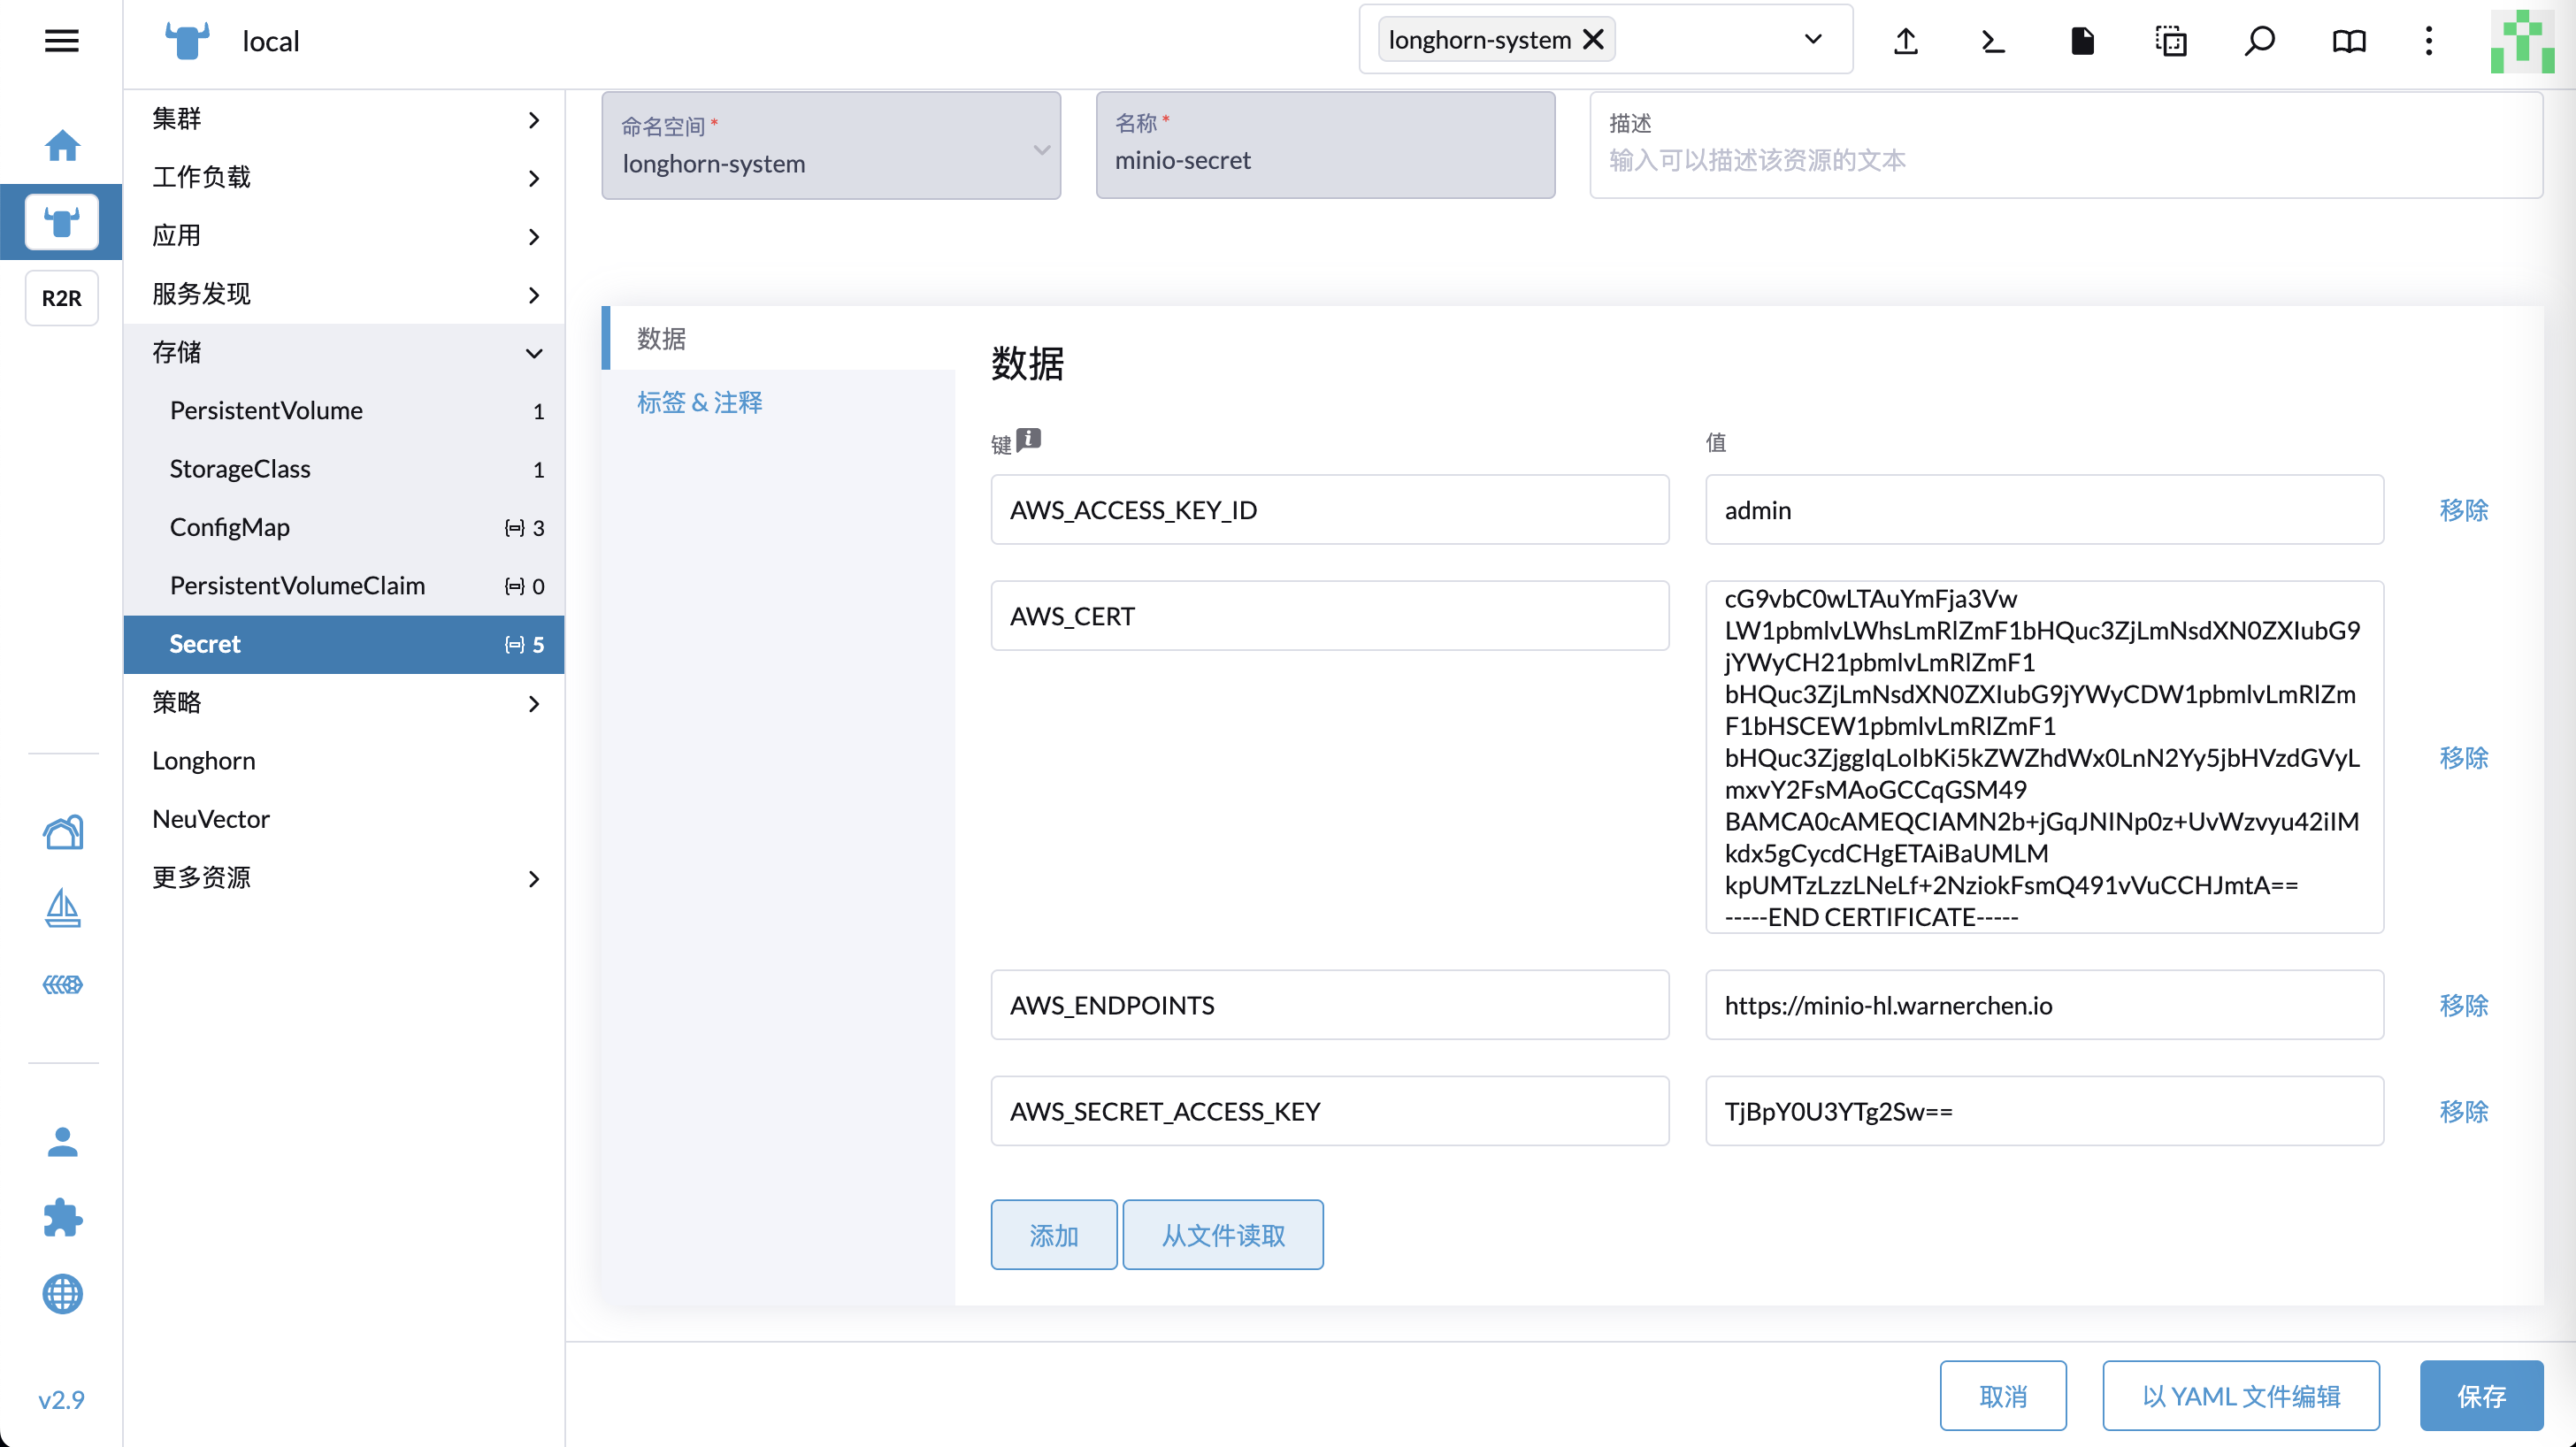
配置 Longhorn Backup Target 在两个集群的 longhorn-system 命名空间中创建 Secret,主要包含以下字段:
AWS_ACCESS_KEY_ID:Access KeyAWS_SECRET_ACCESS_KEY:Secret KeyAWS_ENDPOINTS:S3 URLAWS_CERT:如果使用自签名证书,则需要配置
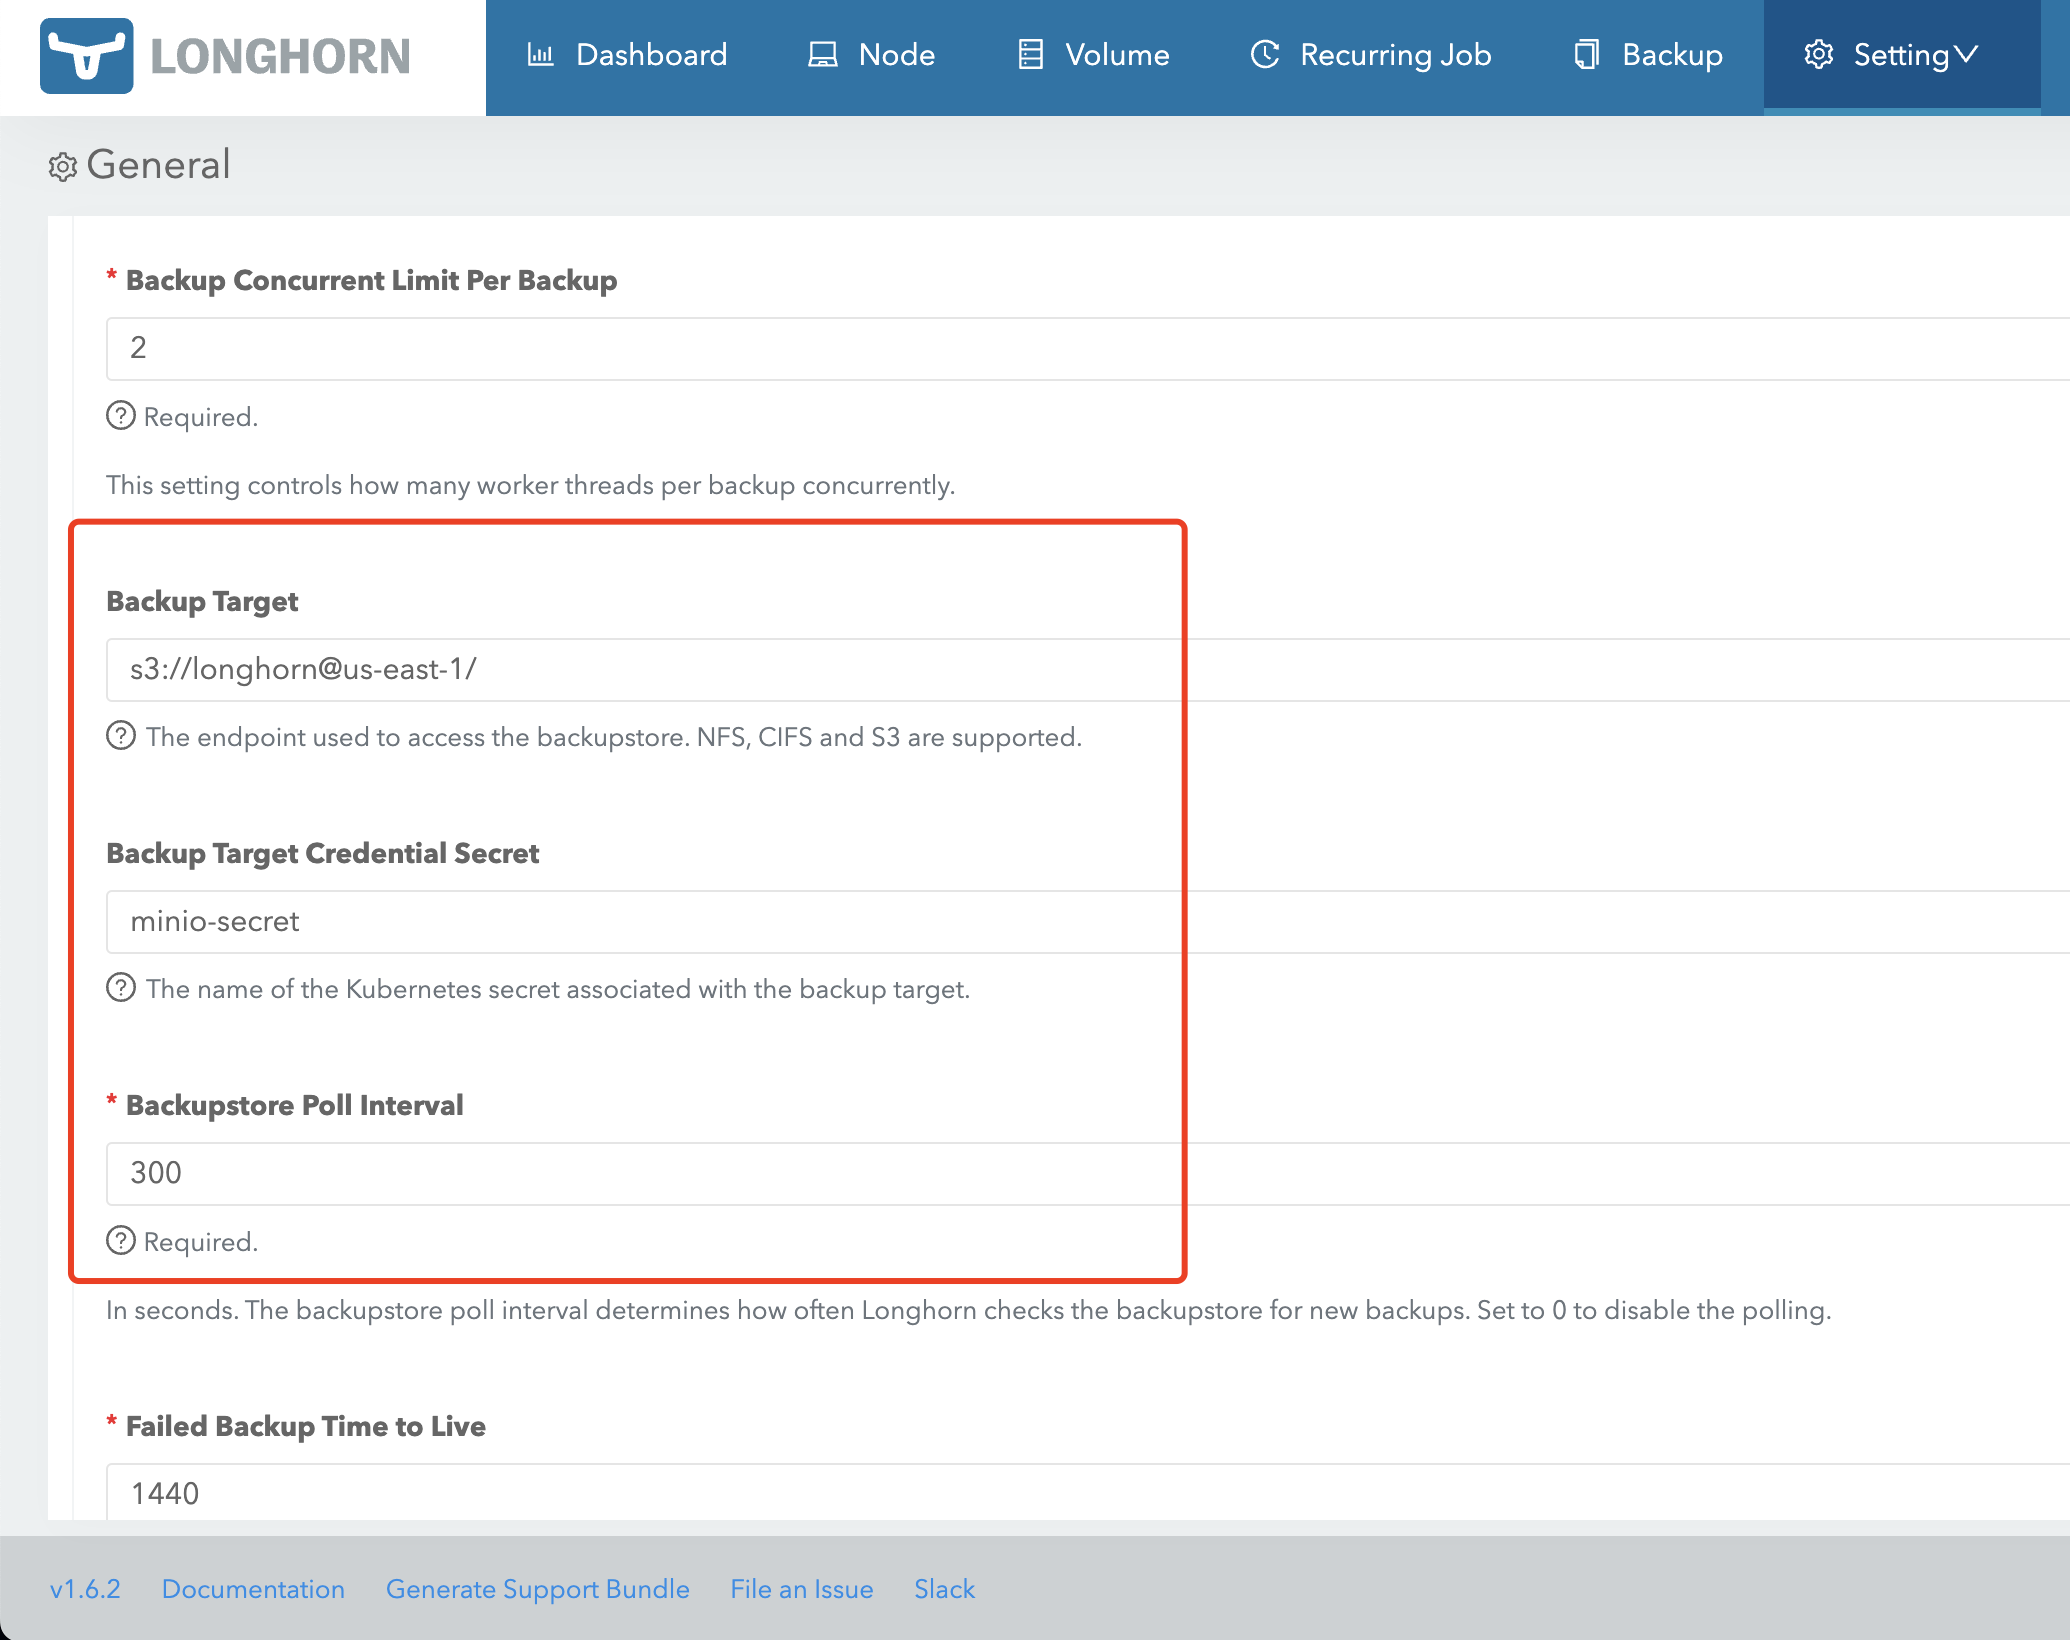
创建 Secret 后,在 Longhorn UI 中配置 Backup Target:
创建 PVC 并写入测试数据 在任意一个集群中创建 PVC:
1 2 3 4 5 6 7 8 9 10 11 12 13 14 cat <<EOF | kubectl apply -f - apiVersion: v1 kind: PersistentVolumeClaim metadata: name: nginx-pvc namespace: default spec: accessModes: - ReadWriteOnce resources: requests: storage: 1Gi storageClassName: longhorn EOF
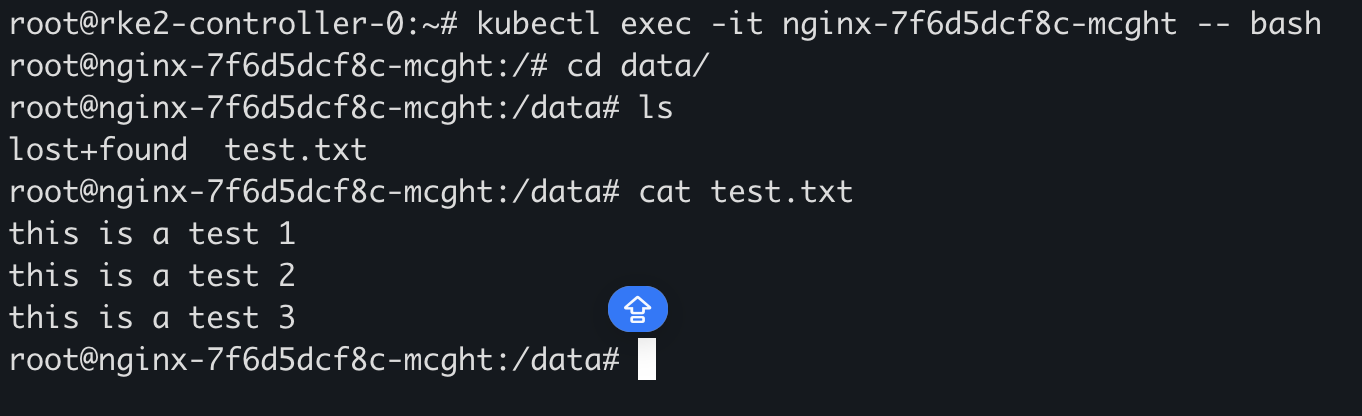
将 PVC 挂载到 Nginx 后,写入测试数据:
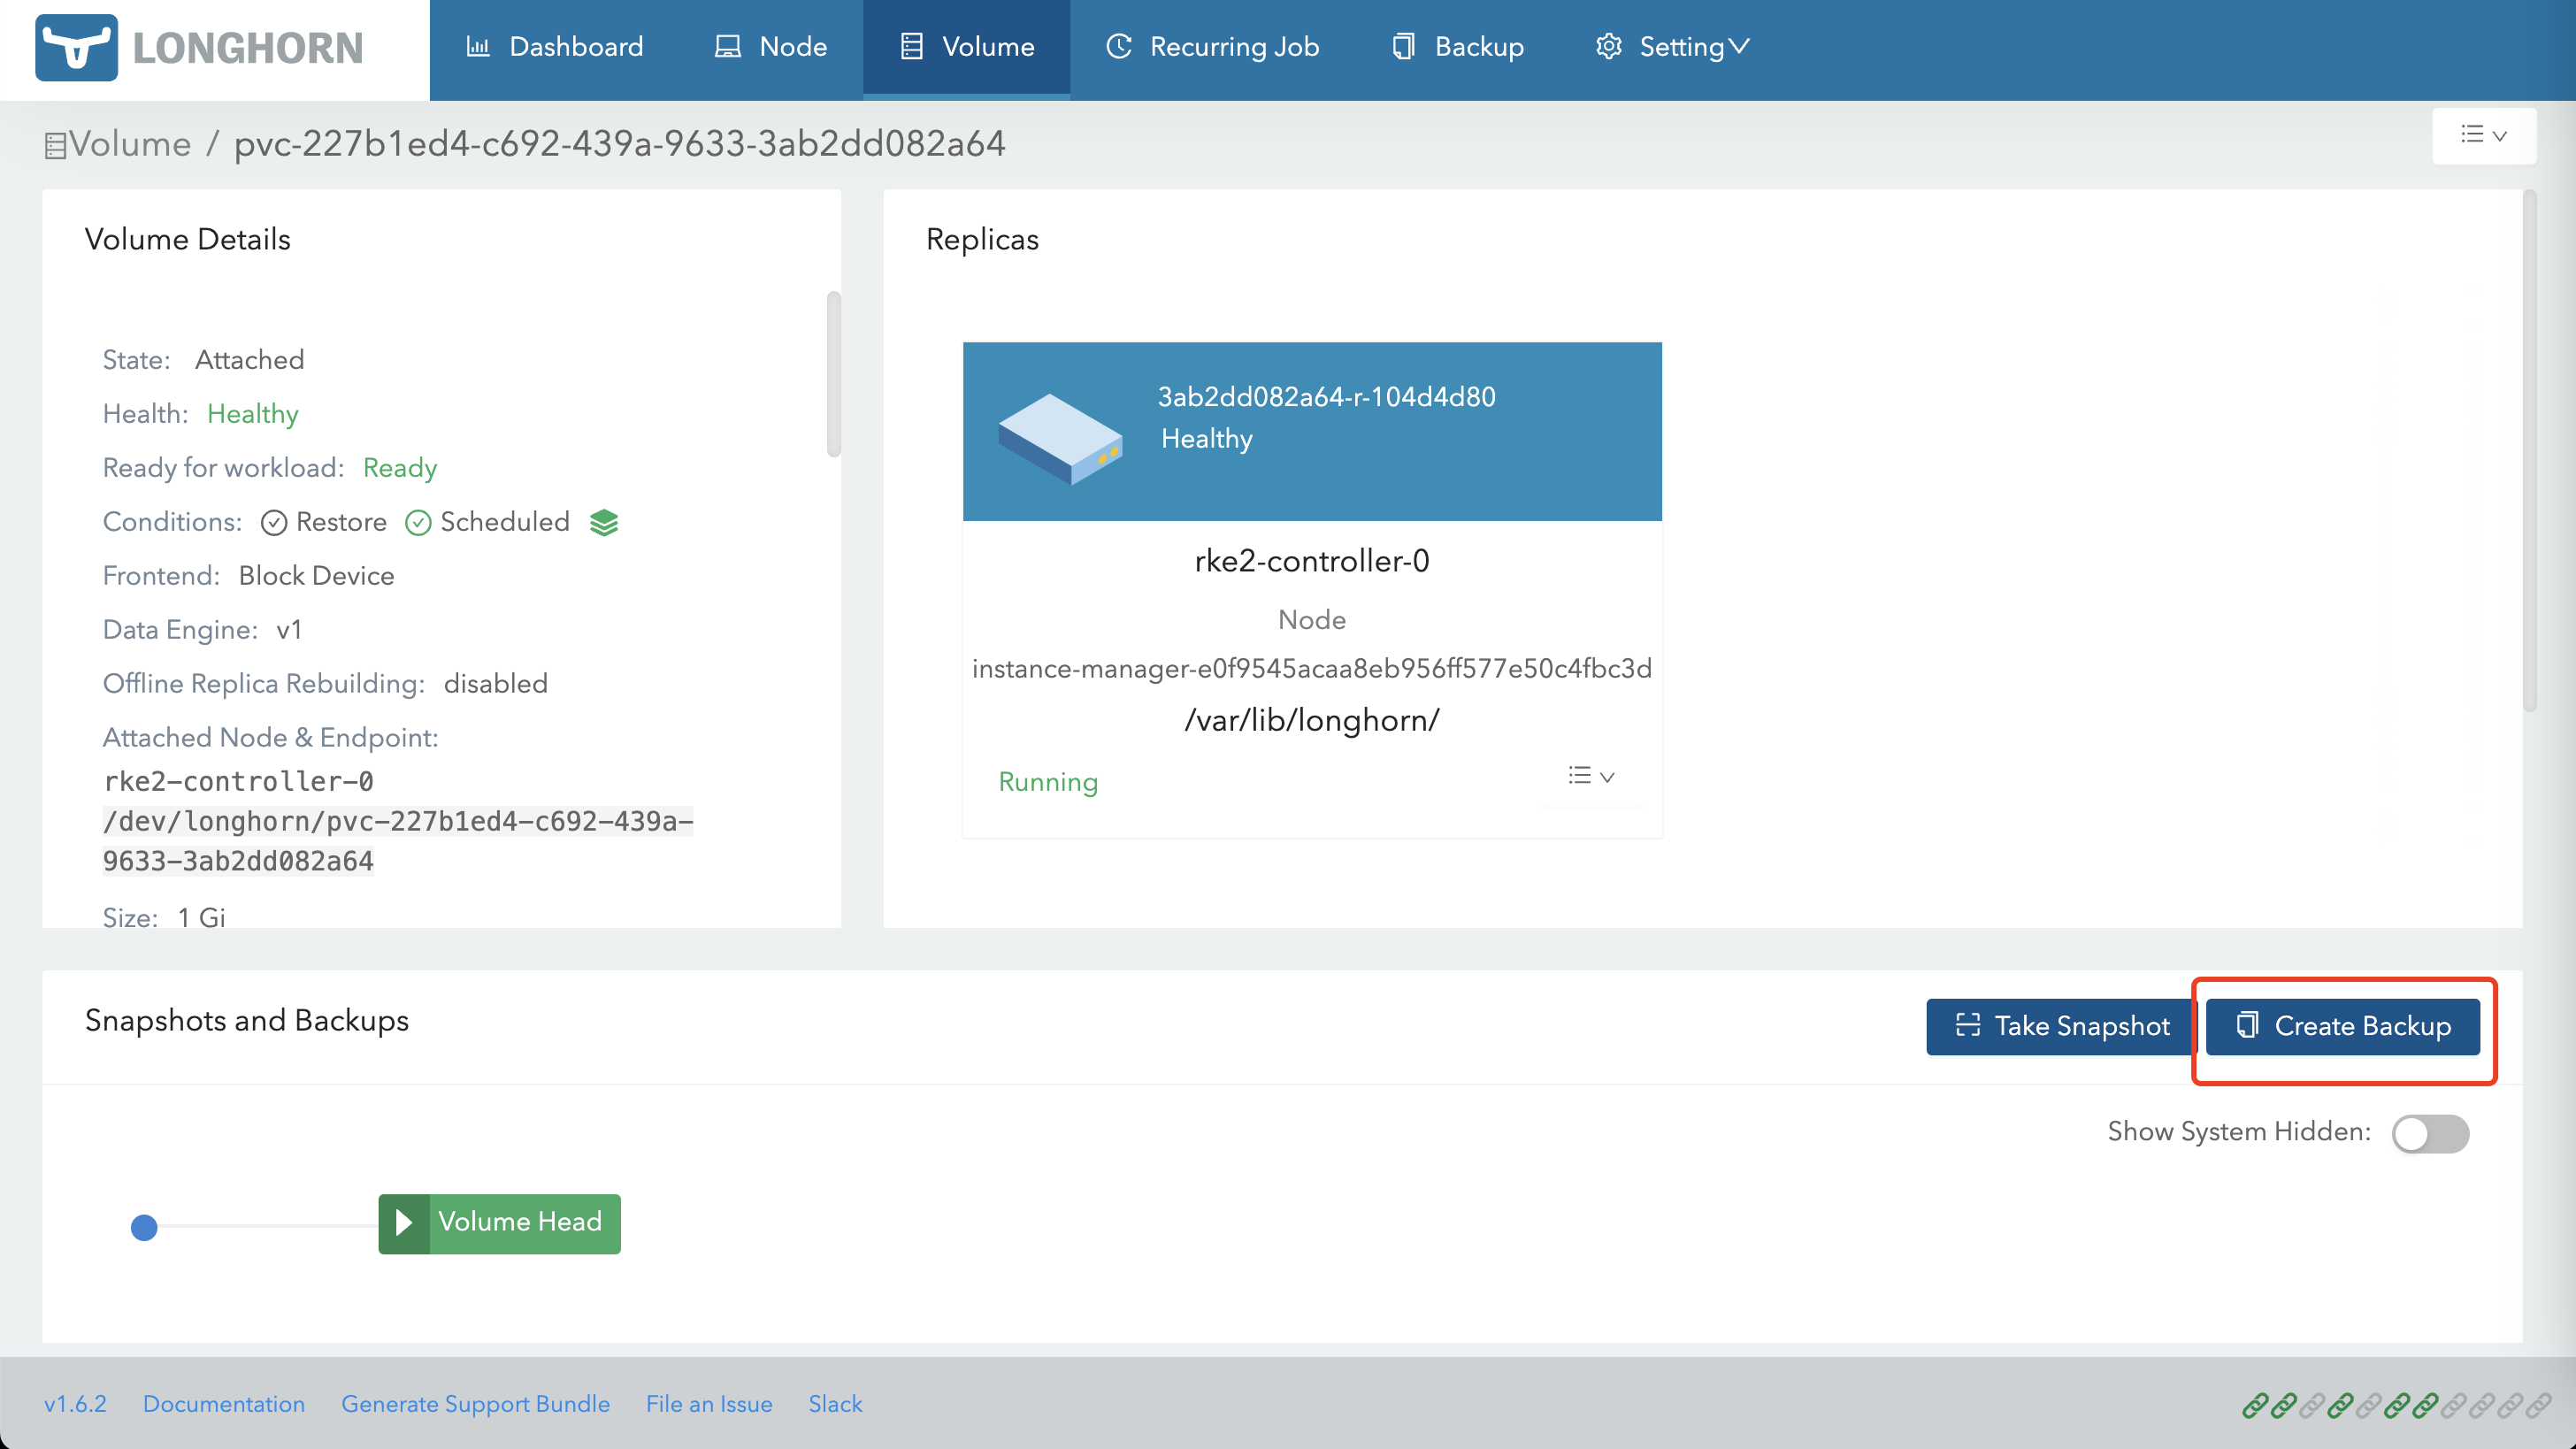
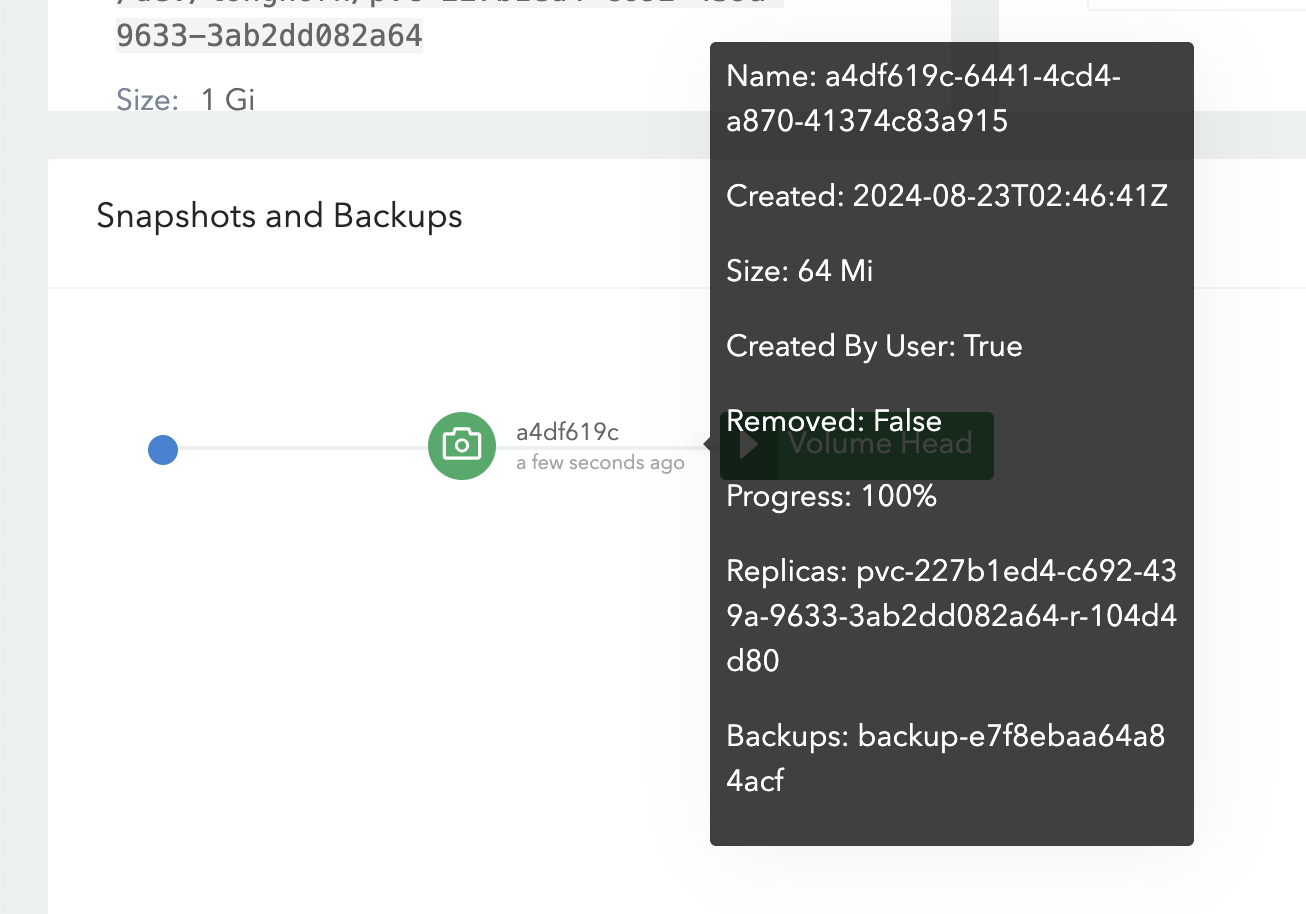
创建备份 在 Longhorn UI 中为该 Volume 创建备份:
备份完成后,可在 MinIO 中看到对应备份数据:
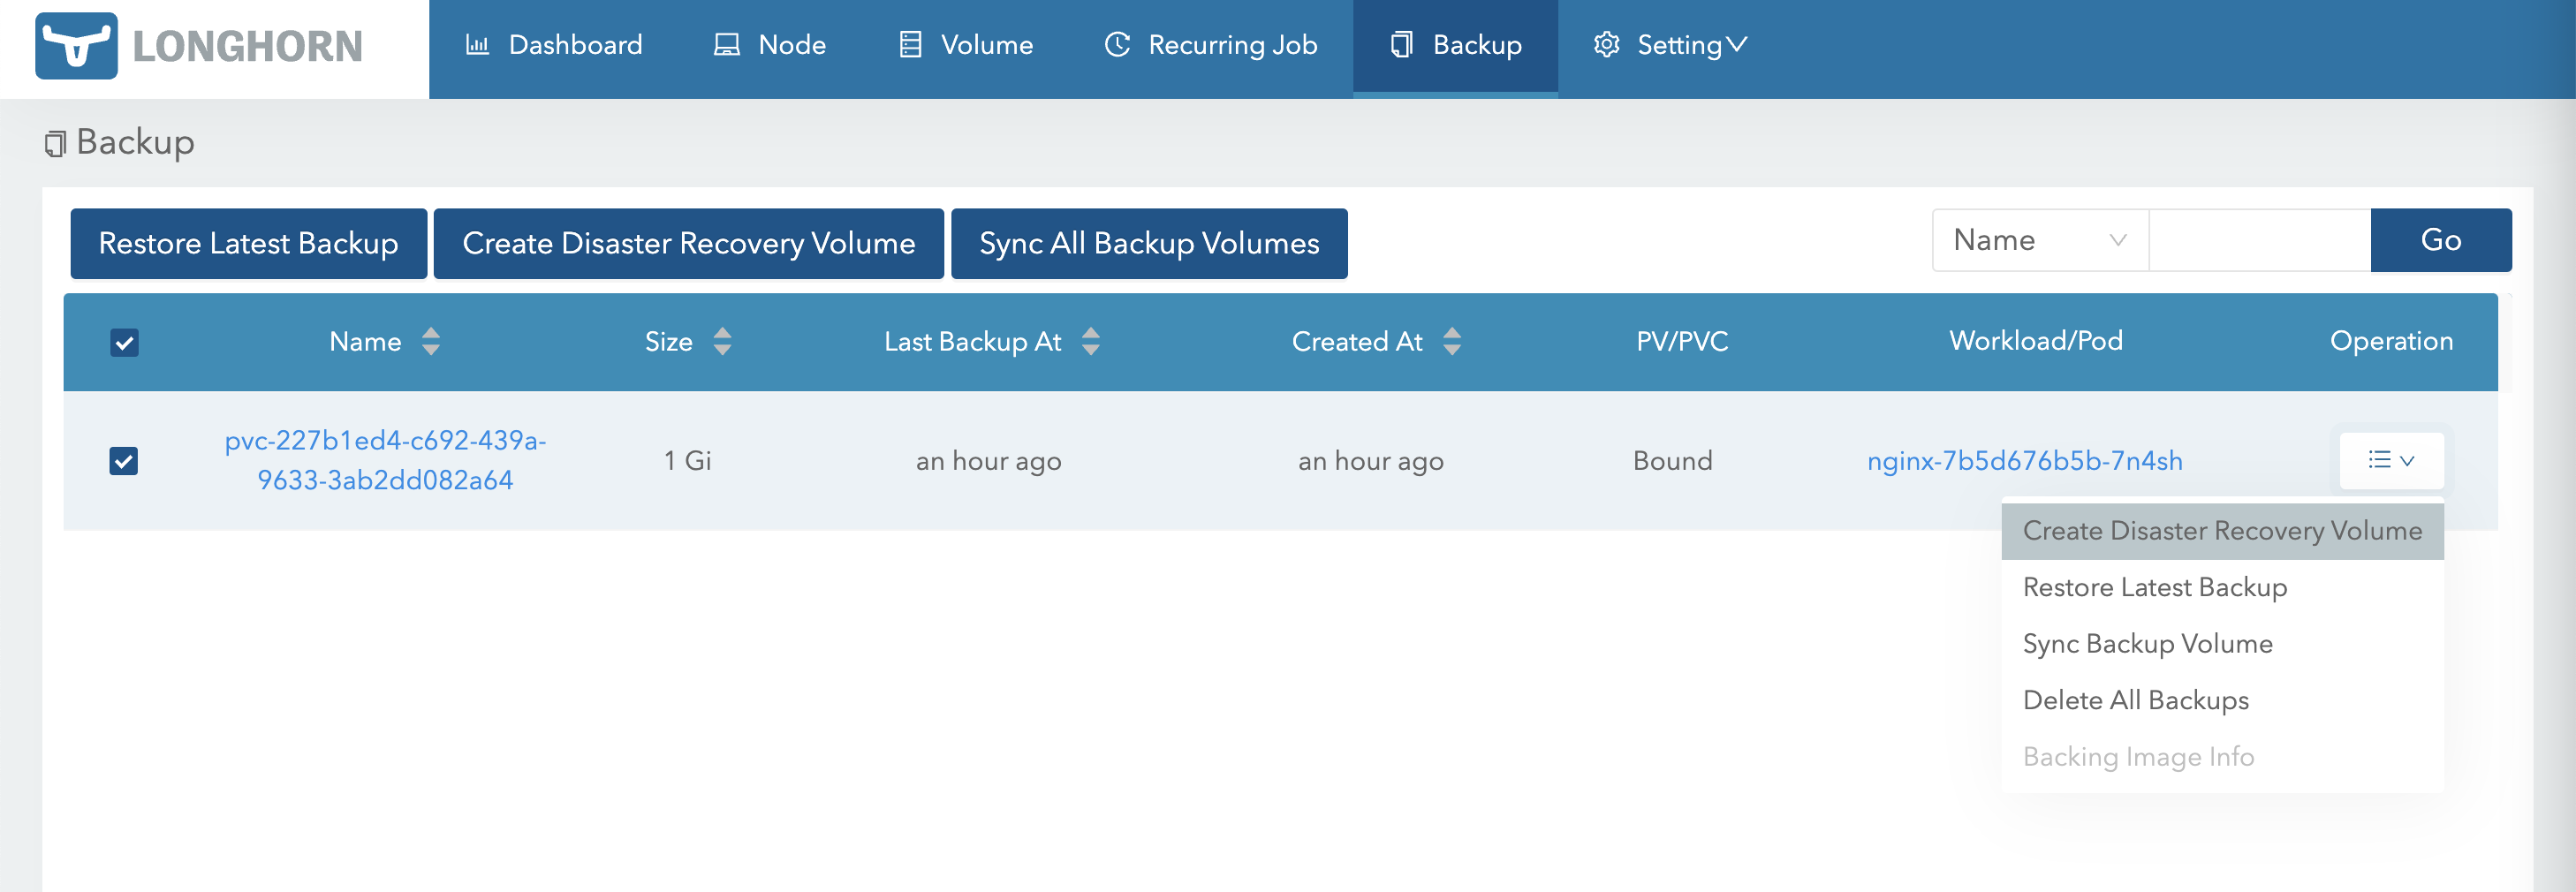
由于两个集群使用同一个 Backup Target,因此两个集群的 Longhorn 都可以看到该备份:
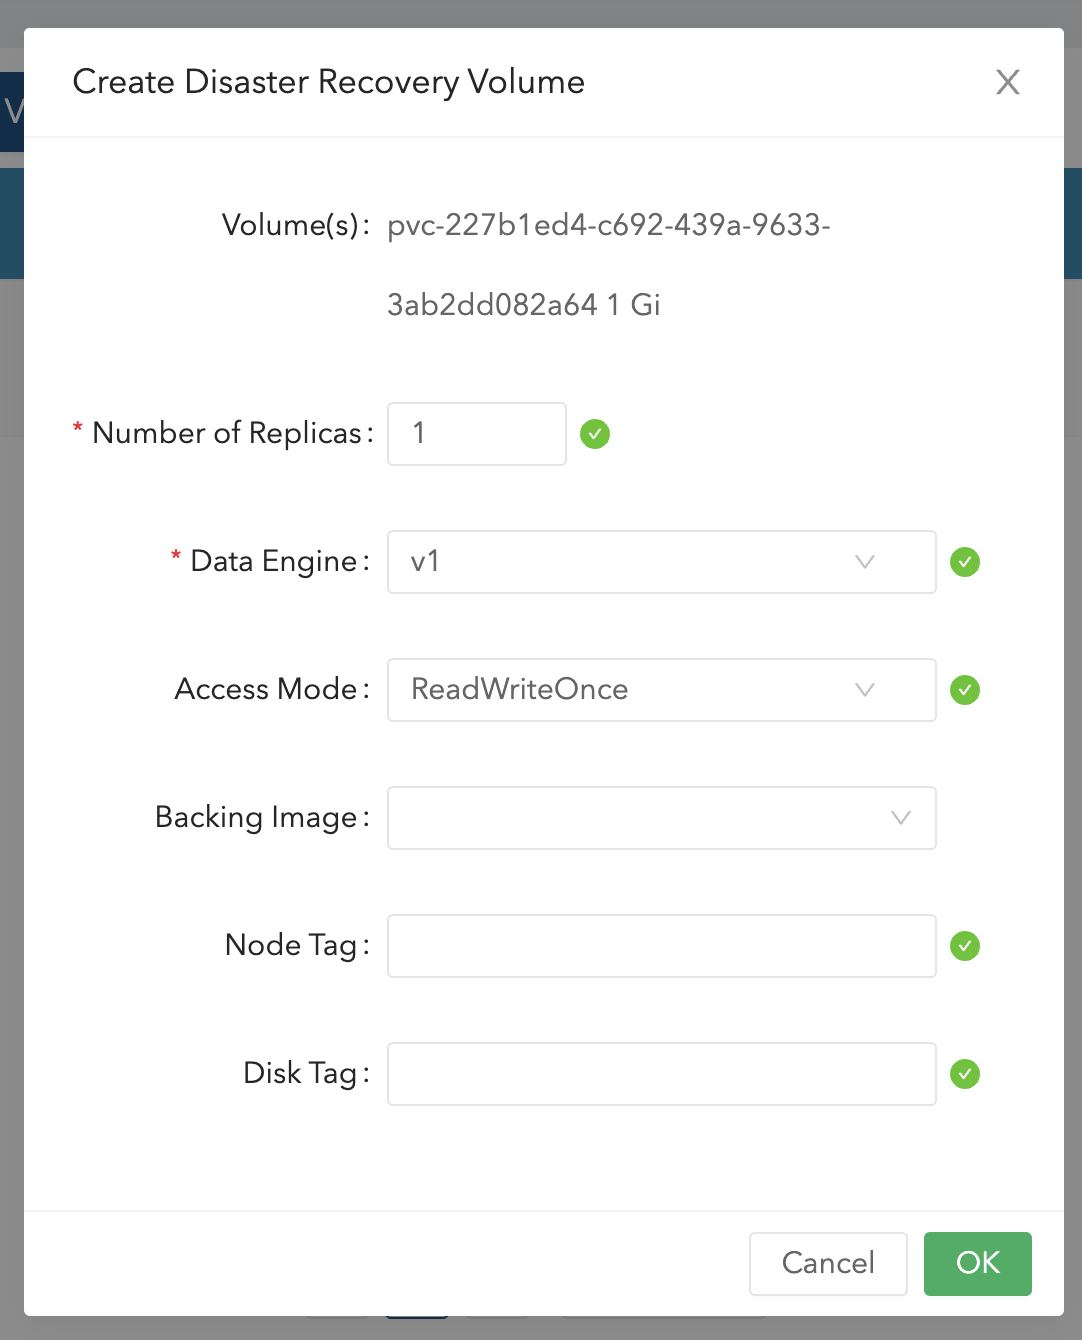
在另一个集群恢复 Volume 在另一个集群中,通过该备份创建 Volume:
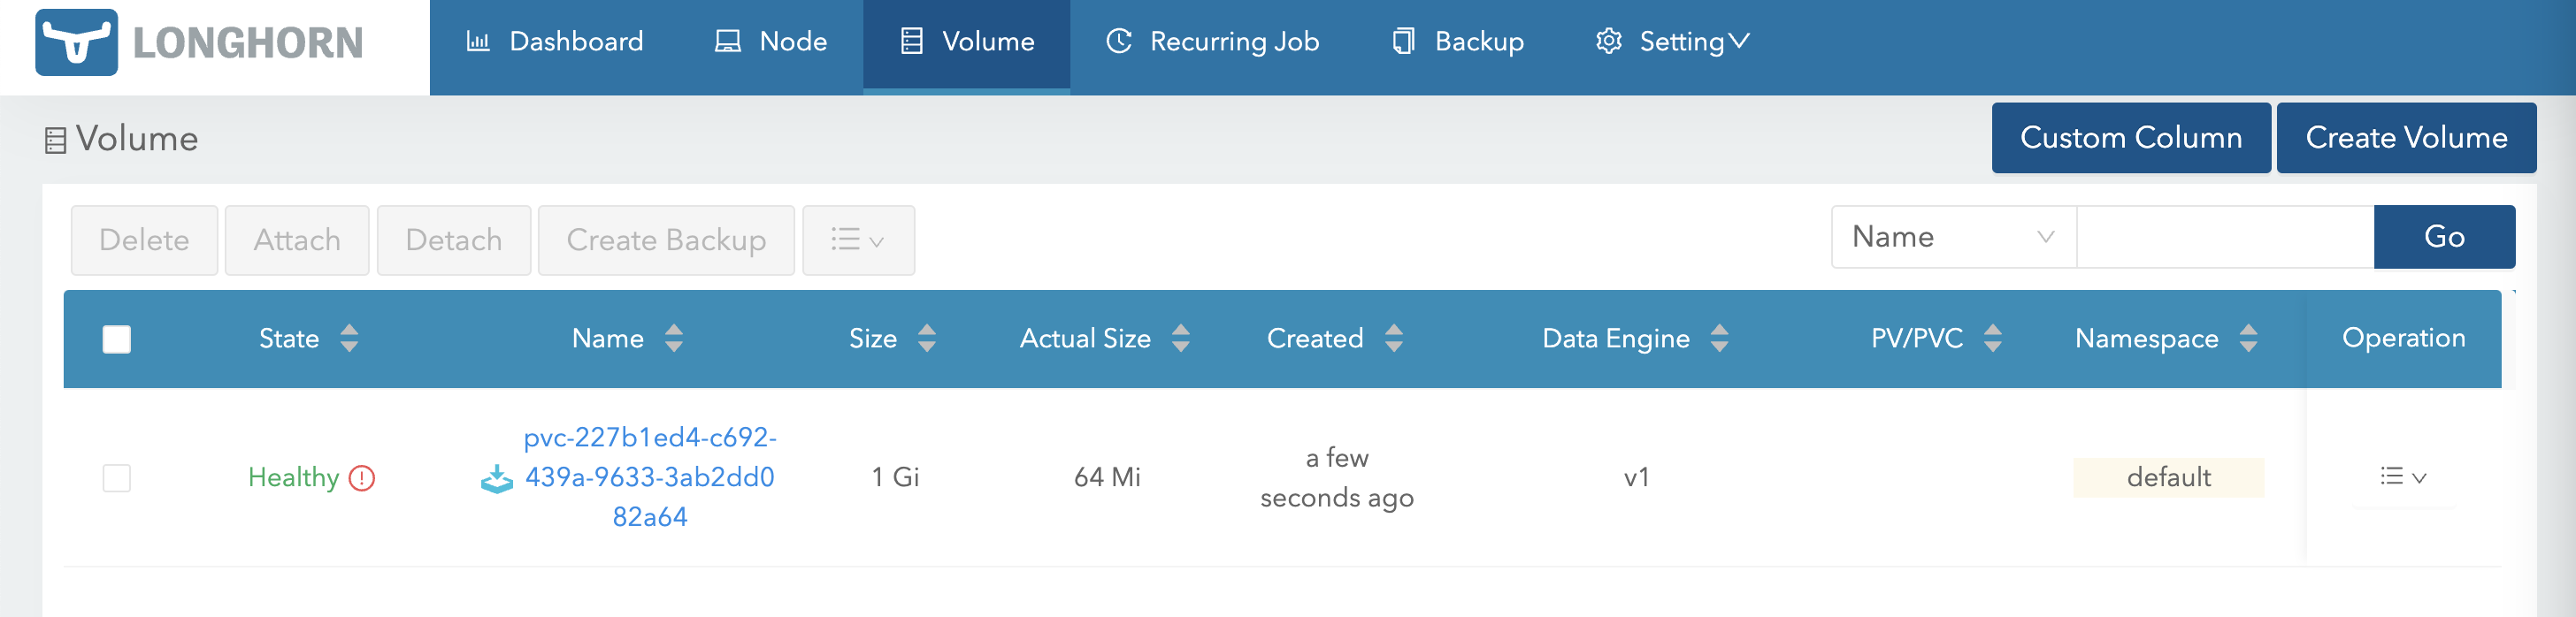
创建完成后,即可看到恢复出的 Volume。此时如果源端继续写入更多数据,Volume 也会自动同步备份数据:
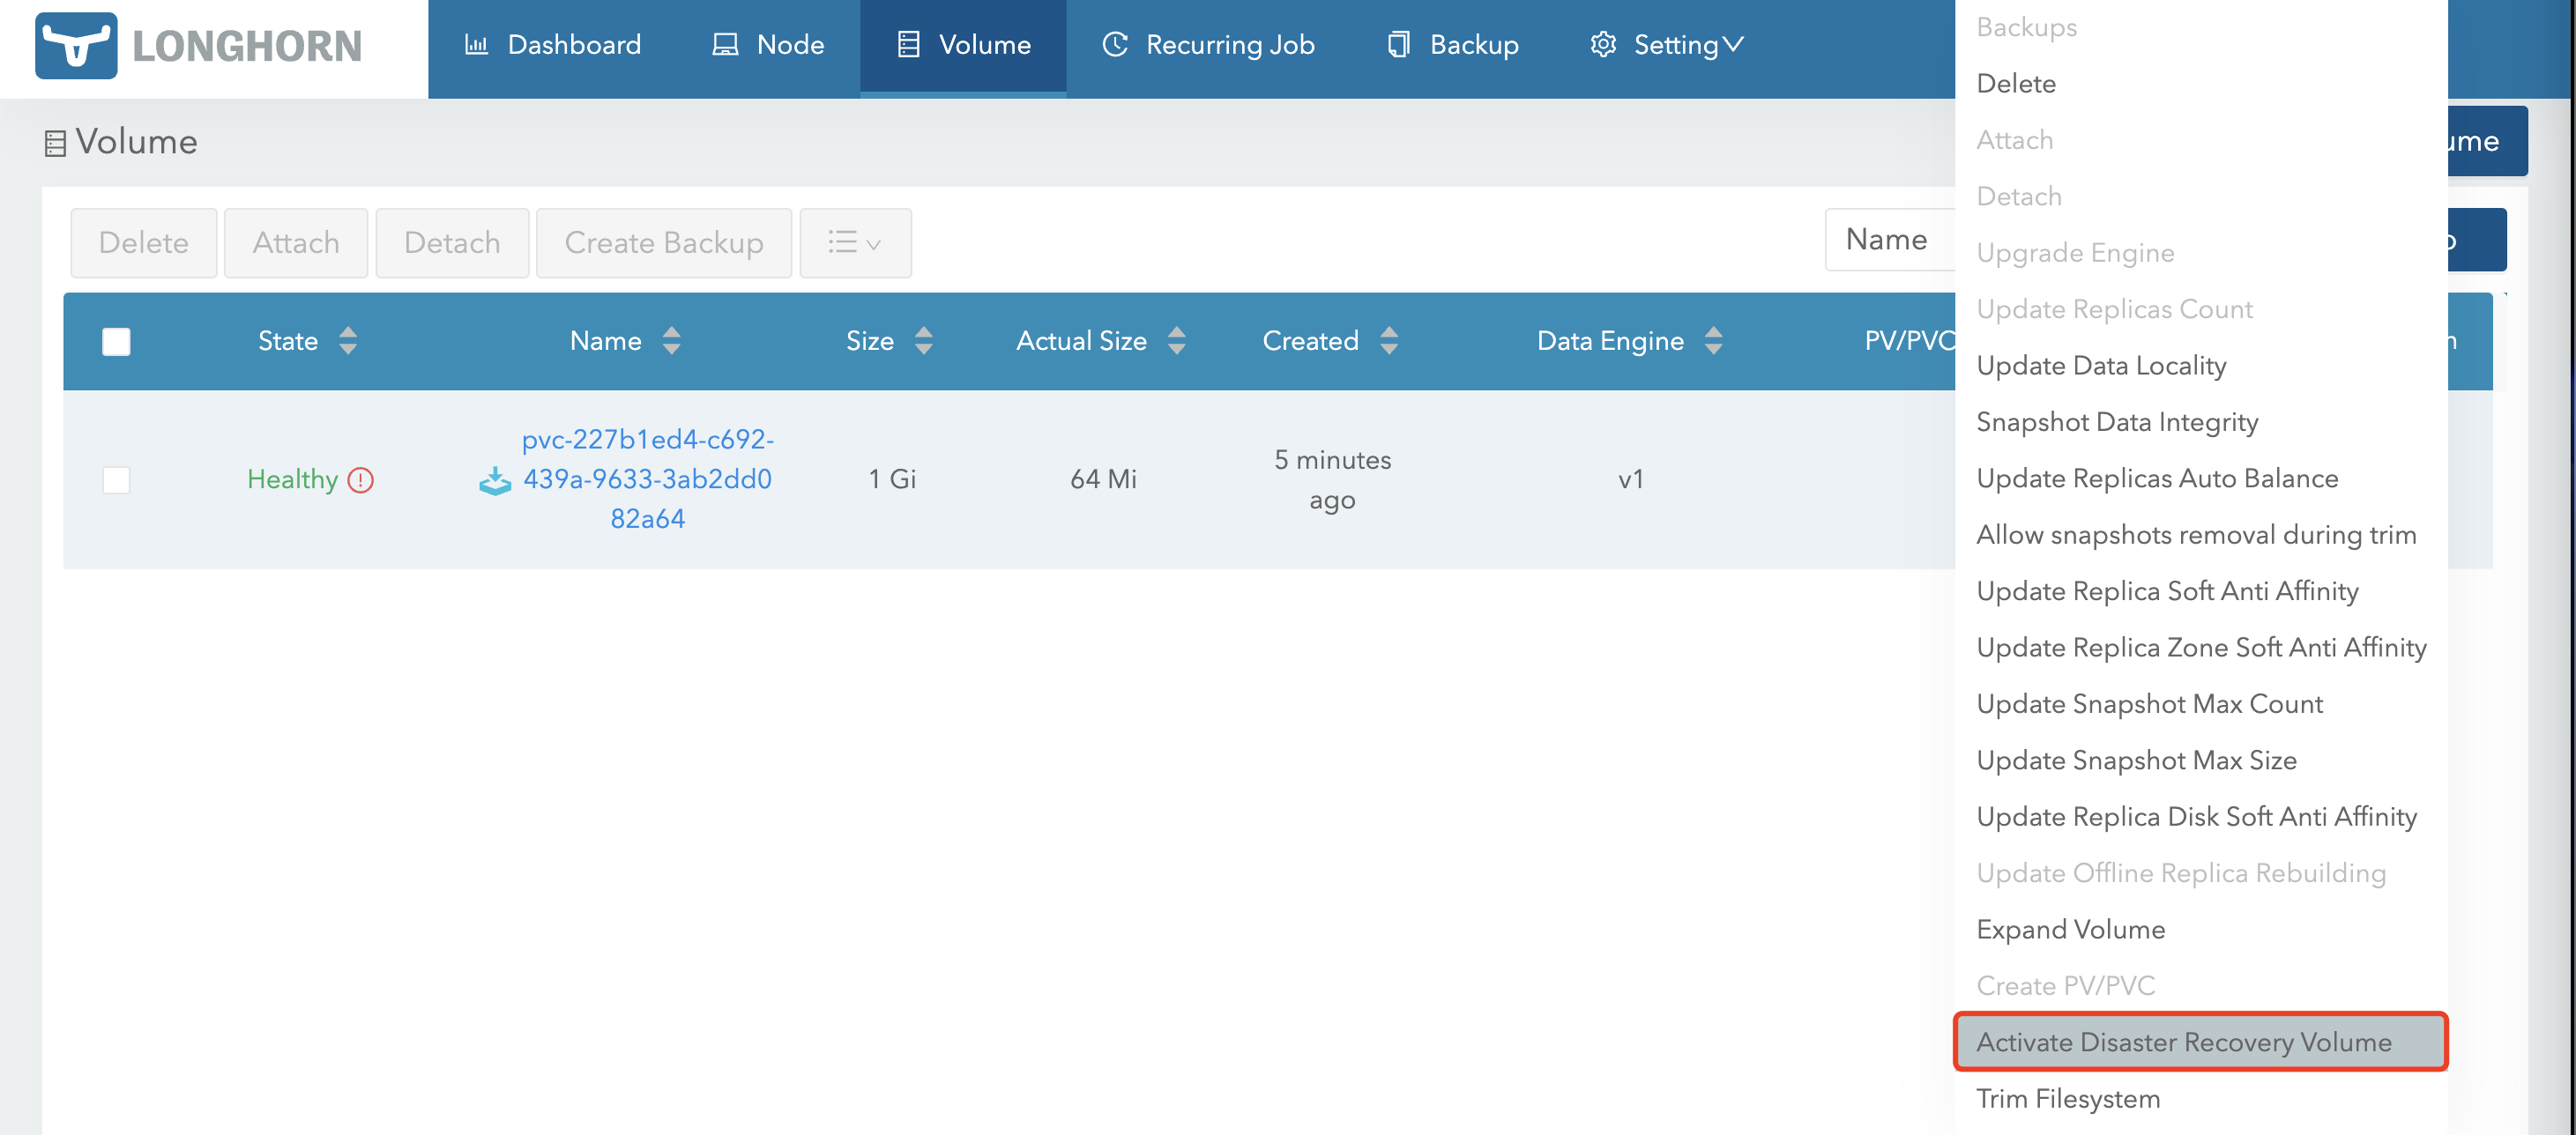
当源集群宕机或业务不可用时,可以使用该 Volume 进行恢复。
首先激活该 Volume:
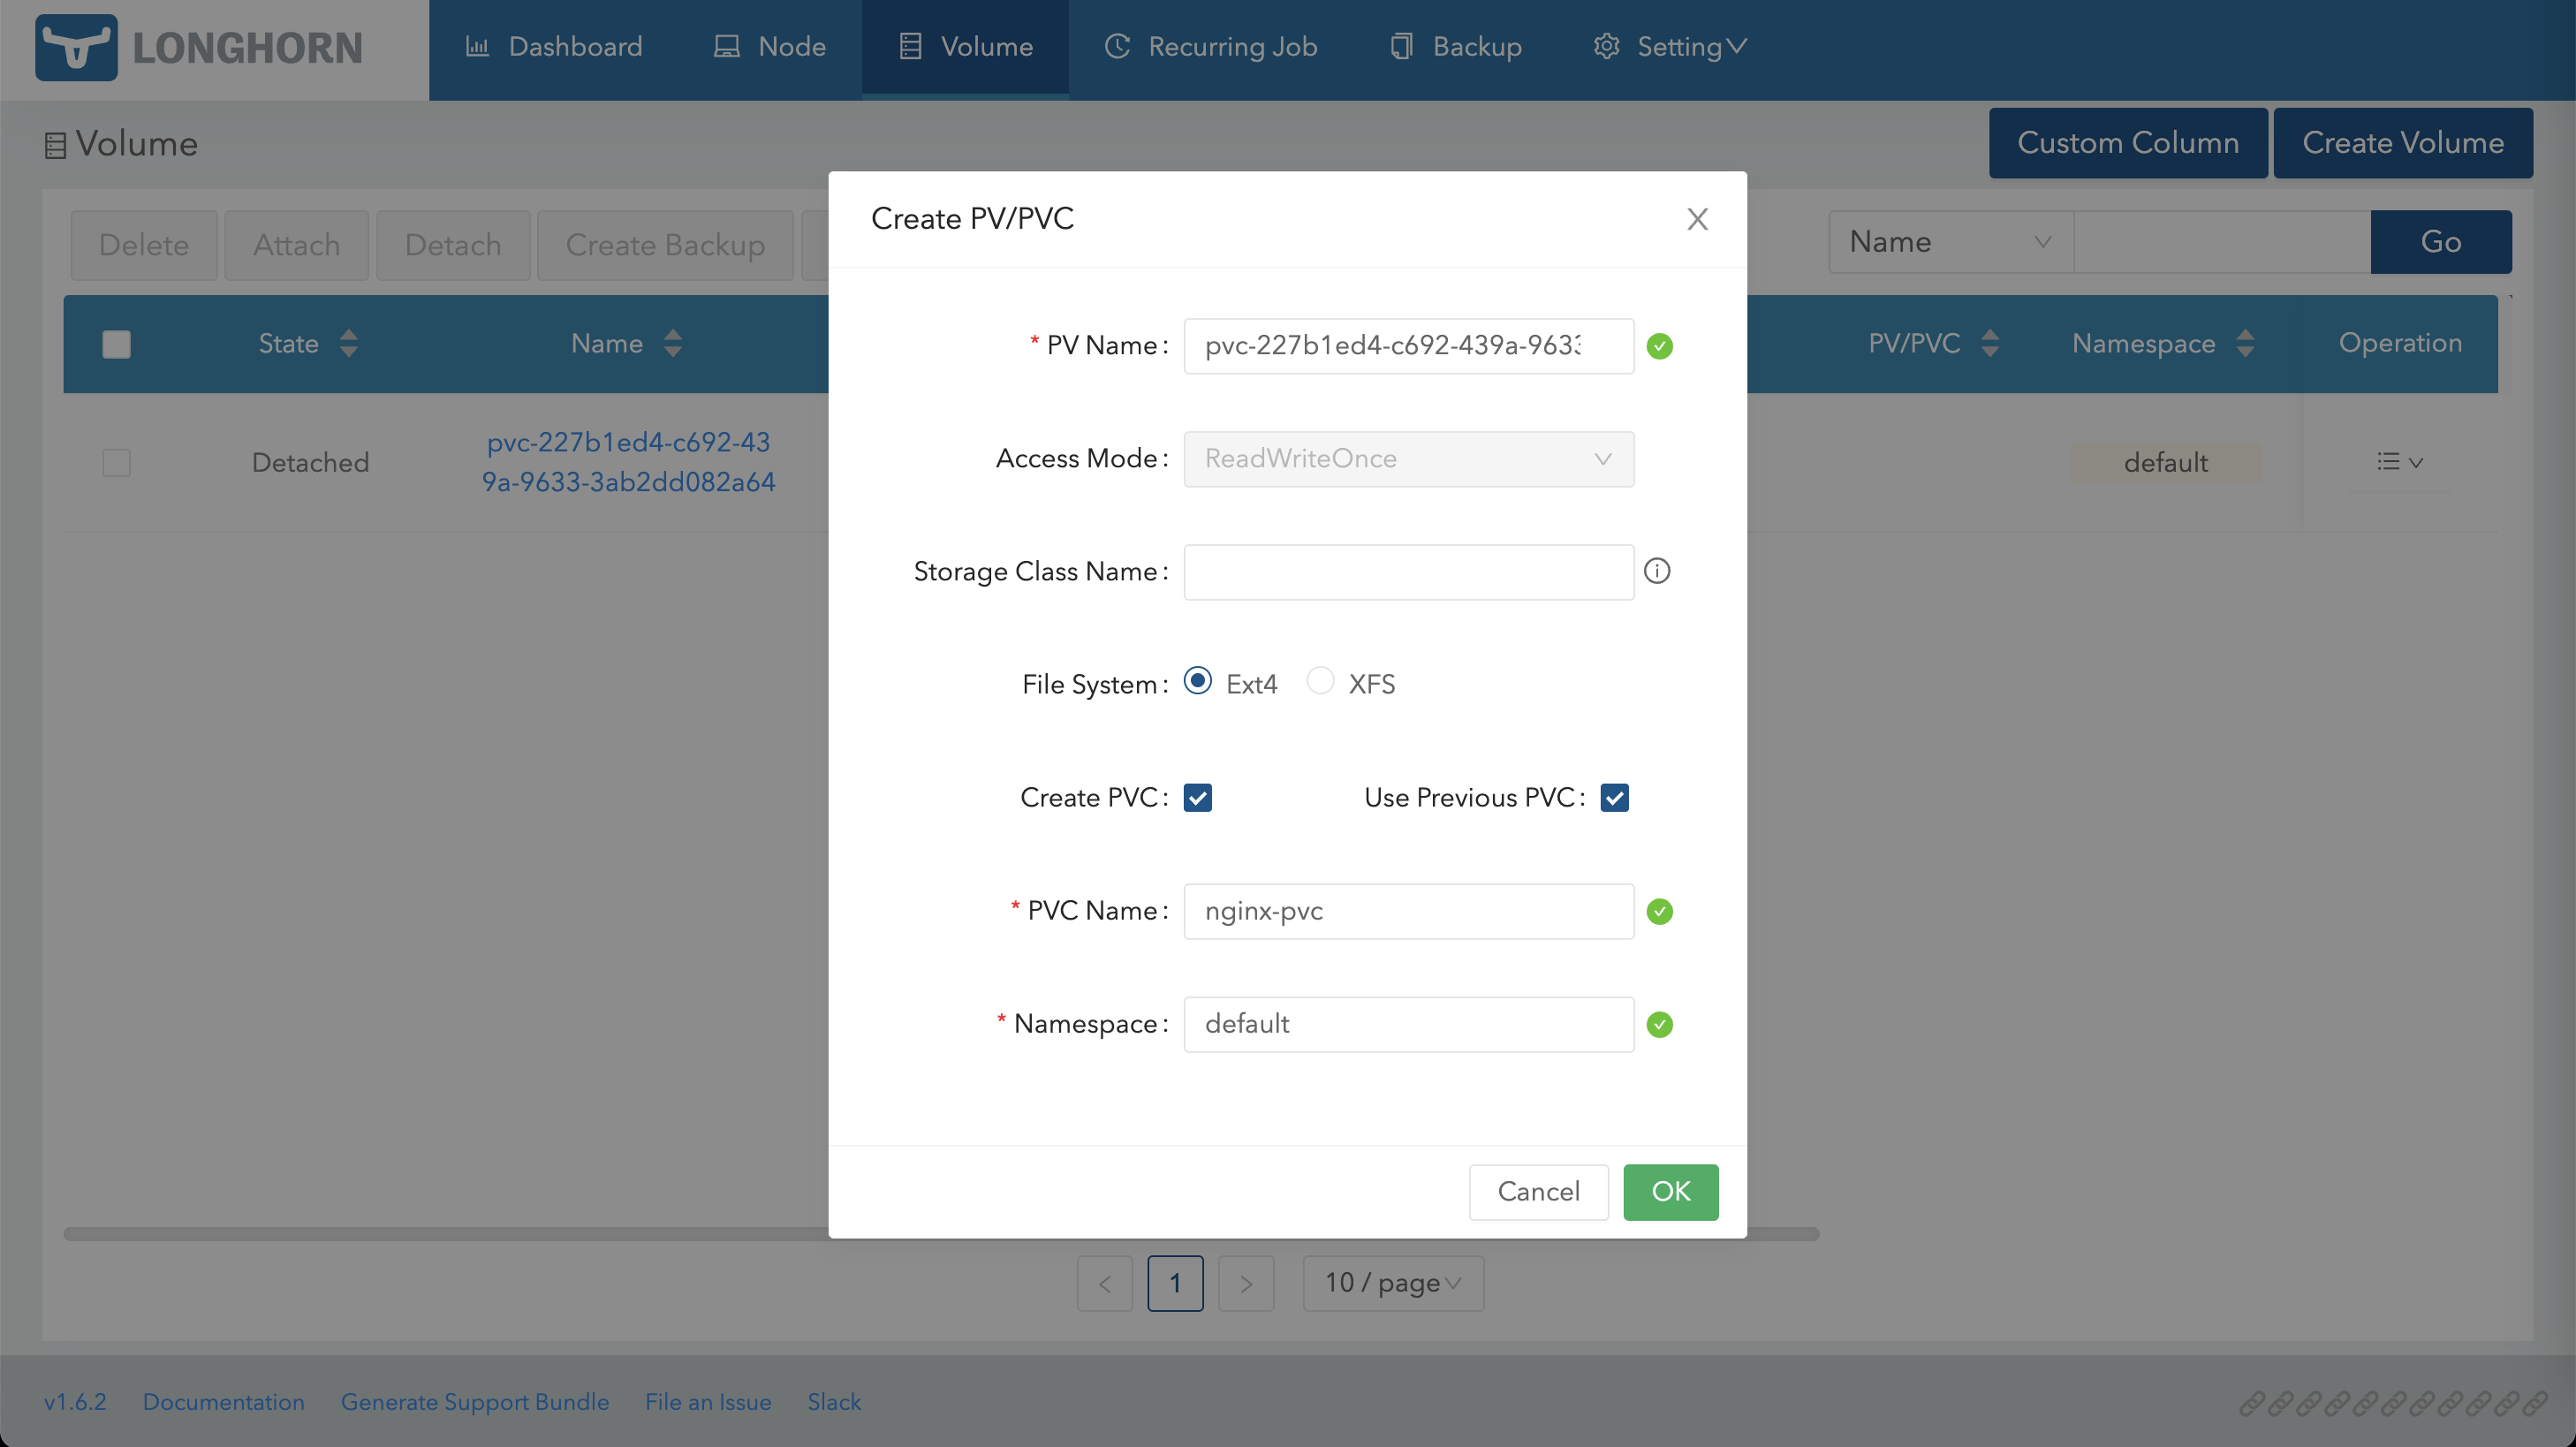
激活后,使用该 Volume 创建 PV/PVC:
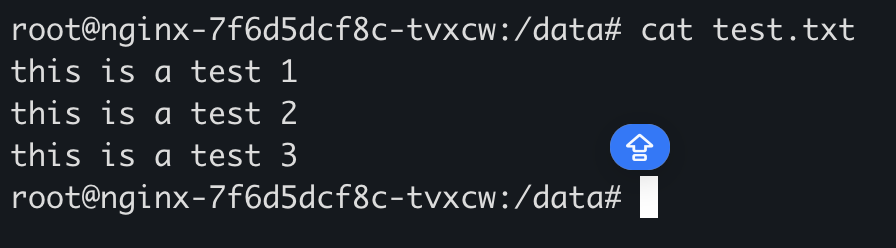
随后在集群中使用该 PV/PVC 重新创建业务 Pod,即可看到原有数据:
Istio 通过 Rancher UI 可以直接选择并安装 Istio。
以下示例部署两个版本的 Nginx,并通过 Istio 实现流量按比例分发。
部署两个版本的 Nginx 1 2 3 4 5 6 7 8 9 10 11 12 13 14 15 16 17 18 19 20 21 22 23 24 25 26 27 28 29 30 31 32 33 34 35 36 37 38 39 40 41 42 43 44 45 46 47 48 49 50 51 52 53 54 55 56 57 58 59 60 61 62 63 64 65 66 67 68 69 70 71 72 73 74 75 76 77 78 79 80 81 82 83 84 85 86 87 88 89 90 91 92 93 94 95 96 97 98 99 100 101 102 103 104 cat <<EOF | kubectl apply -f - apiVersion: v1 kind: ConfigMap metadata: name: nginx-conf namespace: default data: index.html.v1: | <!DOCTYPE html> <html> <title>Welcome to nginx V1!</title> </html> index.html.v2: | <!DOCTYPE html> <html> <title>Welcome to nginx V2!</title> </html> --- apiVersion: v1 kind: Service metadata: name: nginx namespace: default spec: type: ClusterIP selector: app: nginx ports: - name: port-80 port: 80 protocol: TCP targetPort: 80 --- apiVersion: apps/v1 kind: Deployment metadata: name: nginx-v1 namespace: default labels: app: nginx version: v1 spec: selector: matchLabels: app: nginx version: v1 template: metadata: labels: app: nginx version: v1 sidecar.istio.io/inject: "true" spec: containers: - name: nginx-v1 image: docker.io/library/nginx:mainline imagePullPolicy: IfNotPresent volumeMounts: - name: nginx-conf mountPath: /usr/share/nginx/html/index.html subPath: index.html.v1 volumes: - name: nginx-conf configMap: name: nginx-conf defaultMode: 420 --- apiVersion: apps/v1 kind: Deployment metadata: name: nginx-v2 namespace: default labels: app: nginx version: v2 spec: selector: matchLabels: app: nginx version: v2 template: metadata: labels: app: nginx version: v2 sidecar.istio.io/inject: "true" spec: containers: - name: nginx-v2 image: docker.io/library/nginx:mainline imagePullPolicy: IfNotPresent volumeMounts: - name: nginx-conf mountPath: /usr/share/nginx/html/index.html subPath: index.html.v2 volumes: - name: nginx-conf configMap: name: nginx-conf defaultMode: 420 EOF
创建 Istio Gateway 1 2 3 4 5 6 7 8 9 10 11 12 13 14 15 16 cat <<EOF | kubectl apply -f - apiVersion: networking.istio.io/v1alpha3 kind: Gateway metadata: name: nginx-gateway spec: selector: istio: ingressgateway servers: - port: number: 80 name: http protocol: HTTP hosts: - "*" EOF
创建 DestinationRule 1 2 3 4 5 6 7 8 9 10 11 12 13 14 15 cat <<EOF | kubectl apply -f - apiVersion: networking.istio.io/v1alpha3 kind: DestinationRule metadata: name: nginx spec: host: nginx subsets: - name: v1 labels: version: v1 - name: v2 labels: version: v2 EOF
创建 VirtualService 首先将所有流量转发到 Nginx V1:
1 2 3 4 5 6 7 8 9 10 11 12 13 14 15 16 17 18 19 20 21 22 cat <<EOF | kubectl apply -f - apiVersion: networking.istio.io/v1alpha3 kind: VirtualService metadata: name: nginx spec: hosts: - "*" gateways: - nginx-gateway http: - match: - uri: prefix: / route: - destination: host: nginx port: number: 80 subset: v1 weight: 100 EOF
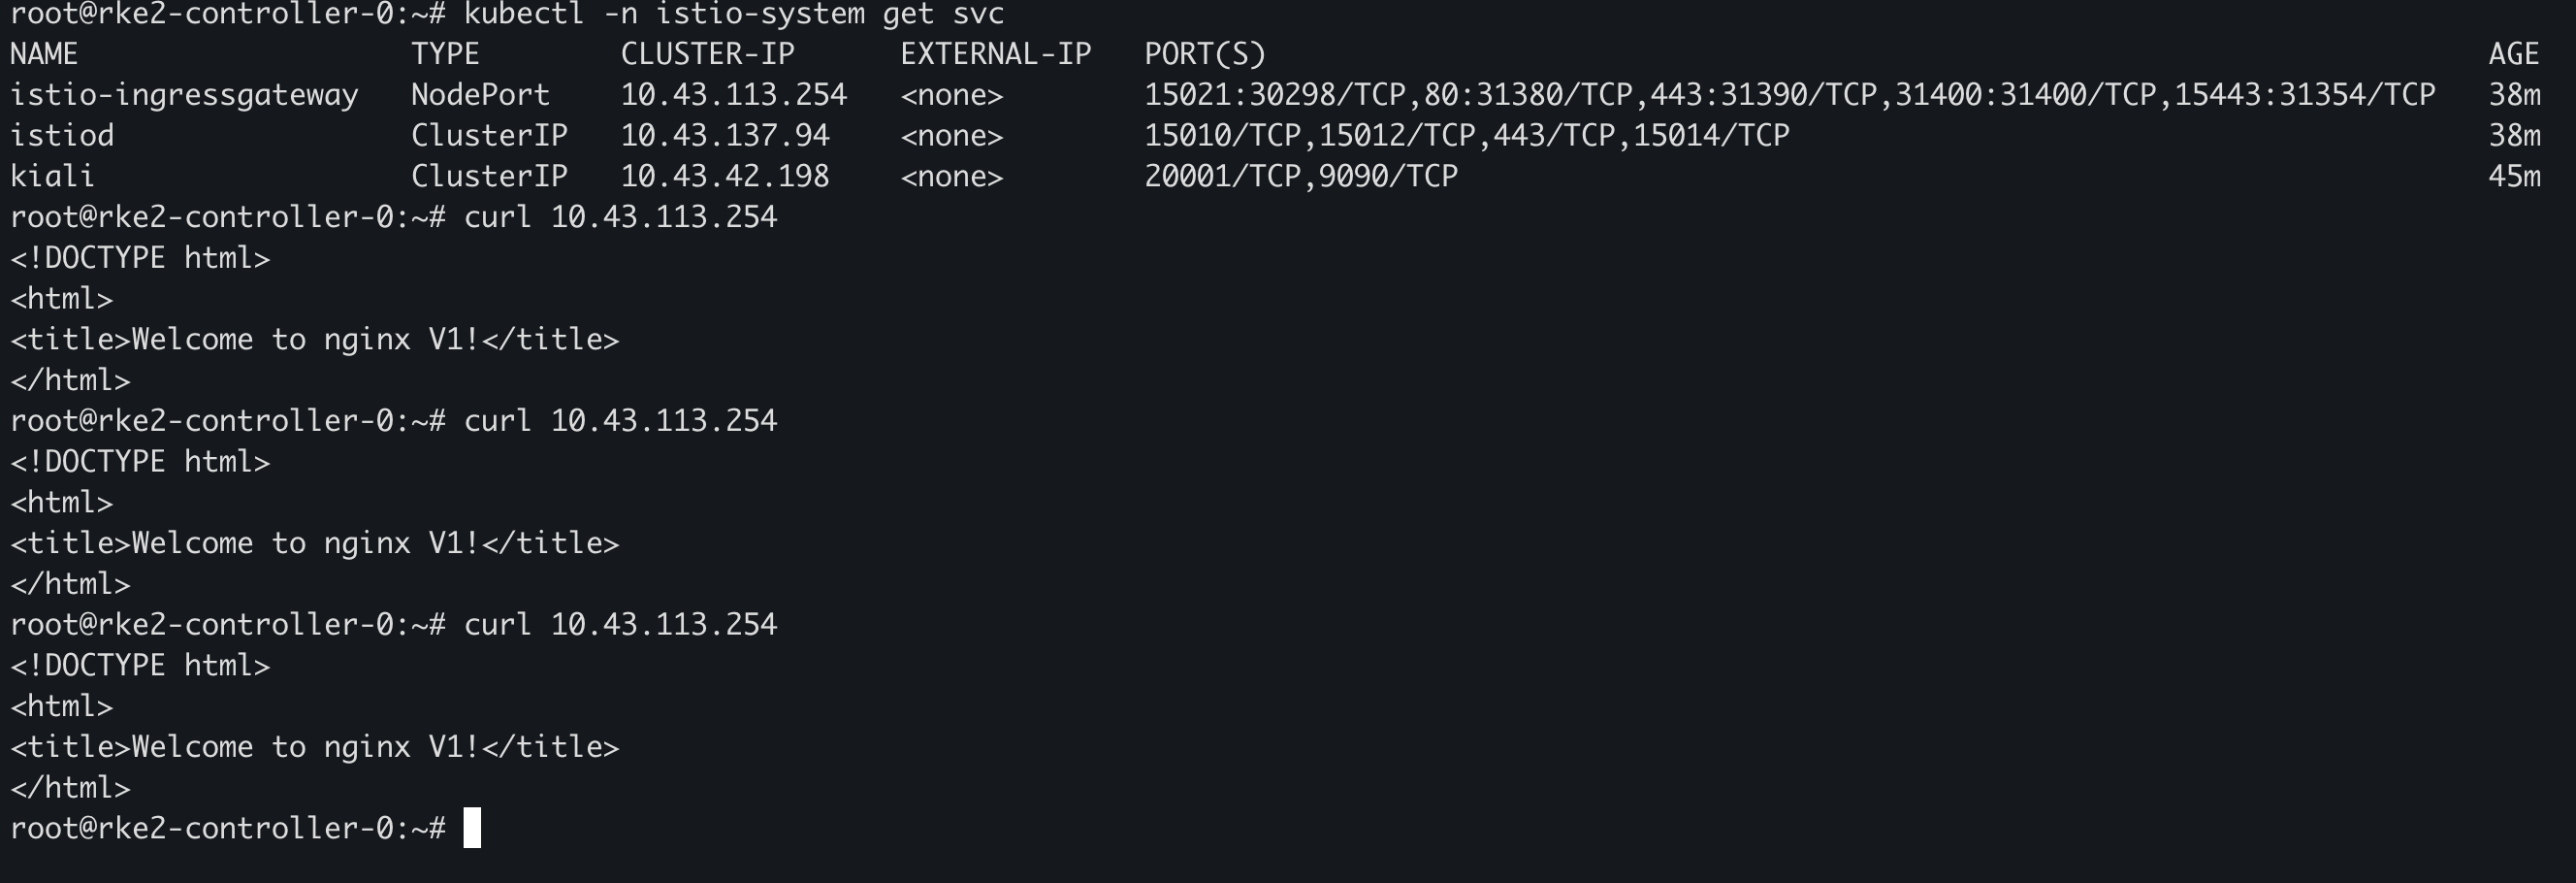
通过 Istio Gateway 访问 Nginx,可以看到返回结果均为 V1:
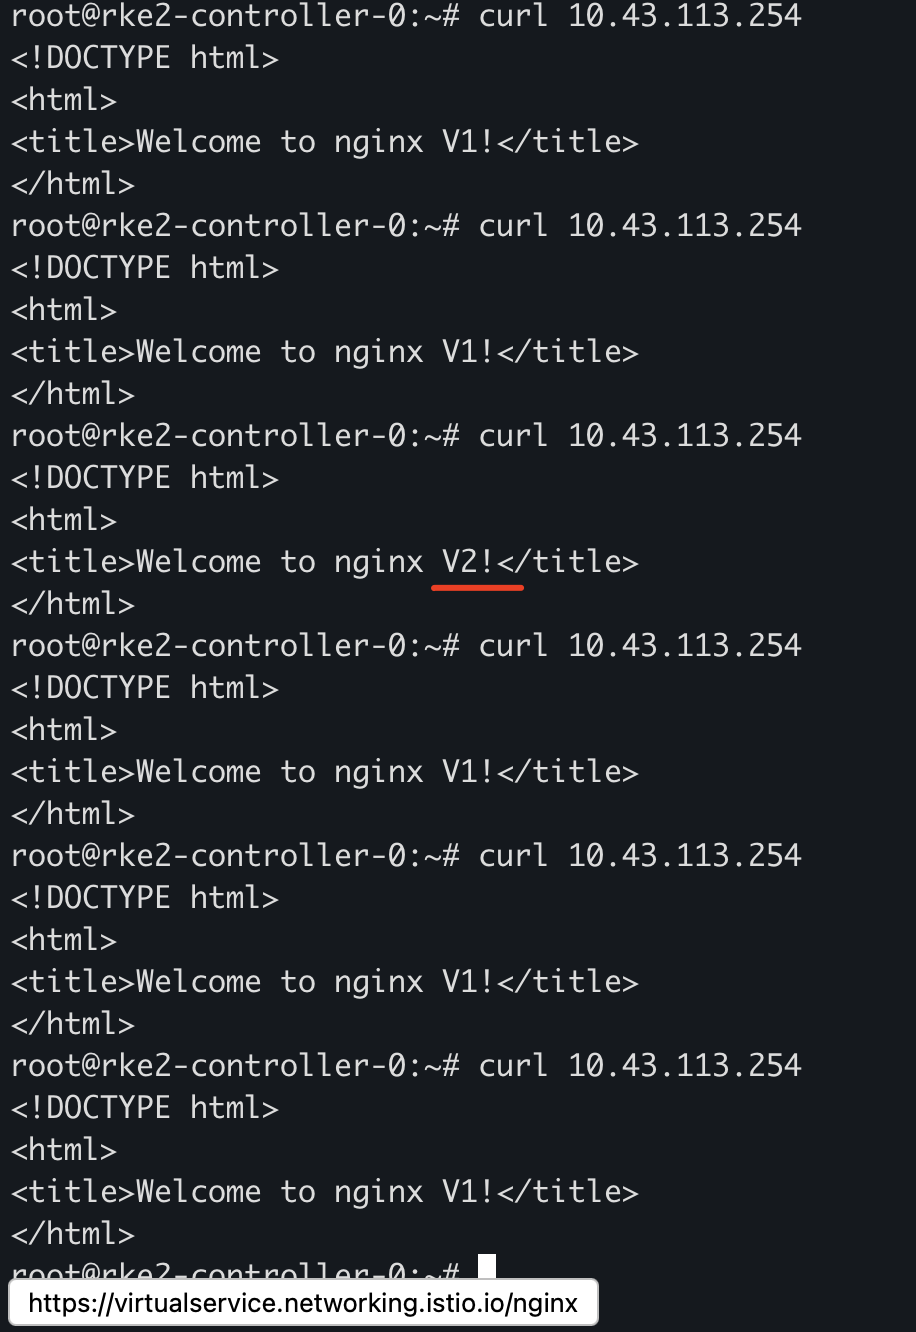
修改 VirtualService,将 20% 的流量转发到 V2:
1 2 3 4 5 6 7 8 9 10 11 12 13 14 15 16 17 18 19 20 21 22 23 24 25 26 27 28 cat <<EOF | kubectl apply -f - apiVersion: networking.istio.io/v1alpha3 kind: VirtualService metadata: name: nginx spec: hosts: - "*" gateways: - nginx-gateway http: - match: - uri: prefix: / route: - destination: host: nginx port: number: 80 subset: v1 weight: 80 - destination: host: nginx port: number: 80 subset: v2 weight: 20 EOF
验证后可以看到部分流量被转发至 V2:
配置熔断 Istio 的熔断能力可以通过 DestinationRule 配置:
1 2 3 4 5 6 7 8 9 10 11 12 13 14 15 16 17 18 cat <<EOF | kubectl apply -f - apiVersion: networking.istio.io/v1beta1 kind: DestinationRule metadata: name: nginx-circuit-breaker spec: host: nginx trafficPolicy: connectionPool: http: # HTTP/1 最大等待请求数 http1MaxPendingRequests: 1 # 每个连接允许的最大 HTTP 请求数 maxRequestsPerConnection: 1 tcp: # 最大 TCP 连接数 maxConnections: 1 EOF
K3s 单节点部署 准备配置文件:
1 2 3 4 5 6 mkdir -pv /etc/rancher/k3scat <<EOF > /etc/rancher/k3s/config.yaml token: my-shared-secret system-default-registry: registry.cn-hangzhou.aliyuncs.com EOF
安装 K3s:
1 2 3 curl -sfL https://get.k3s.io | sh -
K3s 高可用部署(Embedded ETCD) 所有节点准备配置文件:
1 2 3 4 5 6 7 8 9 10 mkdir -pv /etc/rancher/k3scat <<EOF > /etc/rancher/k3s/config.yaml token: my-shared-secret system-default-registry: registry.cn-hangzhou.aliyuncs.com tls-san: - 172.16.16.140 - 172.16.16.141 - 172.16.16.142 EOF
启动第一台 Server 节点:
1 curl -sfL https://get.k3s.io | K3S_TOKEN=123456 sh -s - server --cluster-init
启动第二、第三台 Server 节点:
1 curl -sfL https://get.k3s.io | K3S_TOKEN=123456 sh -s - server --server https://<ip-or-hostname-of-server1>:6443