简介 Rancher Elemental 用于快速部署和管理基于容器的操作系统,例如 SLE Micro。它面向边缘计算和云原生场景,能够提供轻量、可维护、易批量管理的操作系统交付能力。
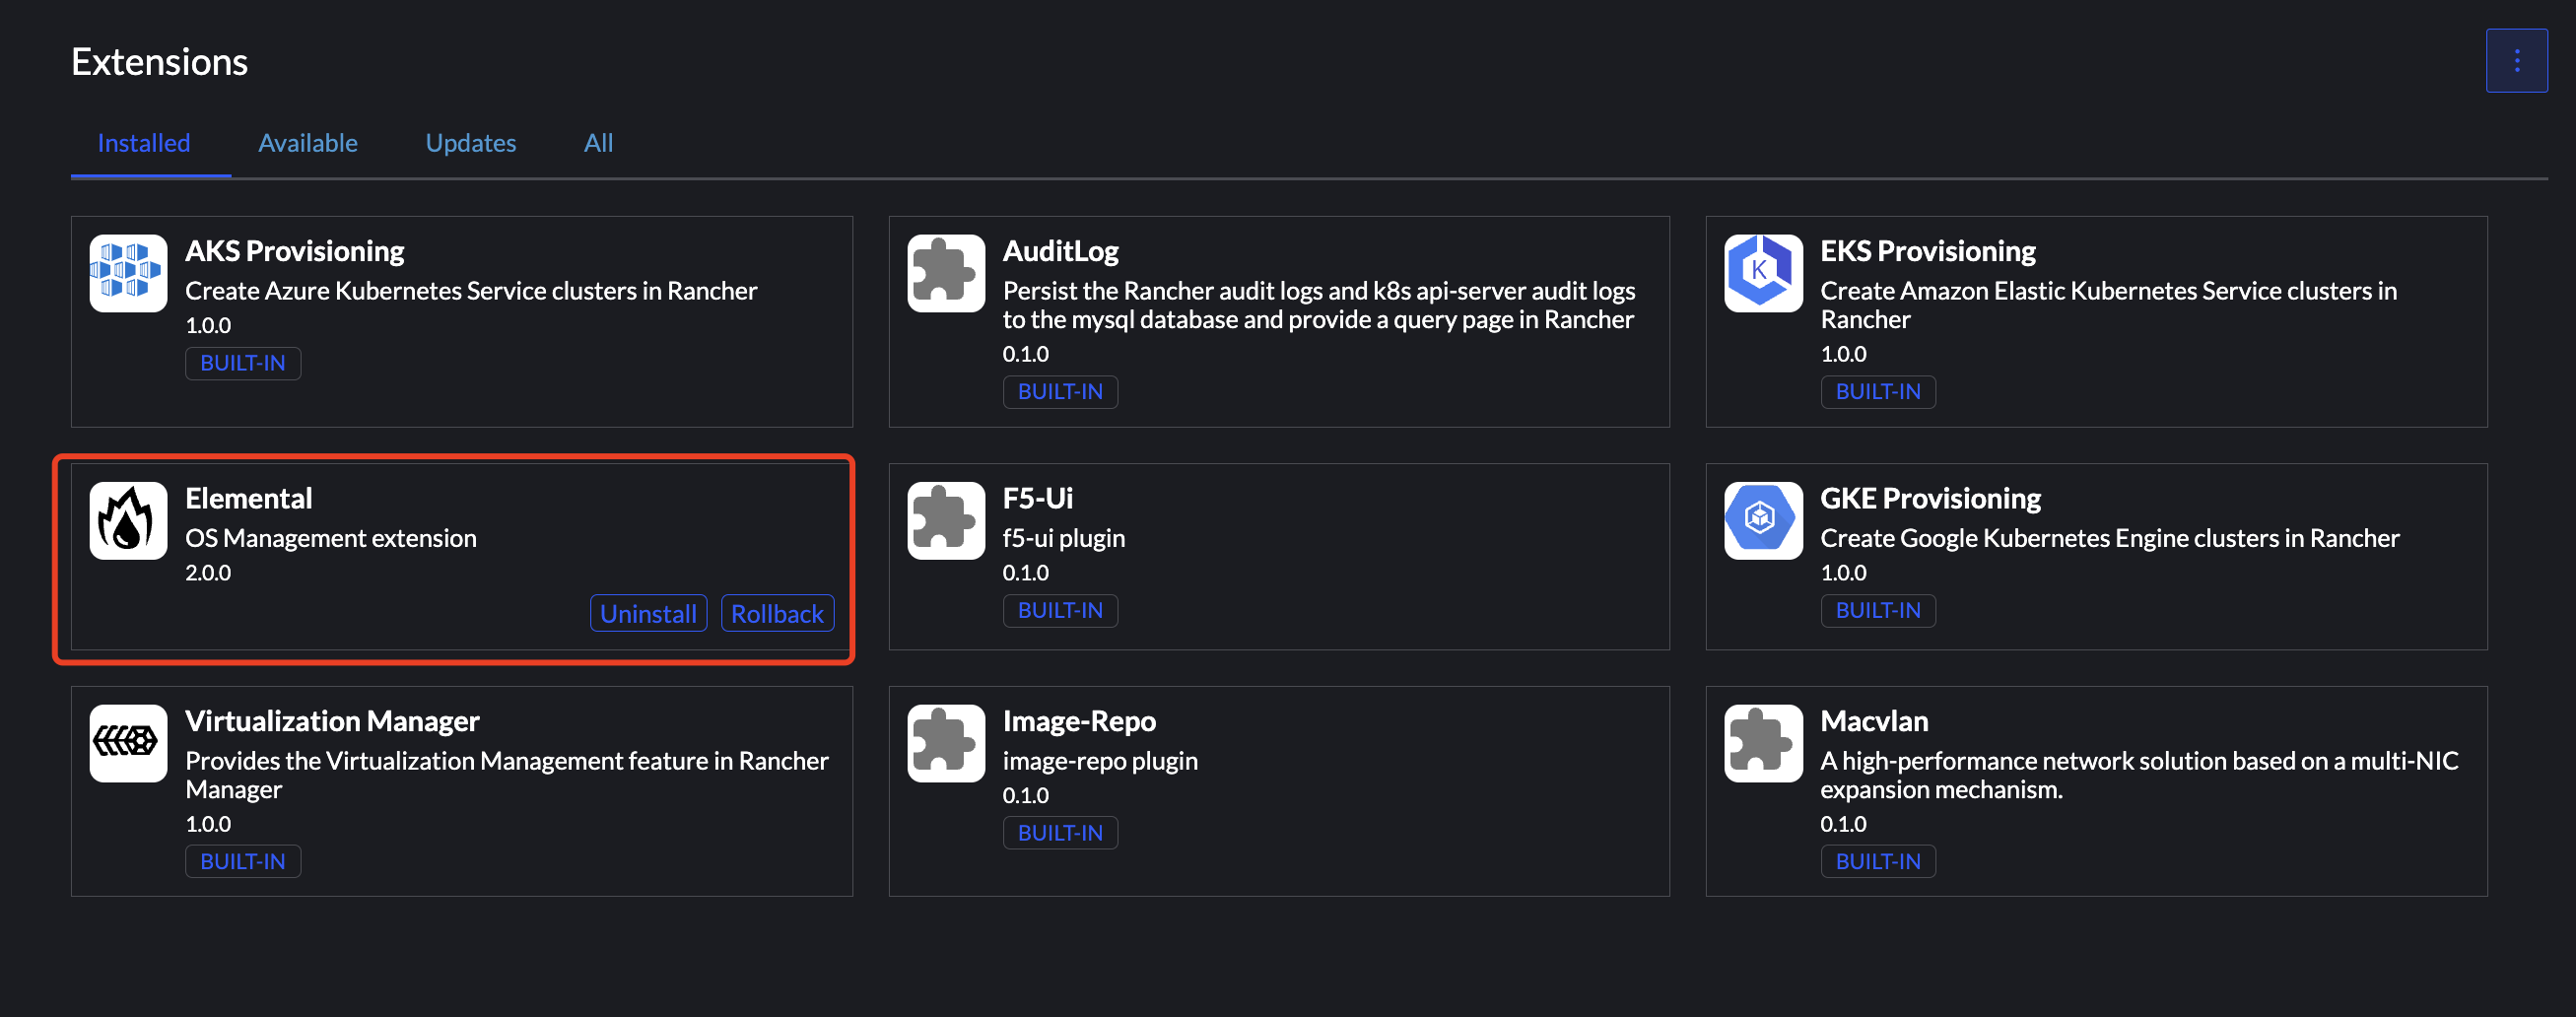
安装 Elemental Extension 首先在 Rancher Extension 中安装 Elemental:
添加 OS Channel 创建一个 ManagedOSVersionChannel,用于定义可用的 OS 镜像版本来源:
1
2
3
4
5
6
7
8
9
10
11
apiVersion: elemental.cattle.io/v1beta1 kind: ManagedOSVersionChannel metadata: name: sl-micro-6.0-base-channel namespace: fleet-default spec: deleteNoLongerInSyncVersions: false options: image: registry.suse.com/rancher/elemental-channel/sl-micro:6.0-base syncInterval: 1h type: custom
创建 MachineRegistration 创建 MachineRegistration,用于定义节点注册、安装以及 Cloud Configuration 配置。
其中 cloud-config 可根据实际需求自定义,例如:
配置主机名
配置网络
配置 SSH 登录
写入系统环境变量
指定安装磁盘
定义重置策略
1
2
3
4
5
6
7
8
9
10
11
12
13
14
15
16
17
18
19
20
21
22
23
24
25
26
27
28
29
30
31
32
33
34
35
36
37
38
39
40
41
42
43
44
45
46
47
48
49
50
51
52
53
54
55
56
57
58
59
60
61
62
63
64
65
66
67
68
69
70
71
72
73
74
75
76
77
78
79
80
81
82
83
84
85
86
87
88
89
90
91
92
93
94
95
96
97
98
99
100
101
102
103
104
105
106
107
apiVersion: elemental.cattle.io/v1beta1 kind: MachineRegistration metadata: name: test namespace: fleet-default spec: machineName: "m-${Product/UUID}" config: cloud-config: name: test-machine-registration stages: boot: - name: Configure Root SSH Access authorized_keys: root: - "ssh-ed25519 xxx warnerchen@Mac" commands: - systemctl enable --now sshd.service fs: - name: Configure NetworkManager Profile files: - path: /etc/NetworkManager/system-connections/eth0.nmconnection owner: 0 group: 0 permissions: 384 content: | [connection] id=eth0 type=ethernet interface-name=eth0 autoconnect=true [ethernet ] [ipv4 ] method=auto dns=172.16.16.1; ignore-auto-dns=true [ipv6 ] method=disabled - name: Configure RKE2 CLI Environment files: - path: /etc/profile.d/rke2-runtime.sh owner: 0 group: 0 permissions: 420 content: | export CONTAINER_RUNTIME_ENDPOINT="unix:///run/k3s/containerd/containerd.sock" export CONTAINERD_ADDRESS="/run/k3s/containerd/containerd.sock" export CONTAINERD_NAMESPACE="k8s.io" export KUBECONFIG="/etc/rancher/rke2/rke2.yaml" export PATH="$PATH:/var/lib/rancher/rke2/bin" - name: Configure RKE2 Containerd Proxy files: - path: /etc/default/rke2-server owner: 0 group: 0 permissions: 420 content: | CONTAINERD_HTTP_PROXY="http://172.16.16.12:10808" CONTAINERD_HTTPS_PROXY="http://172.16.16.12:10808" CONTAINERD_NO_PROXY="localhost,127.0.0.0/8,0.0.0.0,10.0.0.0/8,172.16.0.0/12,192.168.0.0/16,10.42.0.0/16,10.43.0.0/16,cattle-system.svc,.svc,.cluster.local,.cn,warnerchen.com,.warnerchen.com" - path: /etc/default/rke2-agent owner: 0 group: 0 permissions: 420 content: | CONTAINERD_HTTP_PROXY="http://172.16.16.12:10808" CONTAINERD_HTTPS_PROXY="http://172.16.16.12:10808" CONTAINERD_NO_PROXY="localhost,127.0.0.0/8,0.0.0.0,10.0.0.0/8,172.16.0.0/12,192.168.0.0/16,10.42.0.0/16,10.43.0.0/16,cattle-system.svc,.svc,.cluster.local,.cn,warnerchen.com,.warnerchen.com" elemental: install: device: /dev/sda snapshotter: type: btrfs maxSnaps: 3 reboot: true reset: enabled: true reset-oem: true reset-persistent: true reboot: true machineInventoryLabels: author: warner blockDevices: "${Storage/TotalDisks}" cpuCores: "${CPU/TotalCores}" cpuThreads: "${CPU/TotalThreads}" networkInterfaces: "${Network/TotalNICs}" totalMemoryBytes: "${Memory/TotalPhysicalBytes}" machineInventoryAnnotations: cpuModel: "${CPU/Model}" cpuVendor: "${CPU/Processor/Vendor}" gpuVendor: "${GPU/GraphicsCards/VendorName}" registrationHostname: "${Runtime/Hostname}" machineUUID: "${Product/UUID}" manufacturer: "${Product/Vendor}" serialNumber: "${Product/SerialNumber}"
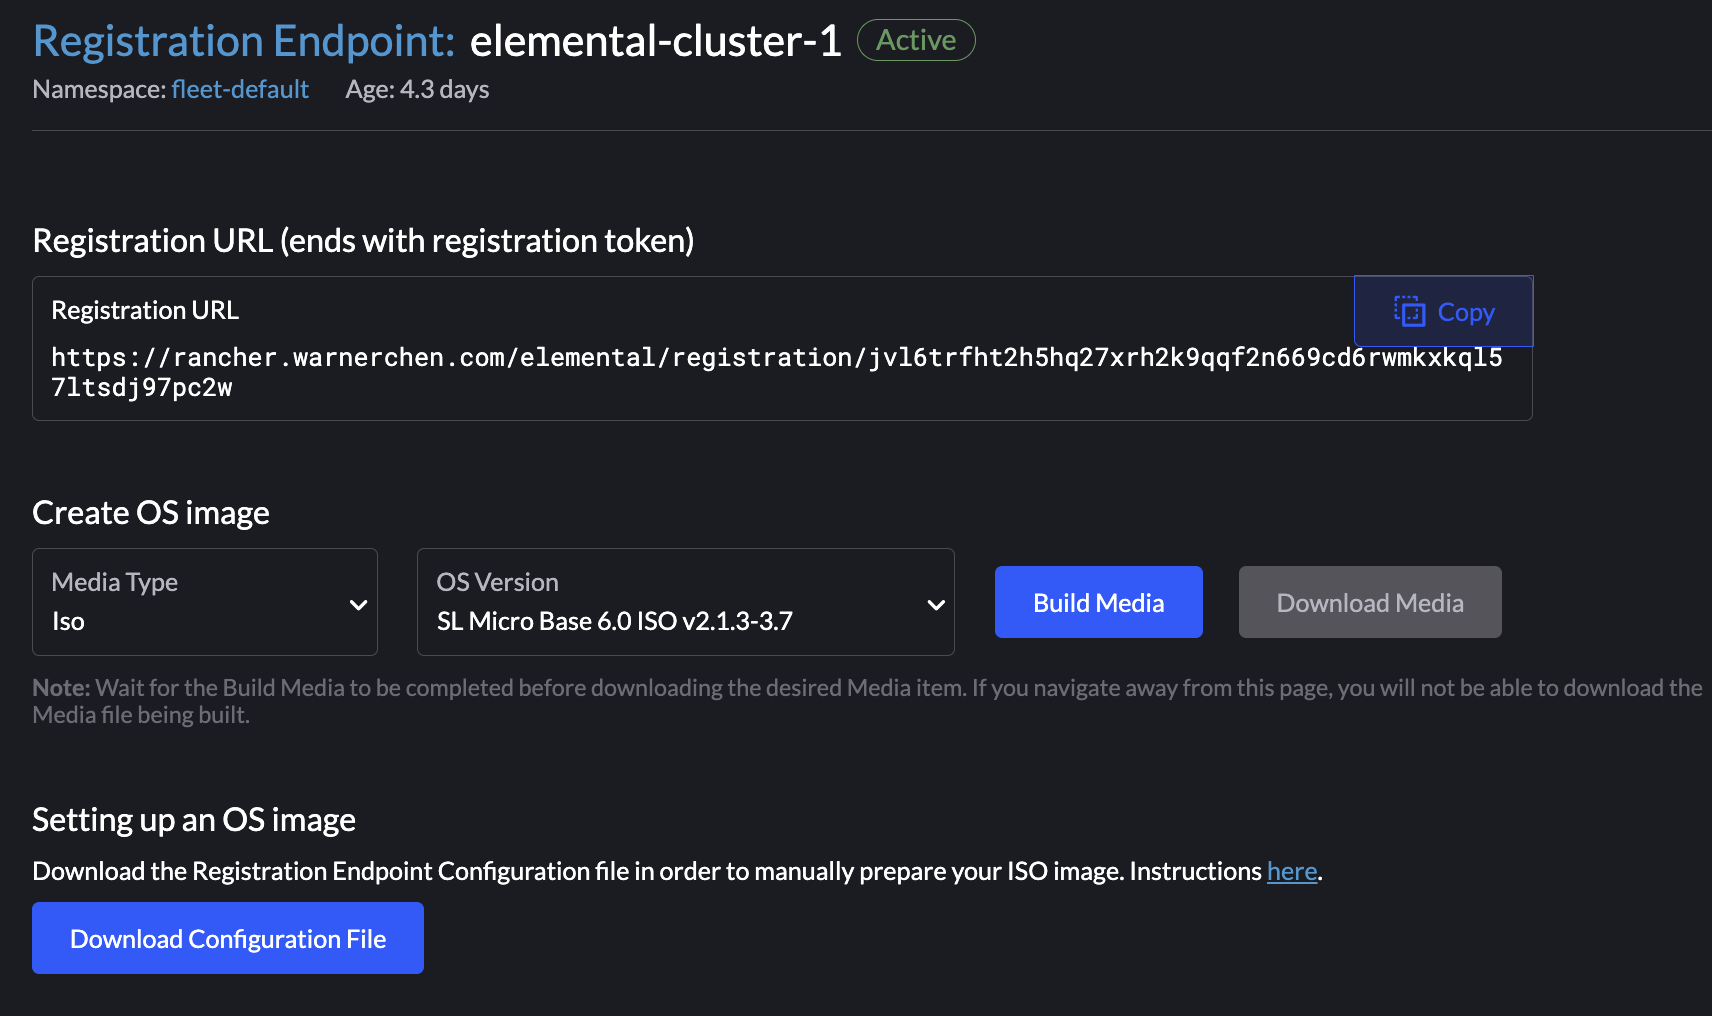
构建 ISO 镜像 创建 MachineRegistration 后,选择对应的 OS Version 构建镜像。
点击构建后,fleet-default 命名空间下会生成一个 Pod,用于执行以下操作:
拉取 Base Image
构建安装镜像
生成 ISO 下载地址
获取 ISO 下载地址 可以直接在 Rancher UI 中下载构建好的 ISO,也可以通过 SeedImage CRD 获取下载地址:
1 kubectl -n fleet-default get seedimages.elemental.cattle.io media-image-reg-xxx -o jsonpath='{.status.downloadURL}'
下载完成后,即可使用该 ISO 创建虚拟机。
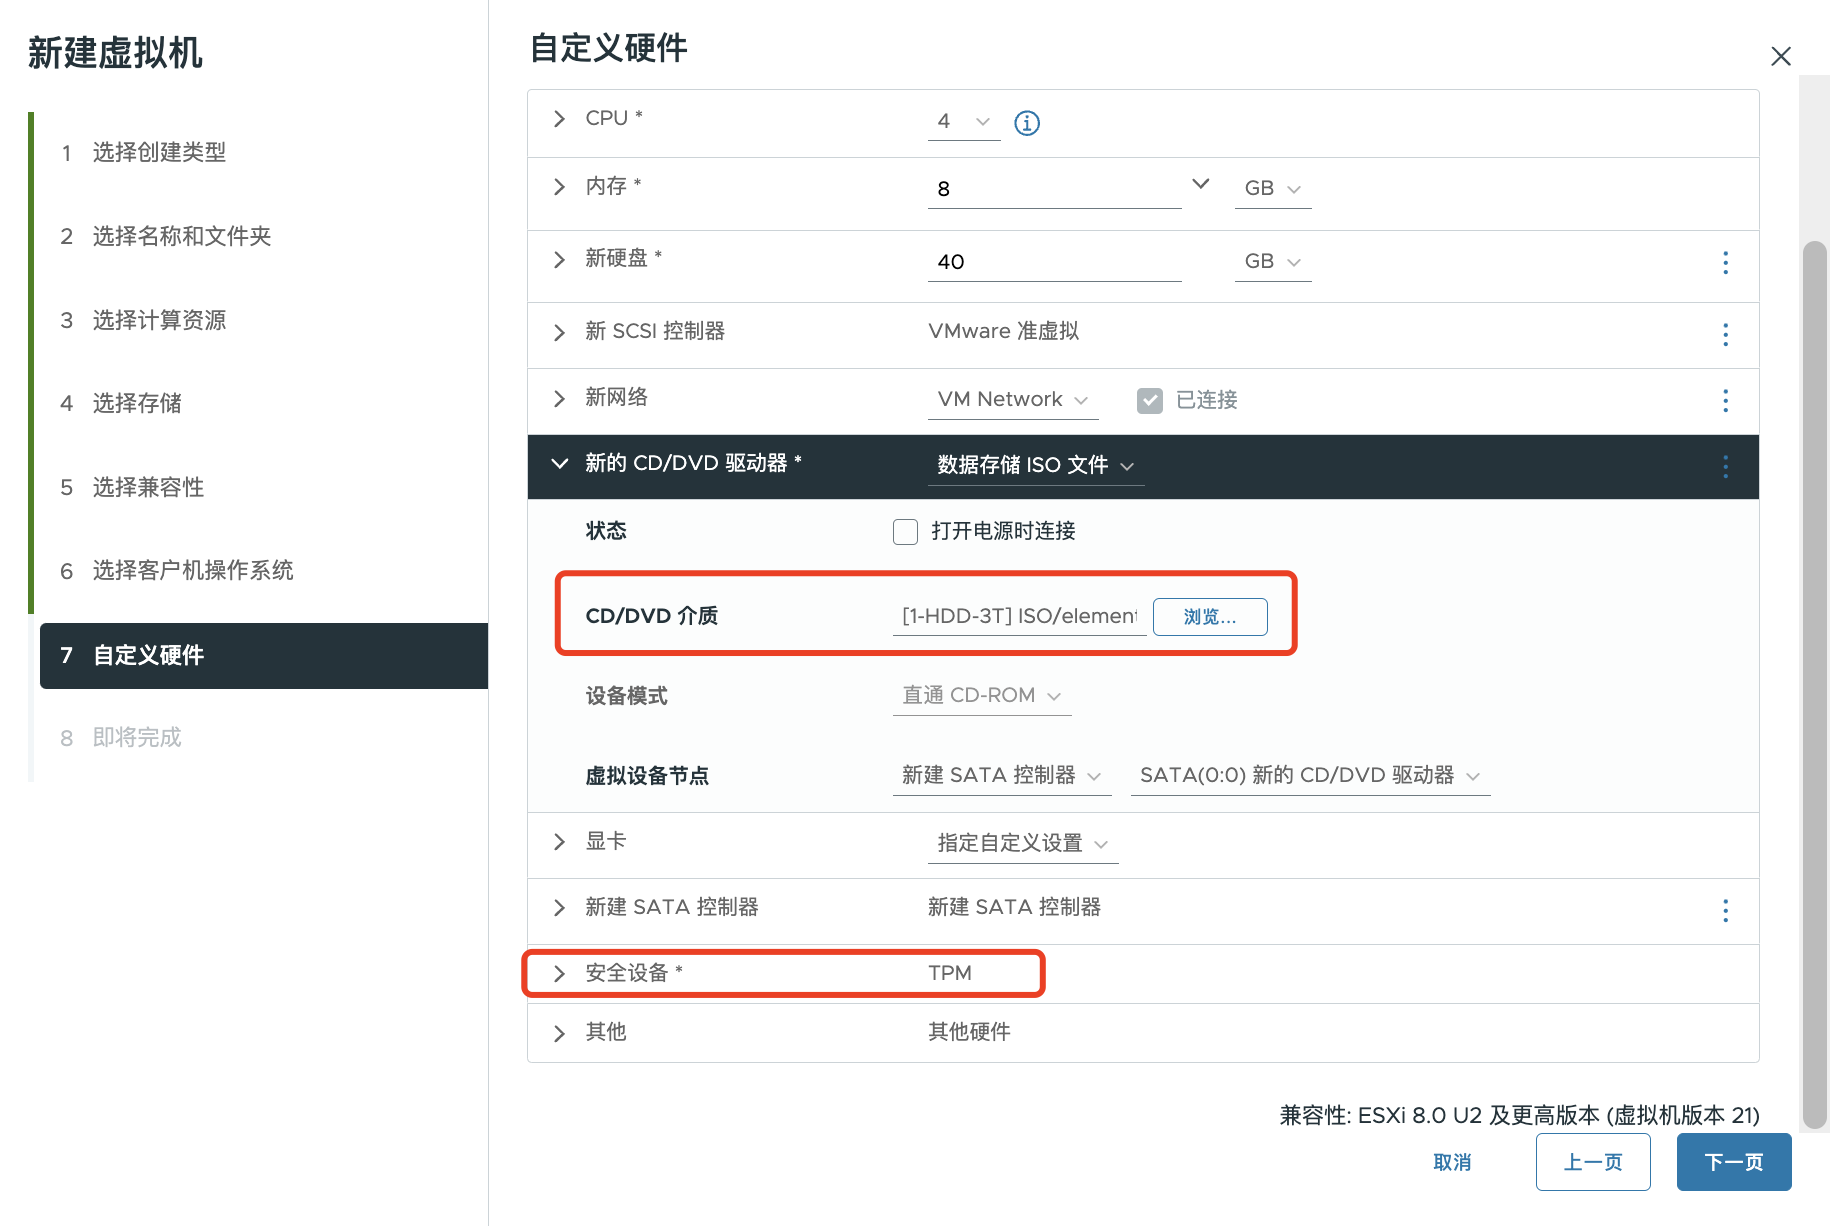
VMware 虚拟机配置注意事项 Elemental OS 安装过程中需要使用 TPM,因此在 VMware 中需要为虚拟机启用本机类型的 TPM。
启用本机类型 TPM 前,需要满足以下条件:
VMware 需要配置域名,否则虚拟机创建后无法进行 TPM 备份;如果 TPM 无法备份,则无法为虚拟机添加 TPM 设备。
创建虚拟机所在的 ESXi 主机需要位于一个集群中,否则添加 TPM 设备后可能导致虚拟机创建失败。
如果环境无法提供 TPM,Elemental 支持内置软件 TPM 模拟,在 MachineRegistration 添加如下配置:
1
2
3
4
5
6
spec: config: elemental: registration: emulate-tpm: true emulated-tpm-seed: -1
满足上述条件后,即可创建虚拟机。引导模式需要选择 EFI :
节点安装与注册 虚拟机启动后,会自动进行 OS 安装,并注册到 Rancher Elemental。
可以在节点上通过以下命令查看注册状态:
1 journalctl -f -u elemental-register-install.service
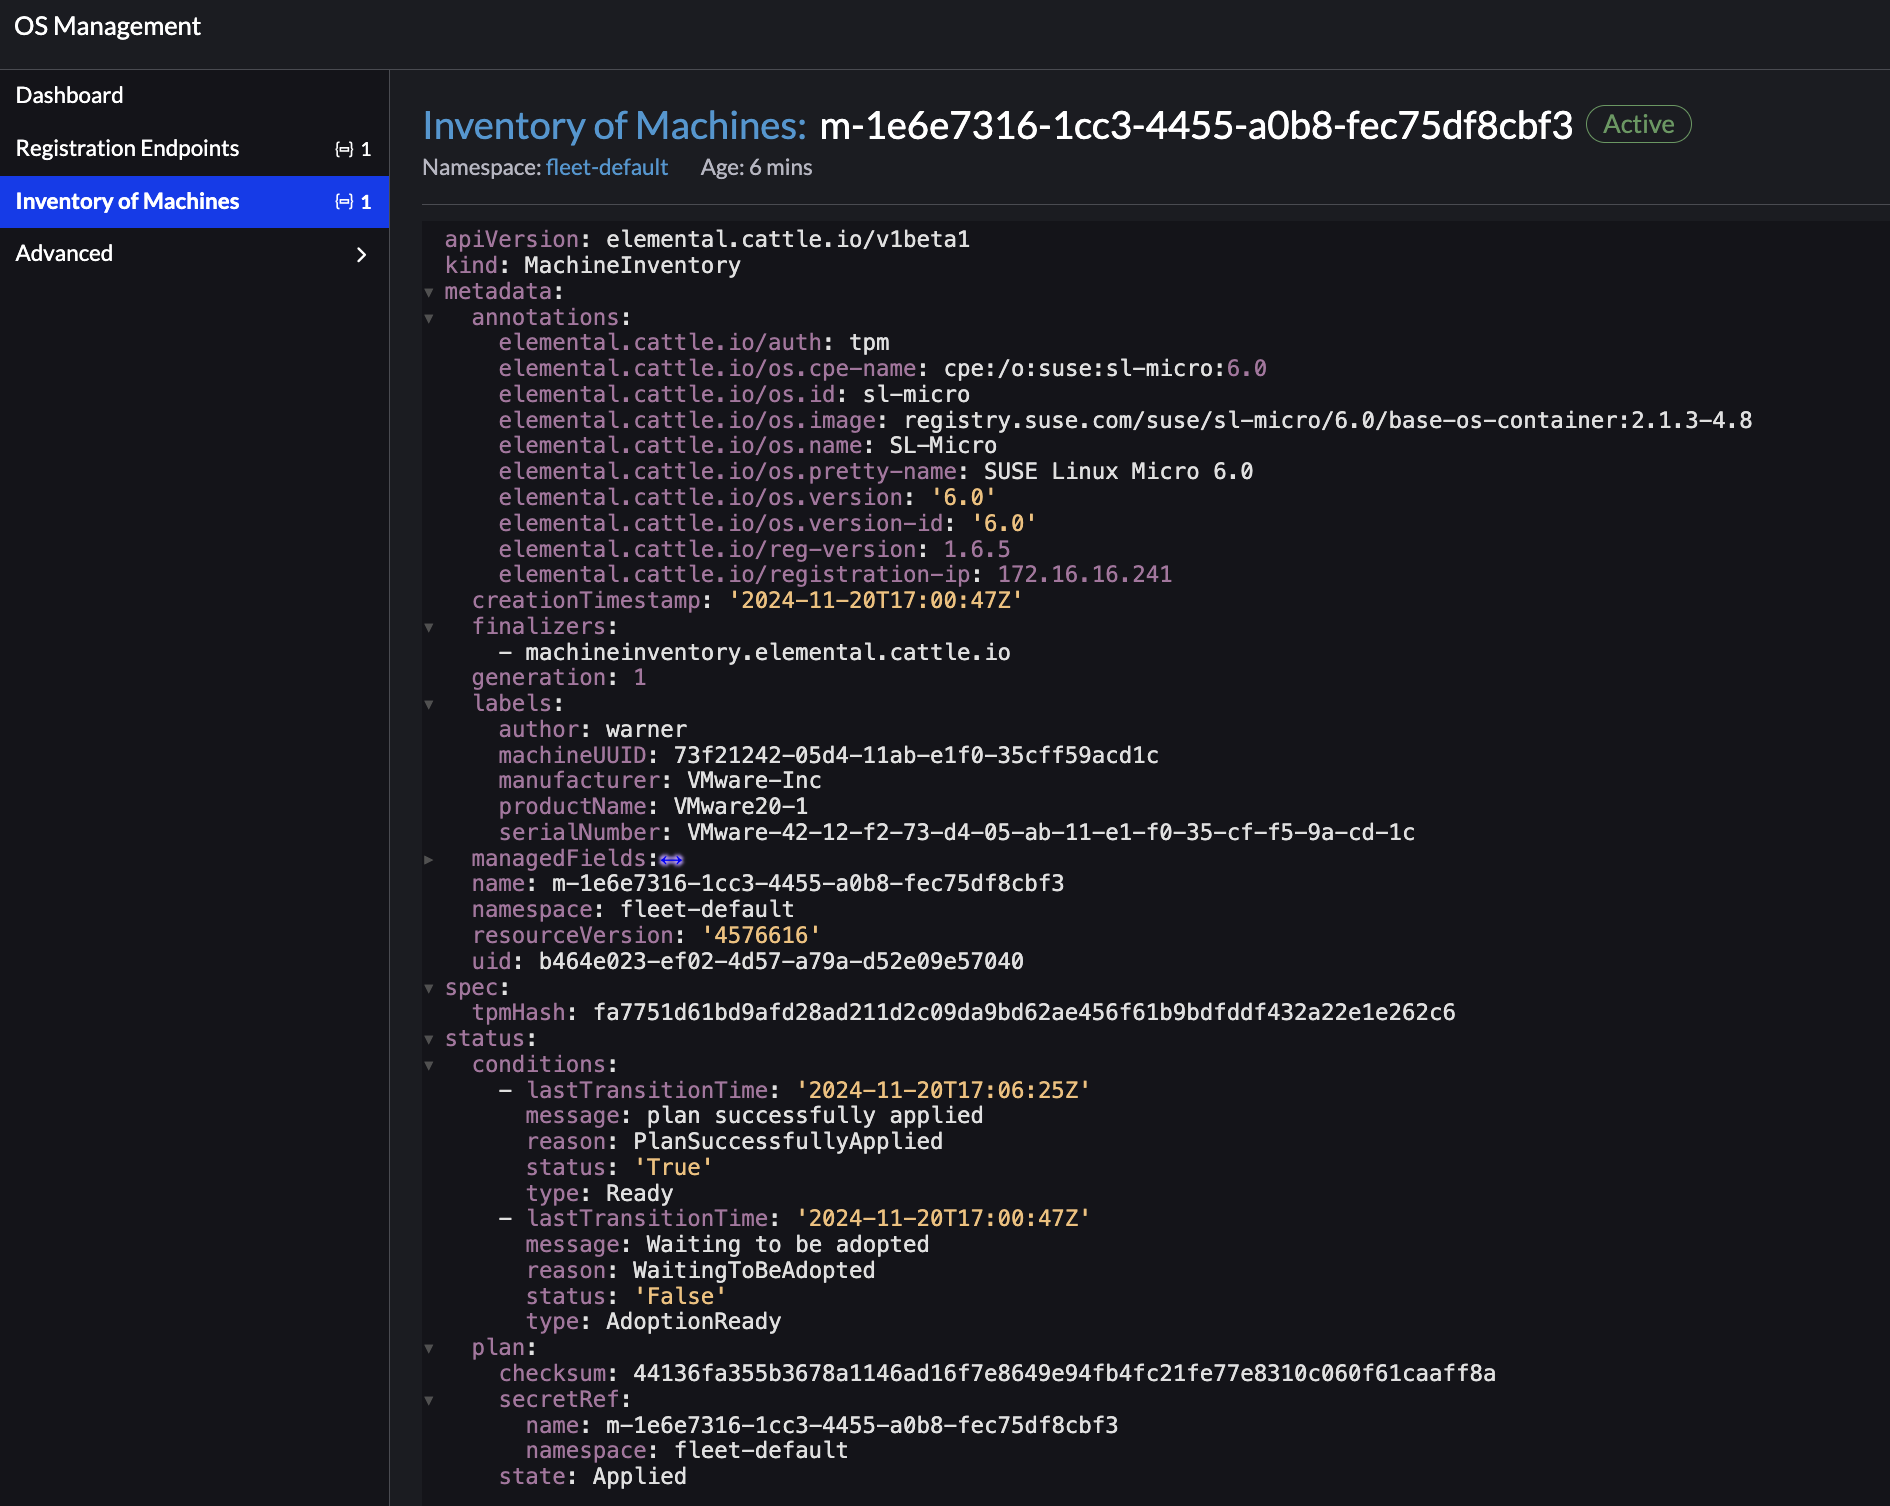
如果注册成功,Rancher 中会生成一个 MachineInventory,用于记录该设备的详细信息:
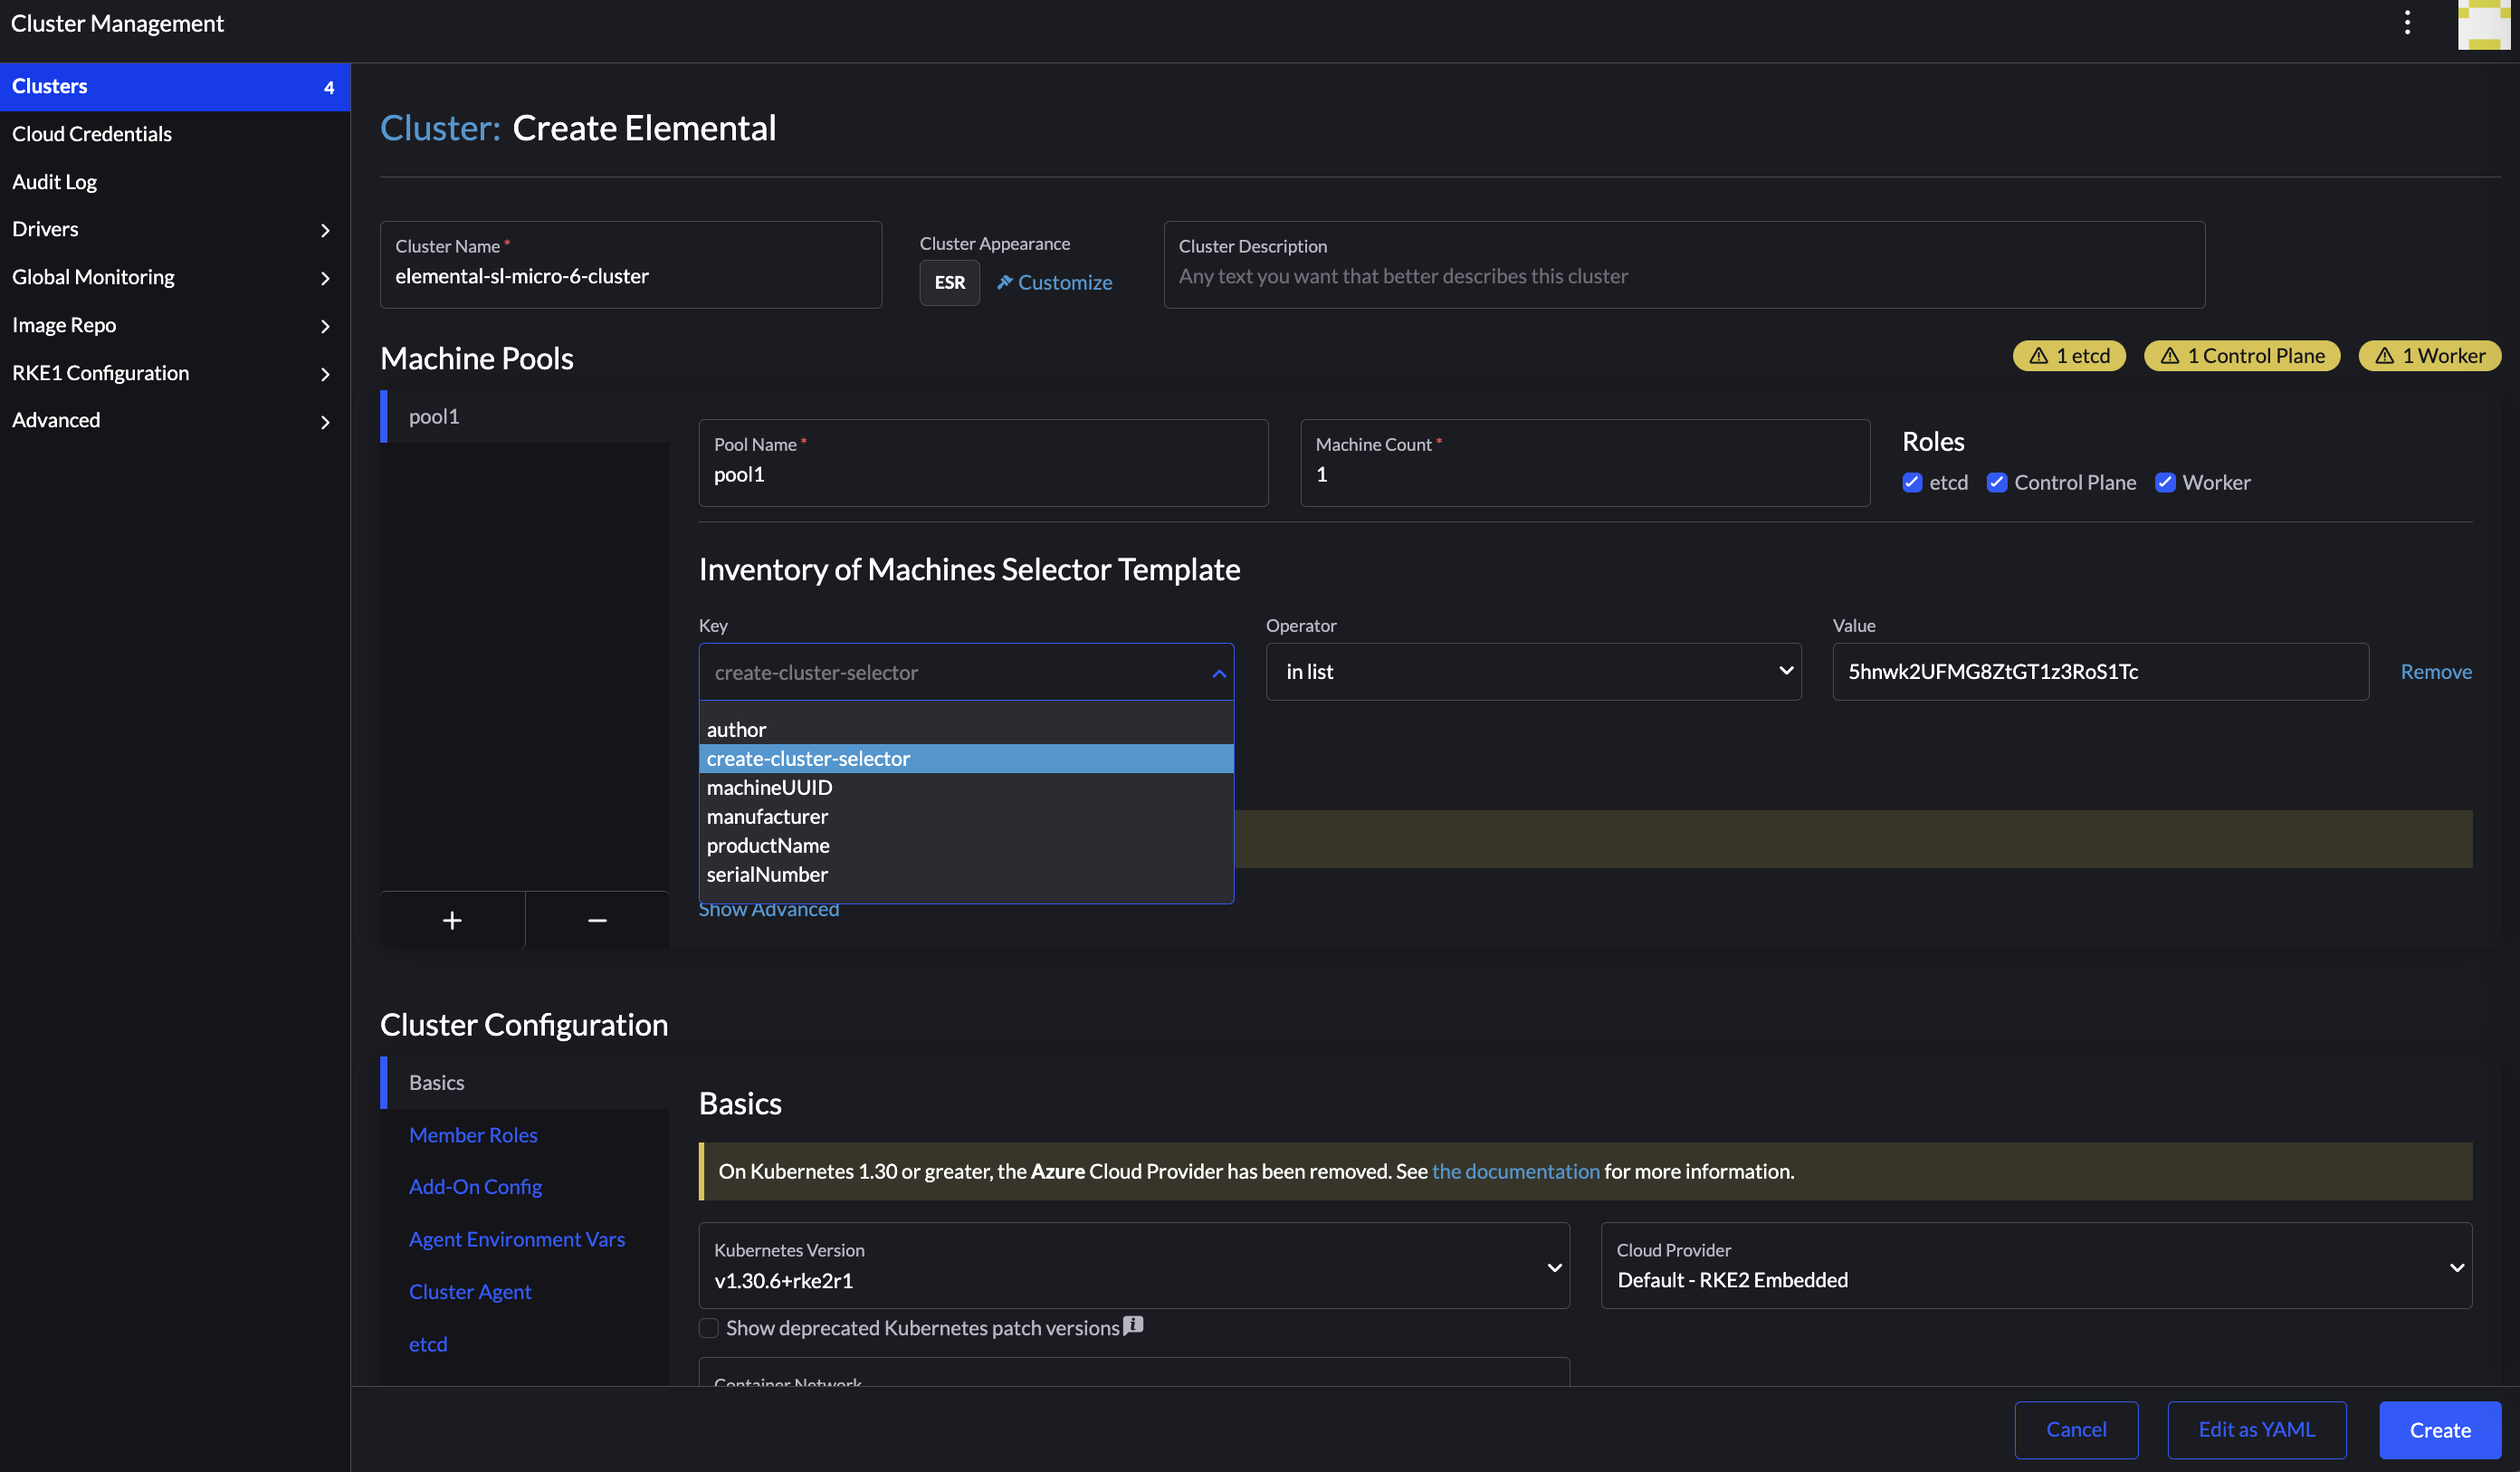
创建集群 节点注册成功后,即可使用该节点创建集群:
Reset 与节点回收 当 MachineRegistration 包含 reset 配置时,相应的 Elemental 机器支持解除集群绑定并恢复成可重新分配的裸机状态。
通过 Rancher 删除 Elemental RKE2 集群或者其中的节点时:
1
2
3
4
5
6
7
8
9
10
11
12
13
14
15
16
17
18
19
MachineInventory 标记删除 | v OS 的 elemental-system-agent 收到 Reset Plan | v 重启到 Recovery | v 清理指定持久分区 | v 再次连接 MachineRegistration | v 创建新的 MachineInventory | v 等待被集群重新采用